

PLATFORMER WITH VISIONAIRE STUDIO
VISUAL SCRIPTING AND TYPED CODE
ILIOS is a scripting language that you can approach either by Visual Scripting or classic Typed Code. Along with Box2D will allow you to create physics-based games, such as Platformers or even RPGs!
Have fun and be creative!

Prerequisities
For this tutorial, we will use:
- The Paper Pixels asset pack which can be found here: https://v3x3d.itch.io/paper-pixels . While it can be downloaded for free, we strongly encourage you to support the creator with a donation to allow them to create such nice assets!
- The Tiled Map Editor which can be downloaded from here: https://thorbjorn.itch.io/tiled. Again, while the software is free, please consider donating!
- Sprite Sheet Slicer which can be downloaded from here: https://isometric8.itch.io/sprite-sheet-slicer. Very useful little program, again please consider purchasing!
- Visionaire Studio 5.3.1+
Please note that while deep programming knowledge is not critical, it’s highly recommended to know the basics of object-oriented programming in order to fully understand the concepts set out in this tutorial. This guide’s primary purpose is not teach programming but to show implementation of these concepts on the Visionaire engine.
0 of 0 users found this section helpful
Game Design
The core gameplay would be quite simple: reach the end of the level while avoiding any traps, obstacles and enemies, collecting stuff and using ladders.
0 of 0 users found this section helpful
Setup Player's Physics
Setting the Assets
The basic steps to setup our player are:
- Create the player object (e.g. test-player)
- Create an idle animation, add its frames and Adjust its settings (set it to Infinite Loops!):
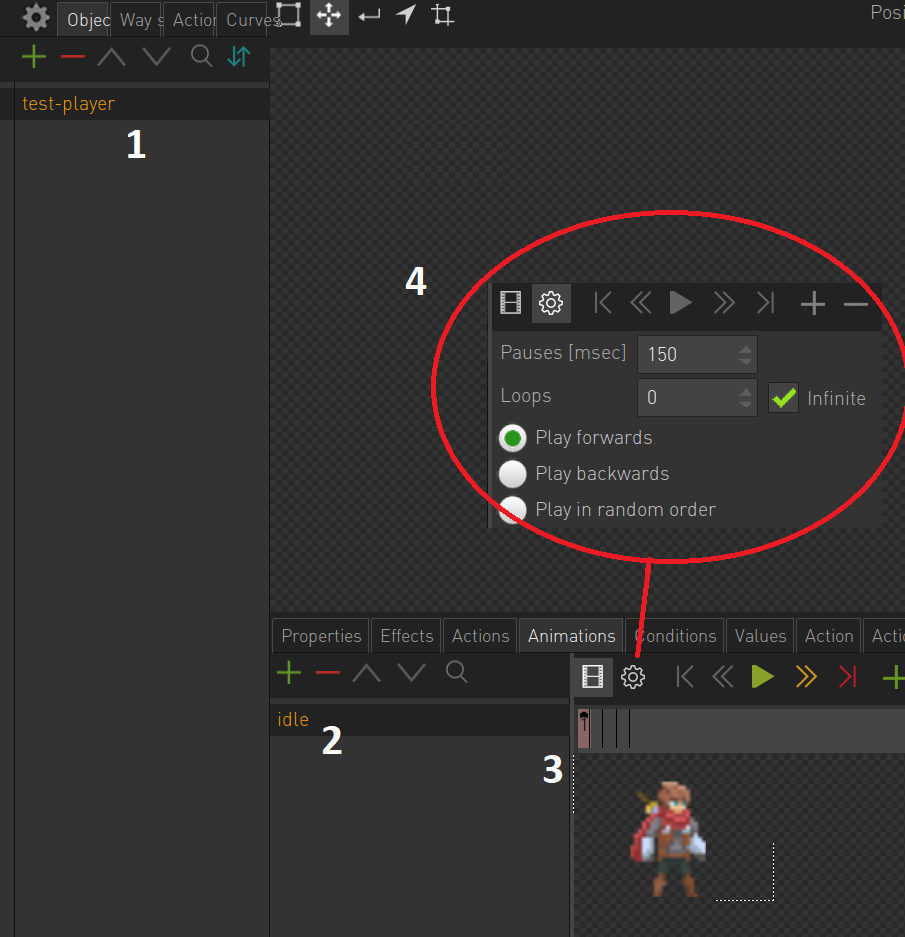
- Position the animation on the canvas, for now place it at (40,90)
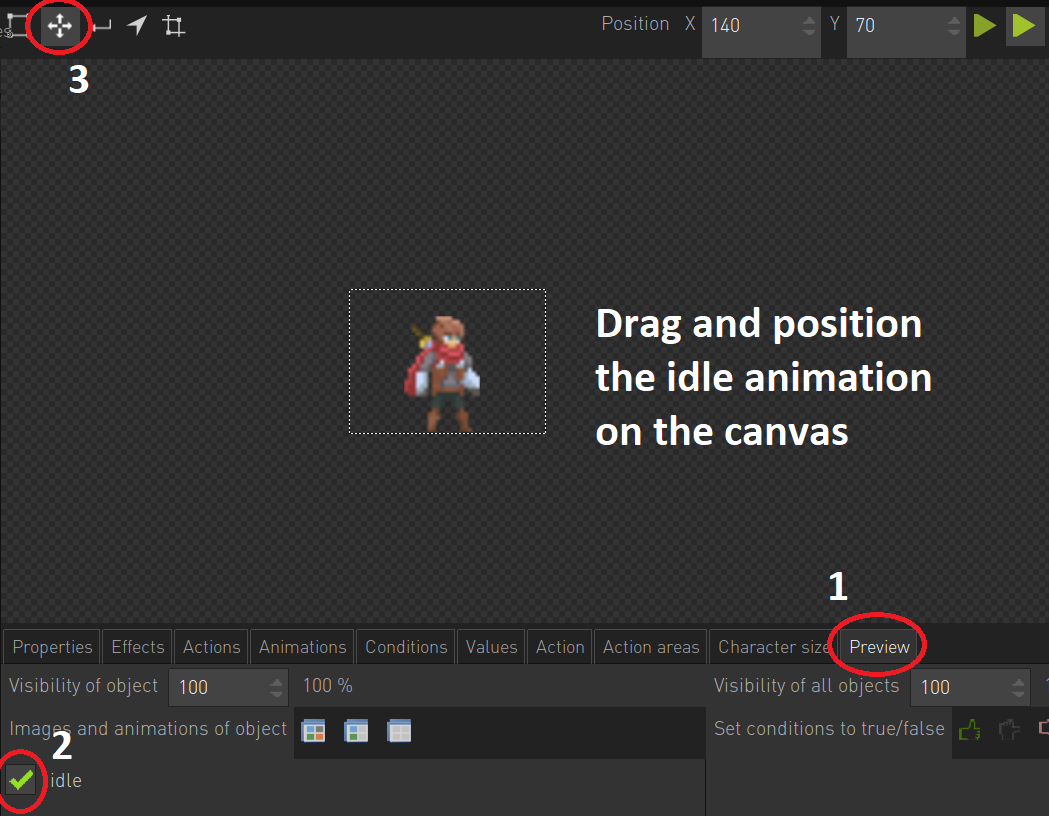
- Finally, for now, set the idle animation to be the default animation for the player:

Now if you run the game you will see the player on the screen with his idle animation. A few notes though due to the small size of the pixel art player assets to improve the display:
- Set the resolution to 320×240 px
- At a script at Start Action to enlarge the window area:
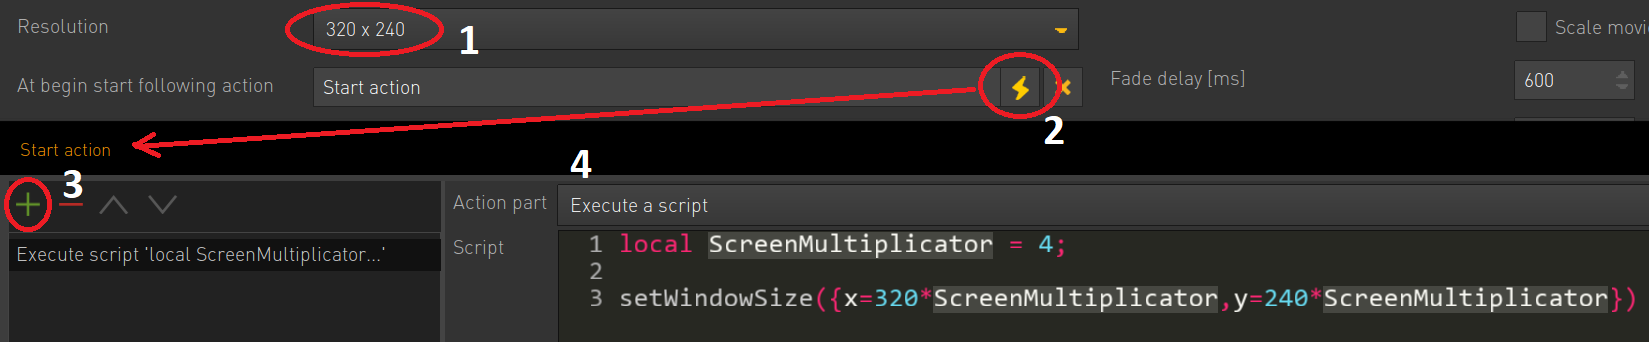
- Activate Pixel Effect for a crispy pixel display:

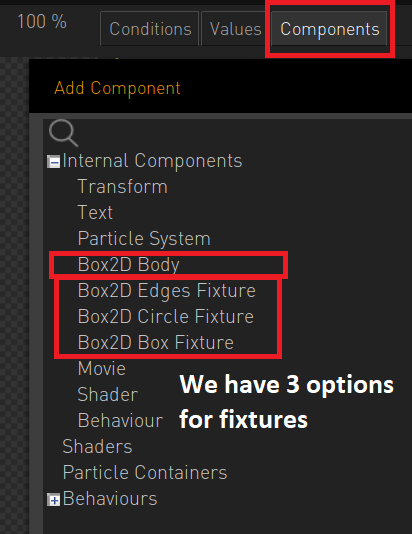
Apply Physics Properties
Visionaire uses Box2D engine to apply physics behaviours to objects through components so let’s add some to our player. To have a fully working Box2D object, you need to define 1. a Body and 2. a Fixture component:
Think of a body as the properties of an object that you cannot see (draw) or touch (collide with). These invisible properties are:
- mass – how heavy it is
- velocity – how fast and in which direction it’s moving
- rotational inertia – how much effort it takes to start or stop spinning
- angular velocity – how fast and which way it’s rotating
- location – where it is
- angle – which way it is facing
So let’s add a body to our player:
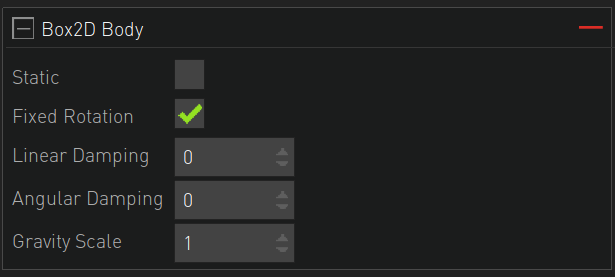
Note that there are 3 types of Box2D bodies:
- dynamic body – a body that is affected by world forces and reacts to collisions. Our player is one example.
- static body – a body that isn’t affected by world forces and does not react to collisions. It can’t be moved, e.g. wall or the ground.
- kinematic body (not supported at the moment) – a hybrid body that is not affected by forces and collisions like a static body but can be moved with a linear velocity like a dynamic body. Example is a moving platform.
- Static – leave it unticked, we want our player to be a dynamic body
- Fixed Rotation – Prevents the body from rotating (e.g when colliding). We need that for our player!
- Linear Damping – Used to reduce the linear velocity
- Angular Damping – Used to reduce the angular velocity
- Gravity Scale – Used to weaken or strengthen the effect of the world’s gravity. E.g. 1 = normal gravity, -1 = reverse gravity, 0 = zero gravity etc.
Even if you know all of these characteristics of an object, you still don’t know what it looks like or how it will react when it collides with another object. To define the size and shape of an object we need to use fixtures; fixtures are used to describe the size, shape, and material properties of an object. One body can have multiple fixtures attached to it, and the center of mass of the body will be affected by the arrangement of its fixtures. When two bodies collide, their fixtures are used to decide how they will react. The main properties of fixtures are:
- sensor – whether the fixture is sensor or not. Sensors detect collisions but do not react to them (our player is not a sensor)
- friction – how slippery it is
- restitution – how bouncy the fixture is
- density – how heavy it is in relation to its area
- shape – a polygon or circle
So let’s add a fixture to our body. Note that you can make 3 fixture shapes: 1. Rectangle, 2. Circle, 3. Edge (free form). All work similarly but for our example let’s choose the box one:
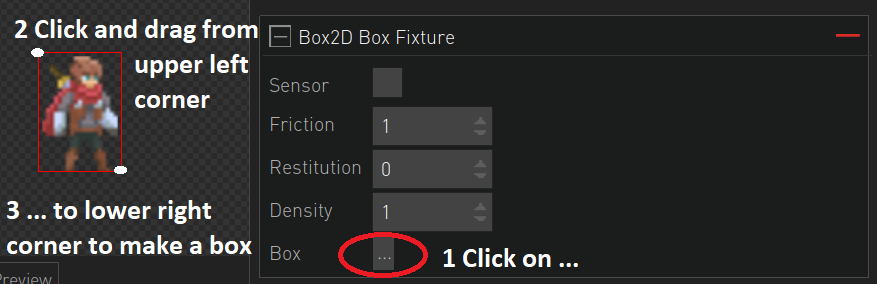
The red rectangle we created is actually the bounding box that defines the collision borders of our player.
Try to run the game now. The player will fall off the screen due to gravity, nice! (well, sort of). So let’s make some ground. Add the background image provided above and setup a new ground object and its relevant (static!) body and fixture:
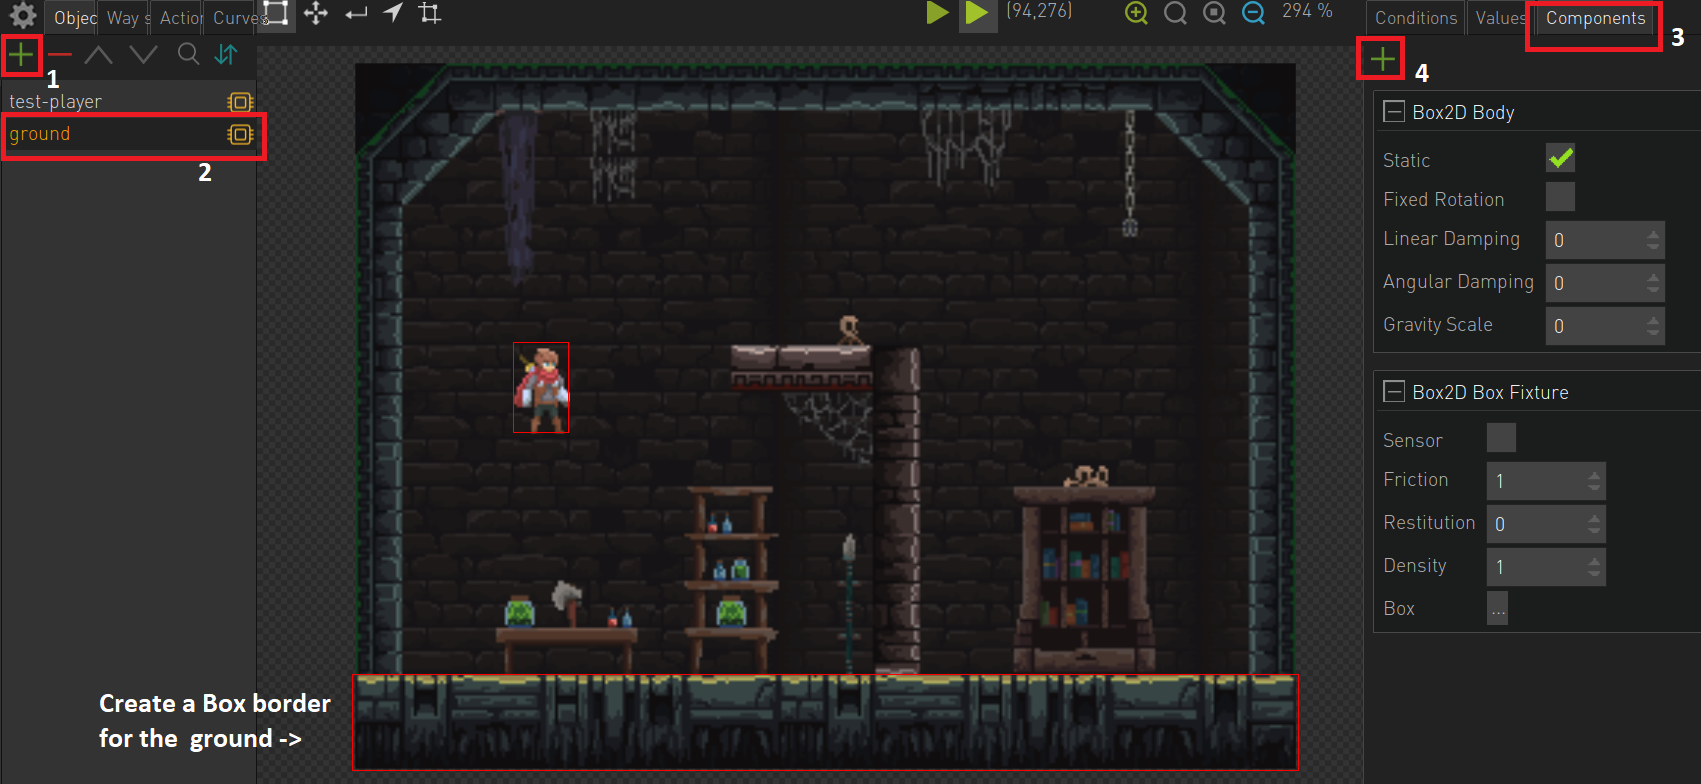
Try to run the game and now the player will stand on the ground, our first collision is a fact!
Project Files
| player-setup.zip | Zip file containing this section’s example. |
0 of 0 users found this section helpful
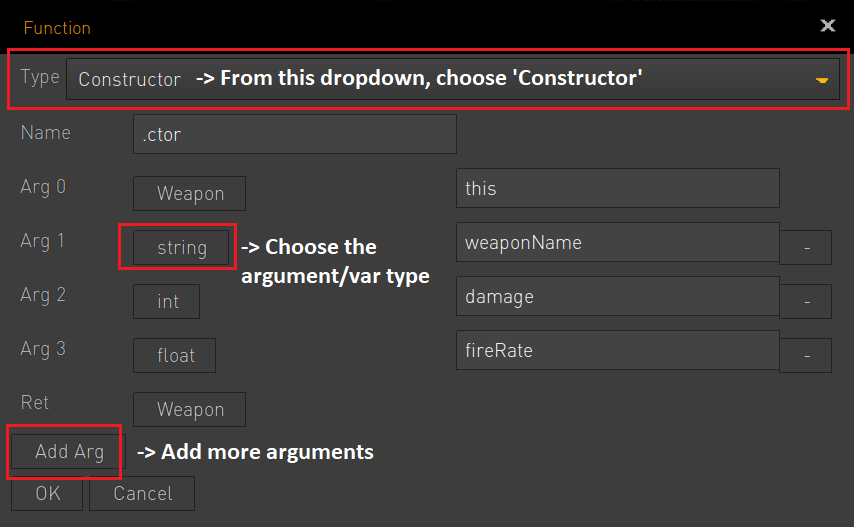
Constructors
A Constructor is a special method which is invoked automatically at the time of object creation and is used to initialize the data members of the new object fast.
Creating a Constructor (Code and Visual Scripting)
Create a new block, and in the code tab let’s create a class for Weapon objects which will also hold the Weapon constructor:
class Weapon : object // we inherit from the object Superclass

{

  string wpnName;
  int dmg;
  float fRate;

  Weapon(string weaponName, int damage, float fireRate) // constructor, needs to have the same name with its class
    {
      	this.wpnName = weaponName;
      	this.dmg = damage;
      	this.fRate = fireRate;
      Debug.Print("Created ${this.wpnName} with Damage ${this.dmg} and Fire Rate ${this.fRate}");
    }

}
A few notes:
- Such objects inherit from the internal ‘object’ superclass and cannot be attached on any Visionaire object, as they do not describe any behaviour.
- the constructor must have the same name as its Class (‘Weapon’ in this case).
- ‘this’ refers to the Weapon object (instance) currently being created.
The equivalent script in visual scripting looks like this:
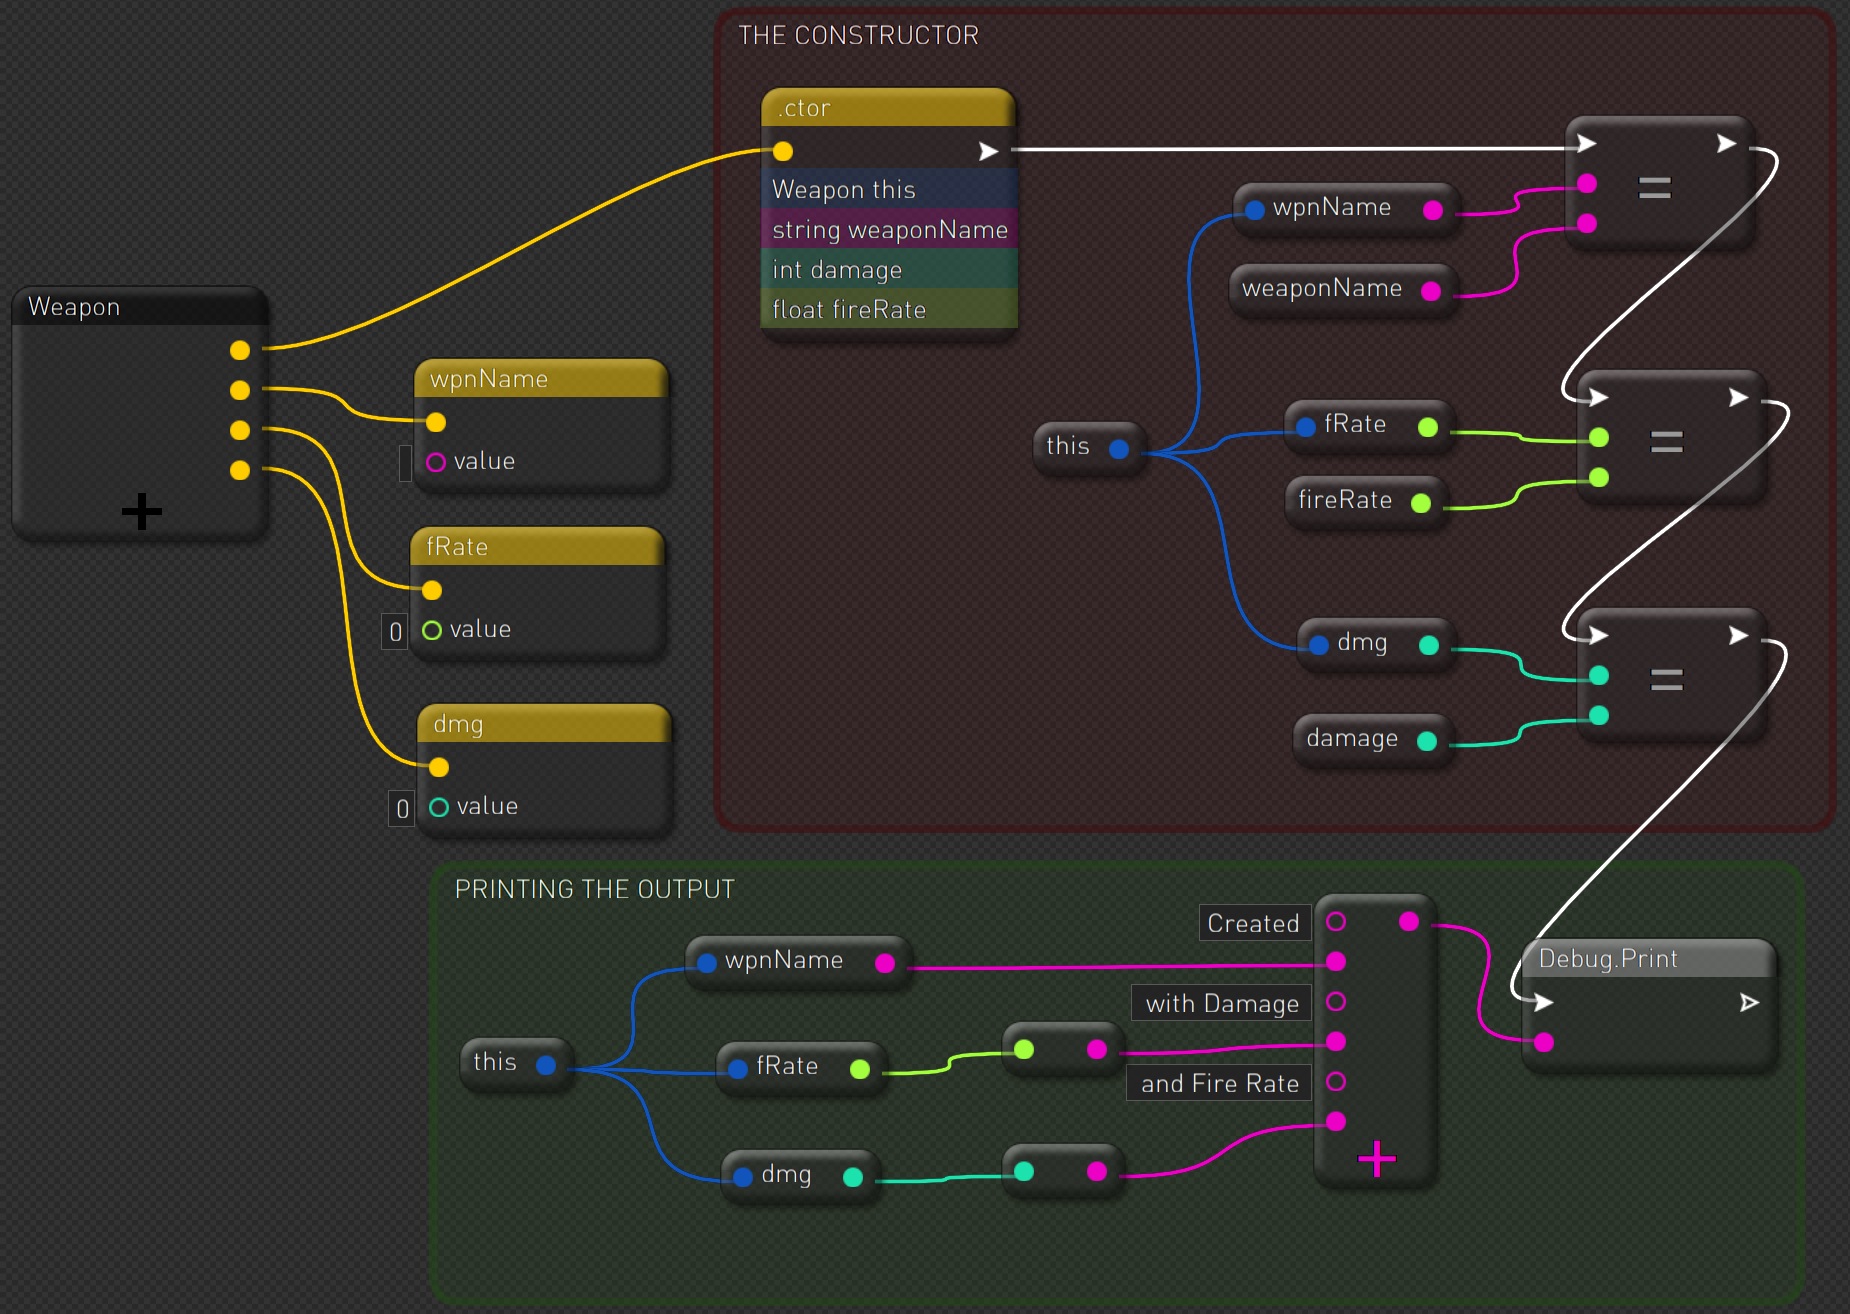
(Click image to enlarge)
To create the constructor in the block editor, just create a normal function block, but instead select ‘Constructor’:
Using the Constructor (Code and Visual Scripting)
For this example we want the objects to be created 1 time upon script loading, so we place their creation inside the Awake(). We will also attach the script on our main player, so our Superclass here will be ObjectBehaviour.
class MainPlayer : ObjectBehaviour

{

  override void Awake()

  {

  Weapon axe = new Weapon("Axe", 7, 3);
  Weapon sword = new Weapon("Sword", 5, 4);

  }

}
Visual Scripting version:
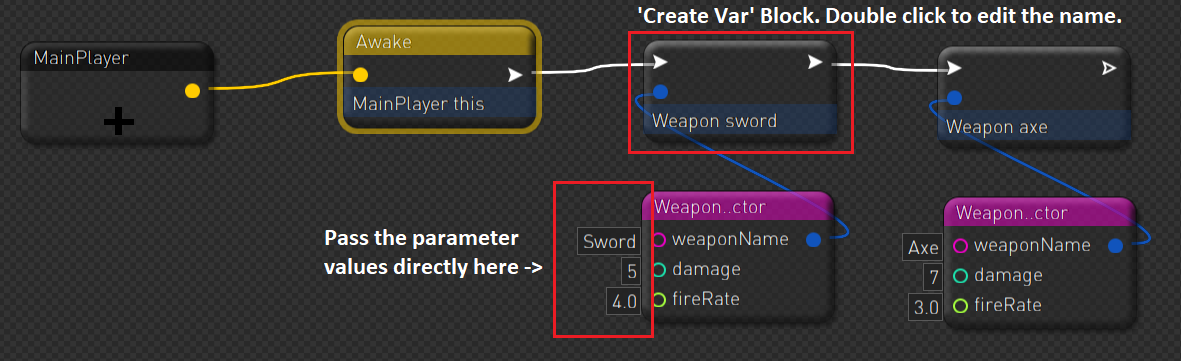
Now if you run the project and check the console, you will see the two objects (sword and axe) being created:

Constructor Overloading
You can also create multiple constructors for the same object but with different signatures. Signature is the part of the constructor declaration which holds the arguments, ie the part inside the parentheses:
Weapon(string weaponName, int damage, float fireRate)
So you can have in addition, a constructor with no parameters Weapon() and one with only a string for the weapon name Weapon(string weaponName). This gives you the flexibility to instantiate weapon object with various ways, e.g. Weapon(spear) or just Weapon()
Project Files
| constructors.veb | Visual scripting version for the above example. |
| constructors-code.veb | Code version for the above example. |
0 of 0 users found this section helpful
Player Setup
We’ll start by slicing the player’s spritesheet and then importing the animations into Visionaire. Then we need to assign some physics properties using box2d.
0 of 0 users found this section helpful
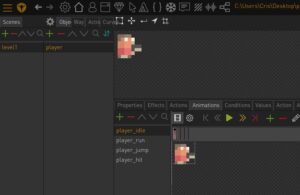
Slicing Spritesheets
Using Sprite Sheet Slicer:
- Import Source Image
- Select Slice by cell size; enter 8 x 8.
- Click ‘Slice’. The individual frames will be shown in the right panel
- We now need to make some grouping:
- Select all the images of a group, e.g. the run.
- Choose a File name prefix, e.g. player_run.
- Enter where to Start numbering from, e.g. 1. Each subsequent frame in this animation group will be numbered incrementally.
- Repeat above steps for each animation group (idle, run, jump, hit)
- Make sure the Output folder is correct and click ‘Write images to disk’. It will export all frames, but keep the ones you need.
![]()
0 of 0 users found this section helpful
Importing Animations
In Visionaire, create a new object (let’s call it player) under a scene (let’s call it level1) and import the animations. Set the idle animation as the default animation for now, so that we’ll be able to see it on the scene when running the game.
0 of 0 users found this section helpful
Attach Physics Properties
In order for the player to respond to collisions and to various forces, we need to create a box2d body for it and attach a fixture for it. This can be easily done with the relevant components that we attach to the player object:
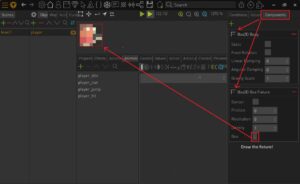
Now if you run the game you will see the player falling of the screen.
0 of 0 users found this section helpful
Level Setup
Next step is to create our level in Tiled and then import in in Visionaire.
0 of 0 users found this section helpful
Build the level in Tiled
Using Tiled, will create a level along with the necessary collission info in order for Visionaire to use this with box2d.
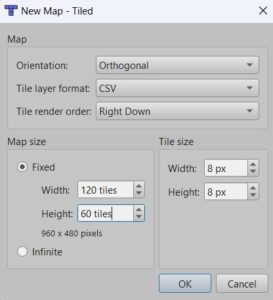
First we create the map of the level. Basis the fact that our game resolution is 320 x 240 and the tile size is 8×8 let’s make a 960×480 px map (yeap, there will be scrolling, stay tuned. So create the map and save it as a tmx file.
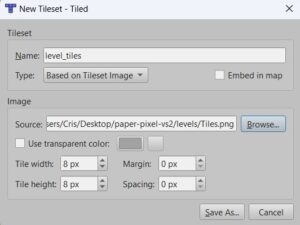
Now let’s create our tileset from the tiles.png image of the Paper Pixel theme.
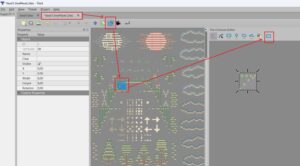
Now let’s set the collision info. This is a critical step that needs to be done before we start laying out the map; it will define which tiles have collision data, like walls, ground, etc. In the tileset editor, use the collision editor and adjust the bounding boxes for any tiles that need collision info as per below:
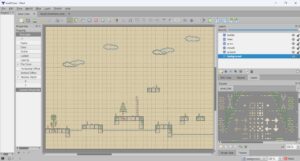
Now you can build your level in Tiled; you can also see the Collision info at anytime with View-> Show Tile Collision Shapes
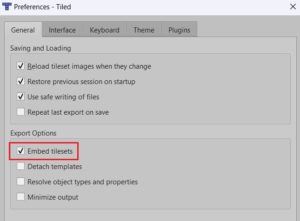
Finally, let’s prepare the map to be imported in Visionaire. Critical to remember that any tilesets (normally .tsx files) neeed to be embedded in the map (.tmx) file, otherwise Visionaire won’t parse it. This needs to be set in Tiled Preferences as follows:
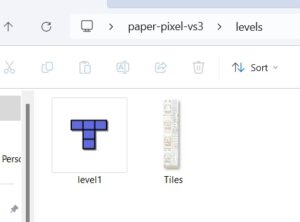
So, finally, you only need the Map file (.tmx) and the Tileset image(s) in the same folder:
And you are ready to import into Visionaire.
0 of 0 users found this section helpful
Import TMX Map in Visionaire
You can easily import the tmx map into Visionaire using the relevant component:
- Create a new scene object that will hold the map (let’s call it level_map)
- Create a TMX component for this object, and import the tmx file. Visionaire will parse and display the map.
- Create a Box2D component for the object and set it as Static so that it’s not affected by the world’s forces.
Now if you run the game, you will see the player falling off the screen, but landing on the ground, meaning that the map was imported correctly and physics work!
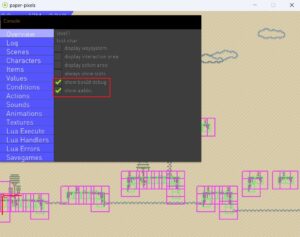
You can also verify that the collission info was imported properly by using the console:
0 of 0 users found this section helpful
Project Files
Input Manager
The next thing is to create an input manager, i.e. a script that will listen for any key input. More specifically we need to listen for any arrow keys pressed and the space bar. Especially for the arrow keys, a convenient way to go is for the script to return a 2d vector representing the current (x,y) direction based on the key pressed at any time. So for example we’d have:
(-1,0) – left only pressed
(0,1) – down only pressed
(1,-1) – right and up pressed at the same time
and so on!
Create a new Ilios script under the Visual Scripting tab. Make sure you link it under Global Behaviours!
0 of 0 users found this section helpful