

VISUAL SCRIPTING AND TYPED CODE
ILIOS is a scripting language that you can approach either by Visual Scripting or classic Typed Code. Along with Box2D will allow you to create physics-based games, such as Platformers or even RPGs!
Have fun and be creative!

Before you get started
While Visionaire is a really powerful engine designed originally for 2D point ‘n click adventure games, it is possible since version 5 with the addition of Box2D and the Ilios scripting language to create different genre games, like physics-based platformers. So, welcome to the first Box2d/Ilios scripting tutorial for Visionaire! Let’s try to make a prototype platformer and see how this works 🙂
Some useful reference links:
https://box2d.org/documentation (Box2D)
https://www.visionaire-studio.com/luadocs/ilios.html (Ilios)
Feel free to contact us for your comments, ideas and any assistance to your projects! As always, the community’s assistance is also there to help:
https://www.visionaire-studio.net/forum (Forum)
https://discord.com/invite/g5zFejW (Discord)
0 of 0 users found this section helpful
Prerequisities
For this tutorial, we will use:
- The Animated Pixels Adventurer asset psack which can be found here: https://rvros.itch.io/animated-pixel-hero . While it can be downloaded for free, we strongly encourage you to support the creator with a donation to allow them to create such nice assets!
- Background Image
- Visionaire Studio 5.1.9.2 +
Please note that while deep programming knowledge is not critical, it’s highly recommended to know the basics of object-oriented programming in order to fully understand the concepts set out in this tutorial. This guide’s primary purpose is not teach programming but to show implementation of these concepts on the Visionaire engine.
3 of 3 users found this section helpful
Code vs Visual Scripting
Visionaire offers 2 ways to create Ilios scripts:
- Code
- Blocks (Visual Scripting)
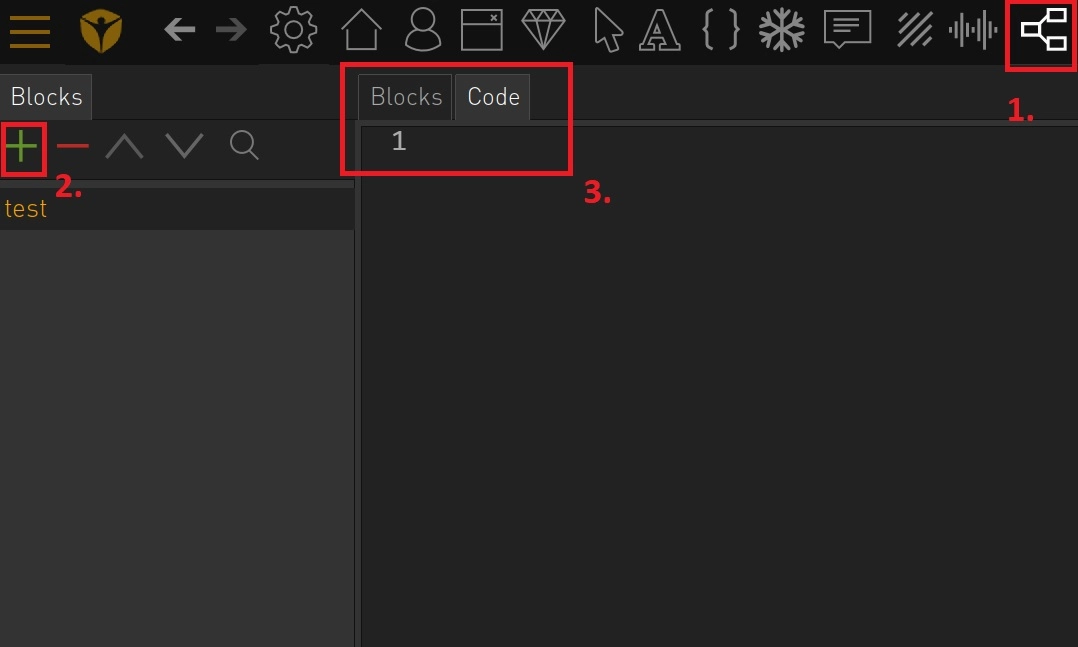
You can access both of these through 1. Visual Scripting at the Top Bar -> 2. Create a new script -> 3. Choose your preferred editor for your script:
Code and Block scripting can be used together in a project. So you can have some scripts with code and some with visual scripting.
0 of 0 users found this section helpful
My first Ilios Script!
Ilios is offering Visionaire a component-based approach to game development. The basic principle is to create behaviours (which are basically classes) that can then be attached to objects, characters, scenes, interfaces, buttons, and the game itself through components. The basic steps can be summarized below:
1. Create a script block to hold your Behaviour Class
Go to the Visual Scripting tab and create a new block entry. You are now ready to create your class. You have 2 options: Visual Scripting (Blocks Tab) or classic Typed Code (Code Tab). Both offer basically the same functionality so it’s a matter of preference. Will show you first how to do it with the visual editor and at the end of this section you can see the code version.

2. Create a Behaviour Class
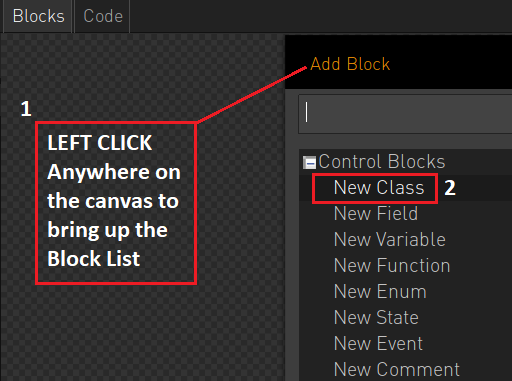
On the Visual Scripting Editor, Click on the canvas. This will bring up the Block List to create your block. Choose ‘New Class’ and double click to confirm.
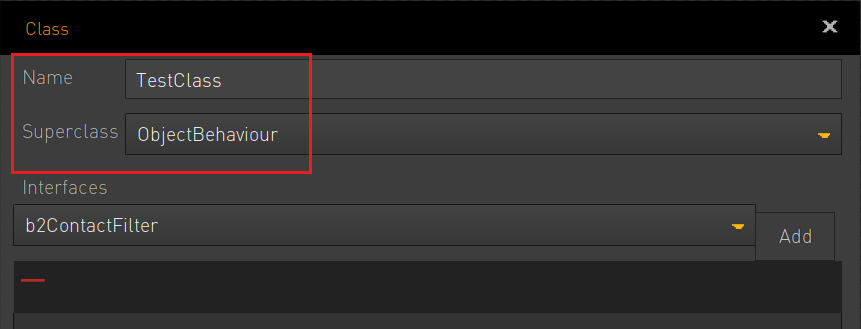
You can now name your class and assign it to a behaviour superclass. A behaviour superclass is just a mother class which holds basic behaviours for Visionaire entities (objects, characters, scenes, interfaces, buttons, and the game itself). By assigning your class to a superclass, you inherit from it all these behaviours which you can now override and alter and you will be able to attach your new behaviour to the relevant Visionaire entity through components.
The behaviour superclasses available are:
- GameBehaviour
- ObjectBehaviour
- CharacterBehaviour
- SceneBehaviour
- ButtonBehaviour,
- Interface Behaviour
For now let’s make an object behaviour so let’s attach it to ObjectBehaviour superclass:
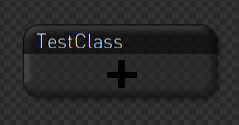
Click OK when finished and your class node is now on the canvas:
3. Create your function
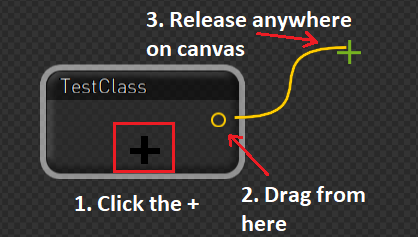
By click on the + sign you can create connection points (yellow dot) for adding functions, variables, states etc to your class. Just click on a connection point and drag it anywhere on the canvas, then release it. A list of possible nodes to connect to will be shown.
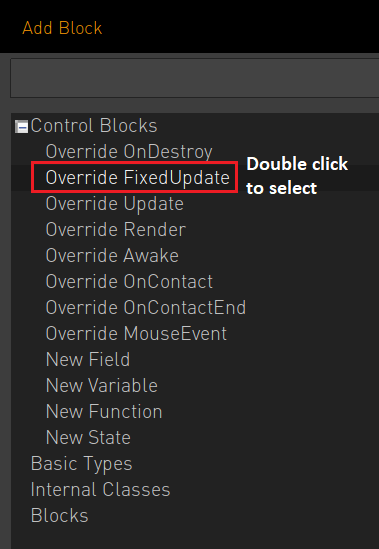
More importantly, you will now be able to Override functions of the ObjectBehaviour superclass, like for example the Fixed Update function which runs at every frame (50 times per second). Let’s do this then:
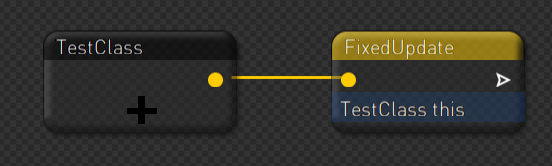
The Fixed Update block is now visible. It’s colour is yellow, denoting that it is a function:
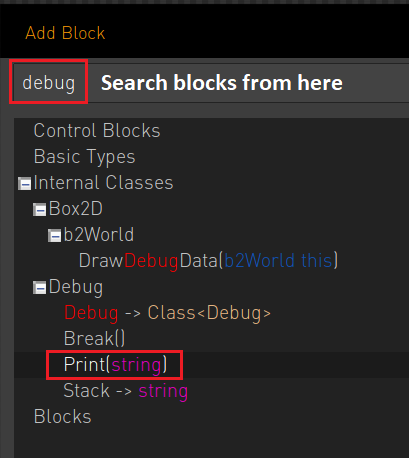
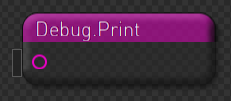
Now let’s call a method to print something on the screen. This method for this is Debug.Print(). Click anywhere on the canvas to open the block list and search for ‘debug’, double click to choose Print(string) from the Debug internal class:
The block looks like this:
You notice that it has an input node to the left (purple color dot means ‘string’ input). Similarly, output nodes are positioned to the right of the block, but here there is no any. To enter your string input here you have 2 ways: either connect a string, or enter the text directly. Let’s do the 2nd for now, click on the small box to the left of the purple dot and you can enter your text:

4. Create your execution flow
The Debug.Print block is ready but won’t run unless we connect it with our class and update function. We can connect blocks by dragging a white line between them, the ‘Execution Flow’ line. Execution starts at a function, follows the line, and executes all blocks in order.
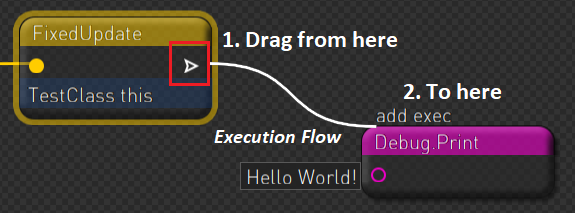
Just drag from the small white arrow on the FixedUpdate over the Debug.Print block (you will see a hint msg ‘add exec’) and release. The blocks are now connected and our first script is ready!

5. Connect the behaviour to your object
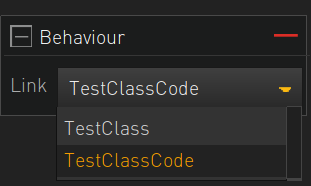
Our new script – behaviour is now available under the components tab to be connected to our object (test-player):

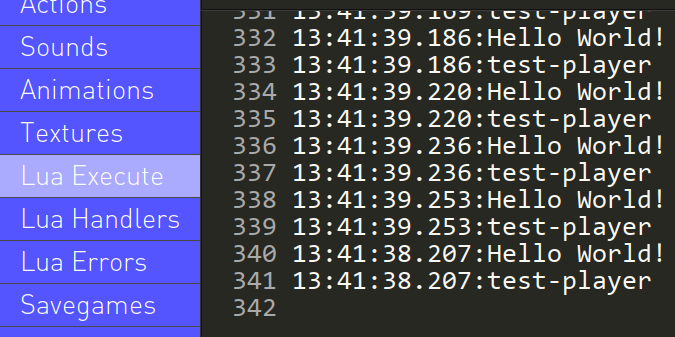
When you Run Game, open the console (TAB) and note that under Lua Execute you will see Debug.Print being executed 50 times/s as it is inside the Update function. Well done!

7. Using Function Arguments
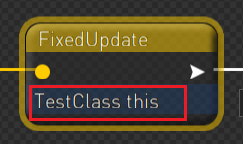
Now let’s say that we also want to print out the object’s name (“test-player” in our case). How can we retrieve the linked object’s data and manipulate it? The secret is in the Update function’s “this” argument:
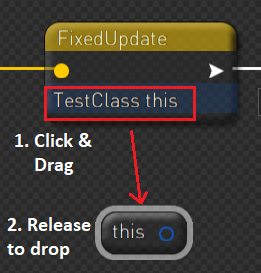
‘this’ holds a reference to the object currently linked to the behaviour and it will help us access and manipulate its properties. To do this, you need to click and drag ‘this’ and drop it on the canvas:
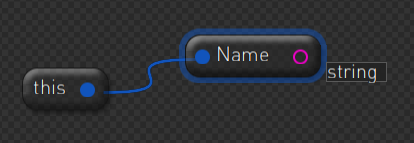
You now have an instance of the linked object and full access to its properties. For example, we want to retrieve and print the object’s name; click and drag the output node on the right (blue dot) and drop it on the canvas. A list of possible Visionaire Object properties are now available to select, so go ahead and choose Name:
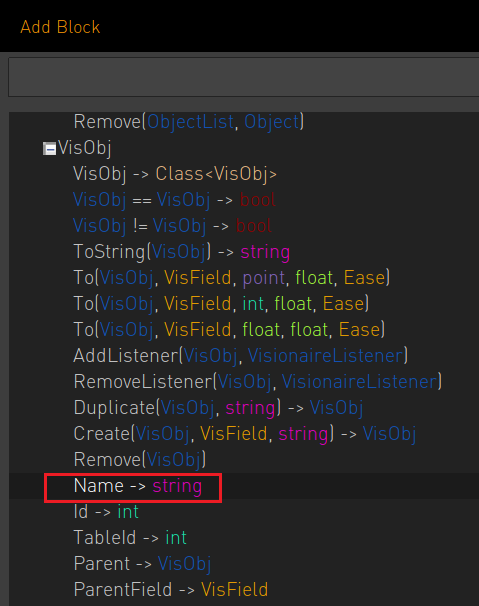
You will now see the Name node appear and getting linked to this. You also see that it has a purple output node which means that it’s of string type:
And you guessed right; you can connect the purple output node to a block that accepts strings as input, and yes that is our purple Debug.Print block, so go ahead, make a new Debug Print Block and link it:
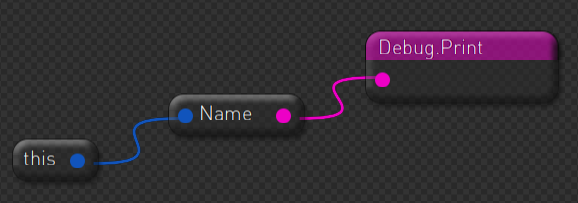
Finally, connect the two Debug.Print blocks using the execution line so that they run one after the other and your script is ready:

And you can confirm it in the console:
The code version of the above looks like:
class TestClassCode : ObjectBehaviour

{
  override void FixedUpdate()
  {
      Debug.Print("Hello World! -Code Version-");
      Debug.Print(this.Name);
  }
}
(we changed a bit the Class name so that you can use it interchangeably with TestClass component in the dropdown):
Project Files
| quickstart.veb | Visionaire file containing this section’s example. |
0 of 0 users found this section helpful
Anatomy of a Script
Let’s create some actual functionality here with some scripts and analyze their structure. We will create 2 scripts that can be attached to a scene object:
- The PlayerInput script which will take the keyboard input, create a direction vector and then pass it to Movement script.
- The Movement script which will take the direction vector from PlayerInput and move the object in the scene.
class PlayerInput : ObjectBehaviour
{
    Movement movement;

    void Update()
    {
        Vector3 moveDirection = new Vector3(Input.GetAxis("Horizontal"), 0, Input.GetAxis("Vertical"));
        movement.Move(movedirection);
    }
}
class Movement : ObjectBehaviour
{
    float moveSpeed = 1;

    void Move(Vector3 direction)
    {
        transform.position += direction * moveSpeed * Time.deltaTime;
    }
}
Class Declaration
This defines the accessibility of the script, such as public, followed by optional modifiers, such as if the class is static or abstract which, in the case of scripts that are attached to objects, it can’t be, the script’s type, which will normally be class, followed by the identifier, which is the name of the script.
In most cases, the script’s name must be the same as the script’s file name, otherwise you’ll get an error.
After the script’s identifier is the script’s Base Class. For scripts that you can attach to an object, this will always be MonoBehaviour or a class that inherits from MonoBehaviour.
You’ll learn how inheritance works later on in this course but all you need to know for now is that this is what allows a script to be attached to an object as a component, and what allows event functions like Update and Start to be called on it automatically.
You’ll the see a set of brackets encapsulating the rest of the script. This is the body of the script, and anything placed within these brackets are within the class’s scope.
So what goes inside the script.
Body of the Script
Generally speaking there are three different types of code you can place inside a class:
- Variables, such as values and references to data that exist elsewhere.
- Functions, which are blocks of code that are executed when they’re called.
- Other classes or data structures (will discuss this later)
Where you put your variables and functions doesn’t technically matter but, generally, you’d put class member variables at the top of your script.
This is information that everything in the script is going to use. Such as a movement speed float, for example, where a float is a type of number with a decimal point.
Other value types include bool, for a true or false value, int for an integer value, which is a whole number, or vec3, which is a set of 3 values that can be used to describe a position, a rotation or even a colour.
It’s also possible to reference other classes and objects using a variables. These are reference types, and typically point to something that exists elsewhere. You’ll find out more about reference types and value types in the lesson on variables later in this course.
On their own, however, variables don’t do anything. They just kind of exist.
To actually make something happen, you’ll need to write a function.
Functions, sometimes called methods, are blocks of code that are executed, line by line, when they’re called.
They are the working, moving parts of your script and are the building blocks of all of the logic in your game.
So how do you write a function?
A function starts with its return type, which is the type of information its going to give back to whatever calls it. In many cases this can be void, meaning that it doesn’t return any information.
Next, is the name of the function. Which needs to be different from the containing class and unique unless you’re overloading the function with different sets of parameters.
What’s a parameter? Parameters are the pieces of information that you pass into a function when you call it and are contained within a set of parentheses that follow the function’s name.
You don’t have to accept any data when writing a function, in which case you can leave the parentheses empty. However, in many cases, you will need to pass some kind of information to the method when you use it.
For example, a move function might accept a vec3 value that represents the movement direction for that frame.
That vector can then be scaled by the movement speed value that’s kept in the class to create movement.
But why keep the two values, movement direction and speed, in separate places?
Why not put the movement vector with the speed value, or make the speed value a parameter of the function?
While you could technically do either of those things, the reason why you might not want to is how the two pieces of information are going to be used.
For example, serializing the speed value, or making it public, allows you to control it in the inspector, meaning that you can change how fast this object can move in an appropriate place, on the object in the component that’s doing the moving.
While the movement vector that’s passed into the function is likely going to be controlled by a different script. For example, if the function is made public, meaning that other scripts can call it, a different script, such as an Input script that reads the player’s input axes and generates a vec3 direction, can then pass that information into the function when it calls it, creating player-controlled movement.
But why two scripts?
Why not just write one script with input and movement combined?
Generally speaking it’s good practice for each script to only do one thing, since it makes problems easier to find and fix, it limits what each script can do and makes it much easier to add, remove or change how the different parts of your game work.
0 of 0 users found this section helpful
Variables
A simple example of setting some variables:
class Player : ObjectBehaviour

{
    outlet float playerHealth;
    outlet bool isDead;

    void Damage(float dmg)
    {
        playerHealth -= dmg;

        if(playerHealth < 0)
        {
            // Player Has Died
            isDead = true;
        }
    }

    void AddHealth(float health)
    {         playerHealth += health;

        if(playerHealth > 100)
        {
            // Player's health is full
            playerHealth = 100;
        }
    }
}
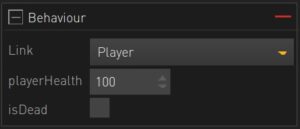
The outlet keyword will expose and show the variable in the editor, so that you can adjust the values easily. If you add the Player component to your object, you can now see this in action:
0 of 0 users found this section helpful
Introduction to Ilios Scripting
You might be familiar with the basic concepts of the engine, such as scenes, objects and components as well as LUA scripts
But how are Ilios scripts different and what are they for? And how should you be using them?
3 basic ways to use an Ilios script in Visionaire:
- as a component, that gives objects, scenes, characters, button etc. a type of behaviour (unlike Unity where you can only attach a script only to objects)
- as a global class that other scripts can access
- or as a data template, which is a definition of a type of data or type of class that other scripts will use
0 of 0 users found this section helpful
Script Components
Script Components can be added to the following entities to make them do something:
- Objects / Scenes / Buttons / Interfaces / Characters / Game
In order to add these scripts to the entities above, they need to inherit from specific superclasses which are built into Visionaire:
- Objects -> ObjectBehaviour Superclass
- Scenes -> SceneBehaviour Superclass
- Buttons -> ButtonBehaviour Superclass
- Interfaces -> InterfaceBehaviour Superclass
- Characters -> CharacterBehaviour Superclass
- Game -> GameBehaviour Superclass
This means that they exist as instances, where you can add multiple scripts of the same type and each one holds its own data. Because they are instances, however, when you want to use one, you’ll need to have a reference to that instance.
When you add a script to an entity above, certain event messages, like FixedUpdate and Awake will be called on that script. These functions, and others like it, are ultimately how you will connect the behaviour that you write in the script to the actual events of your game.
Here’s an example of a script that can be attached on a Scene Object:
class PlayerMoveC : ObjectBehaviour
{
   // Awake is called once before the first execution of Update
   override void Awake()
   {
       // Initialization code here
   }

   // FixedUpdate is called once per frame
   override void FixedUpdate()
   {
       // Code to update object behavior each frame here
   }
}
For something to actually happen in your game, it needs to happen on such entity and be triggered by something that happens, such as input, a collision, an event that another script calls, or constant triggers such as FixedUpdate or Update.
0 of 0 users found this section helpful
Static Classes
Global classes, or static classes, don’t exist on objects. They exist in your project as a whole and can be used by other scripts.
When something is static, such as a class, it means that there’s only one of that type in your project. This means that, unlike script components, static classes cannot exist as multiple instances.
The benefit of that is, that when you want to use one, you can do it without needing a reference. You just type out the name of the class to access it.
As a result, static classes can be useful when you want to create one-of-a-kind code that everything might need to use. An example of this might be a utility class that contains commonly used functions.
Here’s an example of a static class that does a calculation, more specifically it calculates the distance between two points:
class MathUtils
{
   // A static function to calculate the distance between two points
   static float CalculateDistance(vec2 pointA, vec2 pointB)
   {
       // Use the Pythagorean theorem to calculate the distance
       float distance = vec2.Distance(pointB, pointA);
       return distance;
   }
}
We can now call this function easily from anywhere just using the following syntax:
MathUtils.CalculateDistance(new vec2(0,0), new vec2(3,4))
You can easily check this, by using the relevant “Run ilios script” actionpart and printing the result of our calculation on the console:
Debug.Print(MathUtils.CalculateDistance(new vec2(0,0), new vec2(3,4)).ToString());
Notes:
- Debug.Print() is used to print stuff on the console
- We use the .ToString() method to convert the result of our calculation (which is a float) to a string, because Debug.Print() can only print strings.
Resources
| static functions.veb | Demonstration of static functions in Visionaire Studio |
0 of 0 users found this section helpful
Custom Data Types
Lastly, scripts can be used to define types of data in your game. Custom data types such as structs, plain classes, enums, interfaces are all examples of data types that can be created, using scripts, and then used throughout your game as a type of data or as a template for something else.
0 of 0 users found this section helpful
Setup Player's Physics
Setting the Assets
The basic steps to setup our player are:
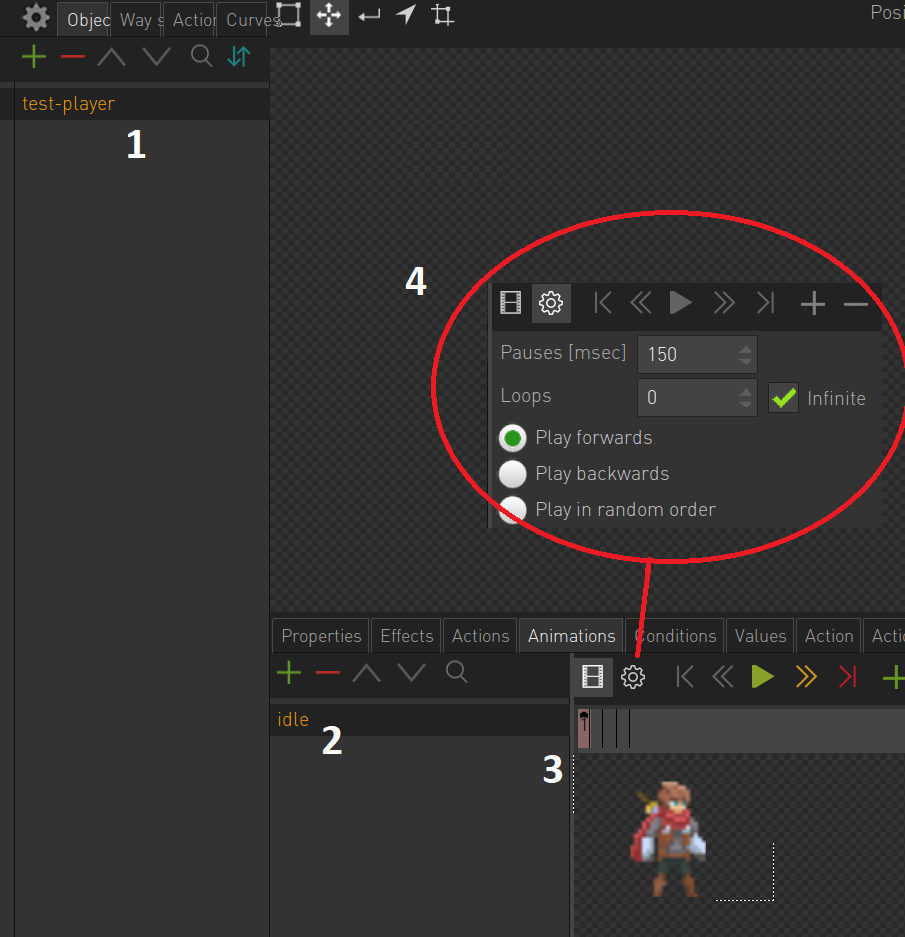
- Create the player object (e.g. test-player)
- Create an idle animation, add its frames and Adjust its settings (set it to Infinite Loops!):
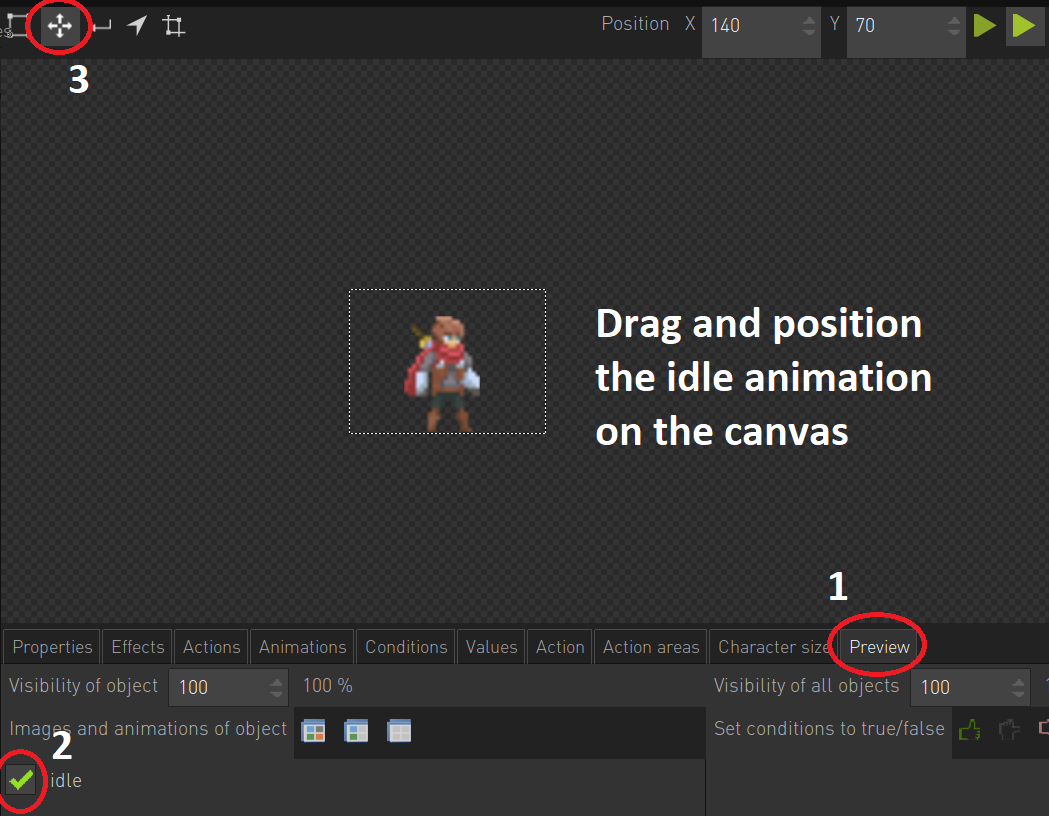
- Position the animation on the canvas, for now place it at (40,90)
- Finally, for now, set the idle animation to be the default animation for the player:

Now if you run the game you will see the player on the screen with his idle animation. A few notes though due to the small size of the pixel art player assets to improve the display:
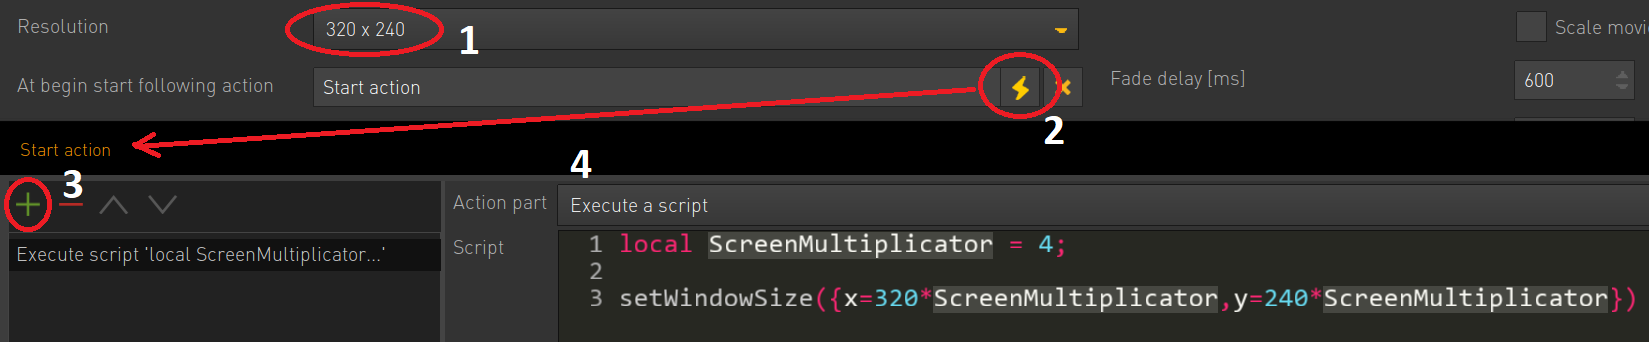
- Set the resolution to 320×240 px
- At a script at Start Action to enlarge the window area:
- Activate Pixel Effect for a crispy pixel display:

Apply Physics Properties
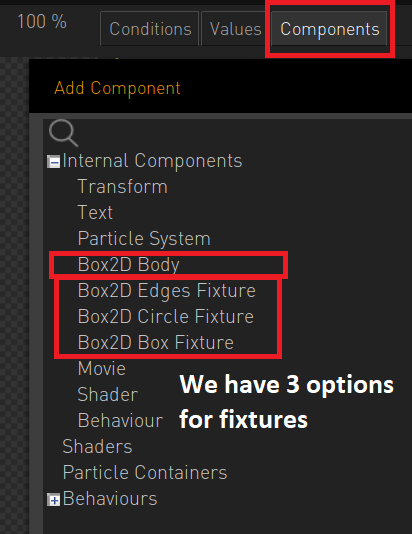
Visionaire uses Box2D engine to apply physics behaviours to objects through components so let’s add some to our player. To have a fully working Box2D object, you need to define 1. a Body and 2. a Fixture component:
Think of a body as the properties of an object that you cannot see (draw) or touch (collide with). These invisible properties are:
- mass – how heavy it is
- velocity – how fast and in which direction it’s moving
- rotational inertia – how much effort it takes to start or stop spinning
- angular velocity – how fast and which way it’s rotating
- location – where it is
- angle – which way it is facing
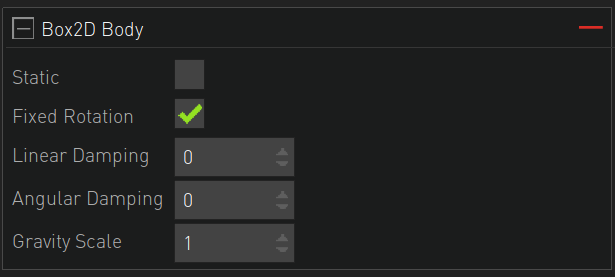
So let’s add a body to our player:
Note that there are 3 types of Box2D bodies:
- dynamic body – a body that is affected by world forces and reacts to collisions. Our player is one example.
- static body – a body that isn’t affected by world forces and does not react to collisions. It can’t be moved, e.g. wall or the ground.
- kinematic body (not supported at the moment) – a hybrid body that is not affected by forces and collisions like a static body but can be moved with a linear velocity like a dynamic body. Example is a moving platform.
- Static – leave it unticked, we want our player to be a dynamic body
- Fixed Rotation – Prevents the body from rotating (e.g when colliding). We need that for our player!
- Linear Damping – Used to reduce the linear velocity
- Angular Damping – Used to reduce the angular velocity
- Gravity Scale – Used to weaken or strengthen the effect of the world’s gravity. E.g. 1 = normal gravity, -1 = reverse gravity, 0 = zero gravity etc.
Even if you know all of these characteristics of an object, you still don’t know what it looks like or how it will react when it collides with another object. To define the size and shape of an object we need to use fixtures; fixtures are used to describe the size, shape, and material properties of an object. One body can have multiple fixtures attached to it, and the center of mass of the body will be affected by the arrangement of its fixtures. When two bodies collide, their fixtures are used to decide how they will react. The main properties of fixtures are:
- sensor – whether the fixture is sensor or not. Sensors detect collisions but do not react to them (our player is not a sensor)
- friction – how slippery it is
- restitution – how bouncy the fixture is
- density – how heavy it is in relation to its area
- shape – a polygon or circle
So let’s add a fixture to our body. Note that you can make 3 fixture shapes: 1. Rectangle, 2. Circle, 3. Edge (free form). All work similarly but for our example let’s choose the box one:
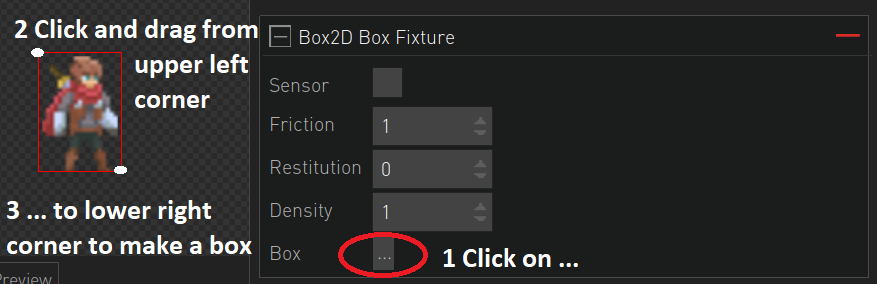
The red rectangle we created is actually the bounding box that defines the collision borders of our player.
Try to run the game now. The player will fall off the screen due to gravity, nice! (well, sort of). So let’s make some ground. Add the background image provided above and setup a new ground object and its relevant (static!) body and fixture:
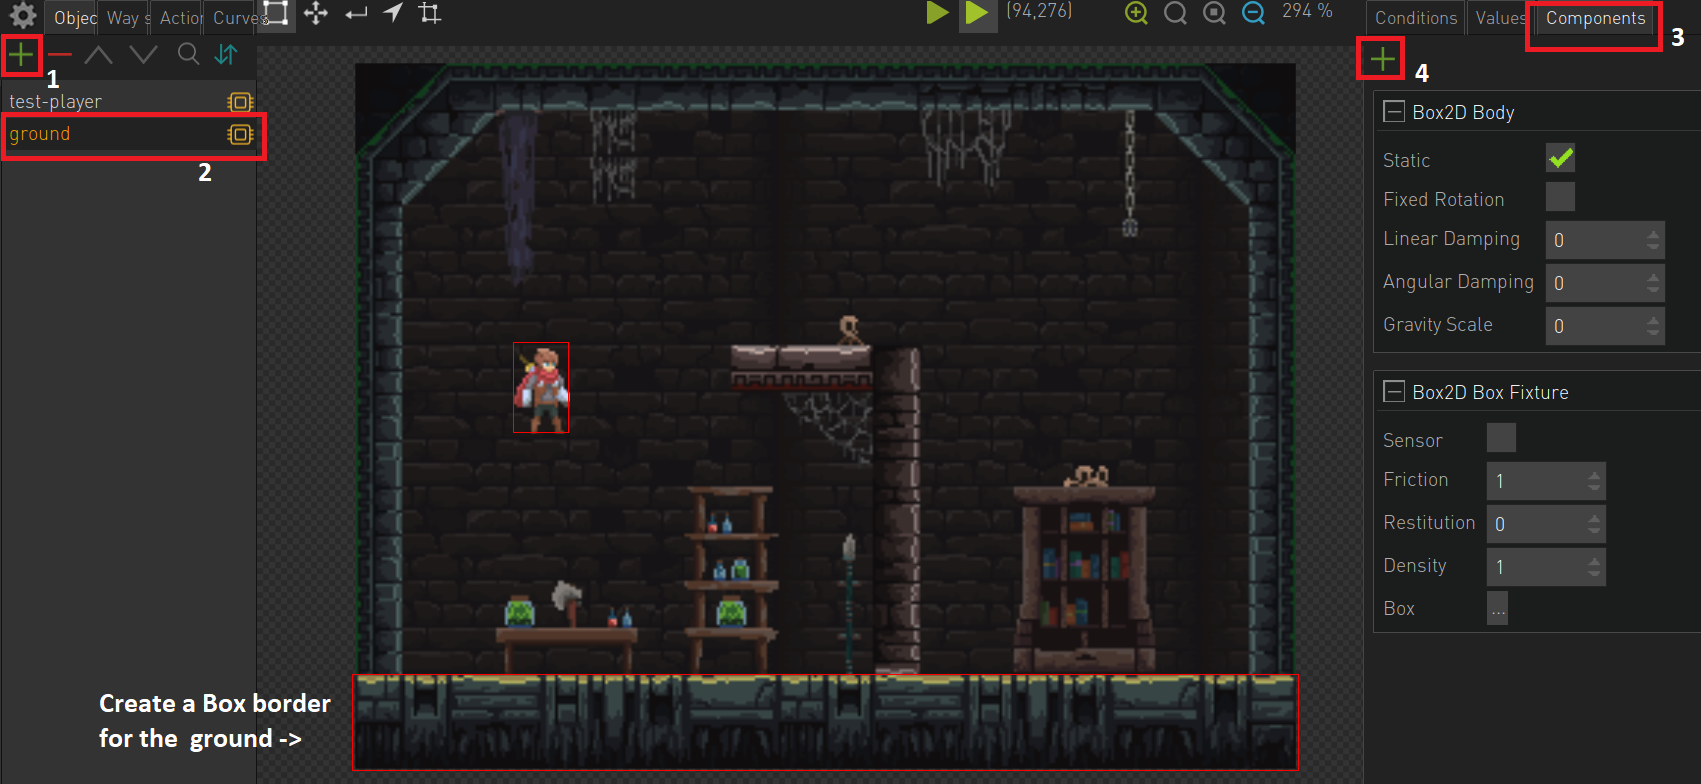
Try to run the game and now the player will stand on the ground, our first collision is a fact!
Project Files
| player-setup.zip | Zip file containing this section’s example. |
2 of 2 users found this section helpful
Constructors
A Constructor is a special method which is invoked automatically at the time of object creation and is used to initialize the data members of the new object fast.
Creating a Constructor (Code and Visual Scripting)
Create a new block, and in the code tab let’s create a class for Weapon objects which will also hold the Weapon constructor:
class Weapon : object // we inherit from the object Superclass
{
string wpnName;
int dmg;
float fRate;
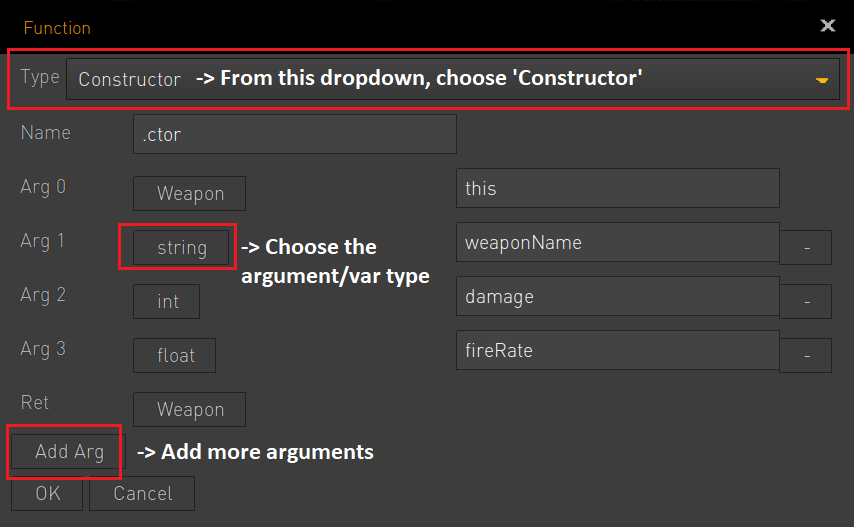
Weapon(string weaponName, int damage, float fireRate) // constructor, needs to have the same name with its class
{
this.wpnName = weaponName;
this.dmg = damage;
this.fRate = fireRate;
Debug.Print("Created ${this.wpnName} with Damage ${this.dmg} and Fire Rate ${this.fRate}");
}
}
A few notes:
- Such objects inherit from the internal ‘object’ superclass and cannot be attached on any Visionaire object, as they do not describe any behaviour.
- the constructor must have the same name as its Class (‘Weapon’ in this case).
- ‘this’ refers to the Weapon object (instance) currently being created.
The equivalent script in visual scripting looks like this:
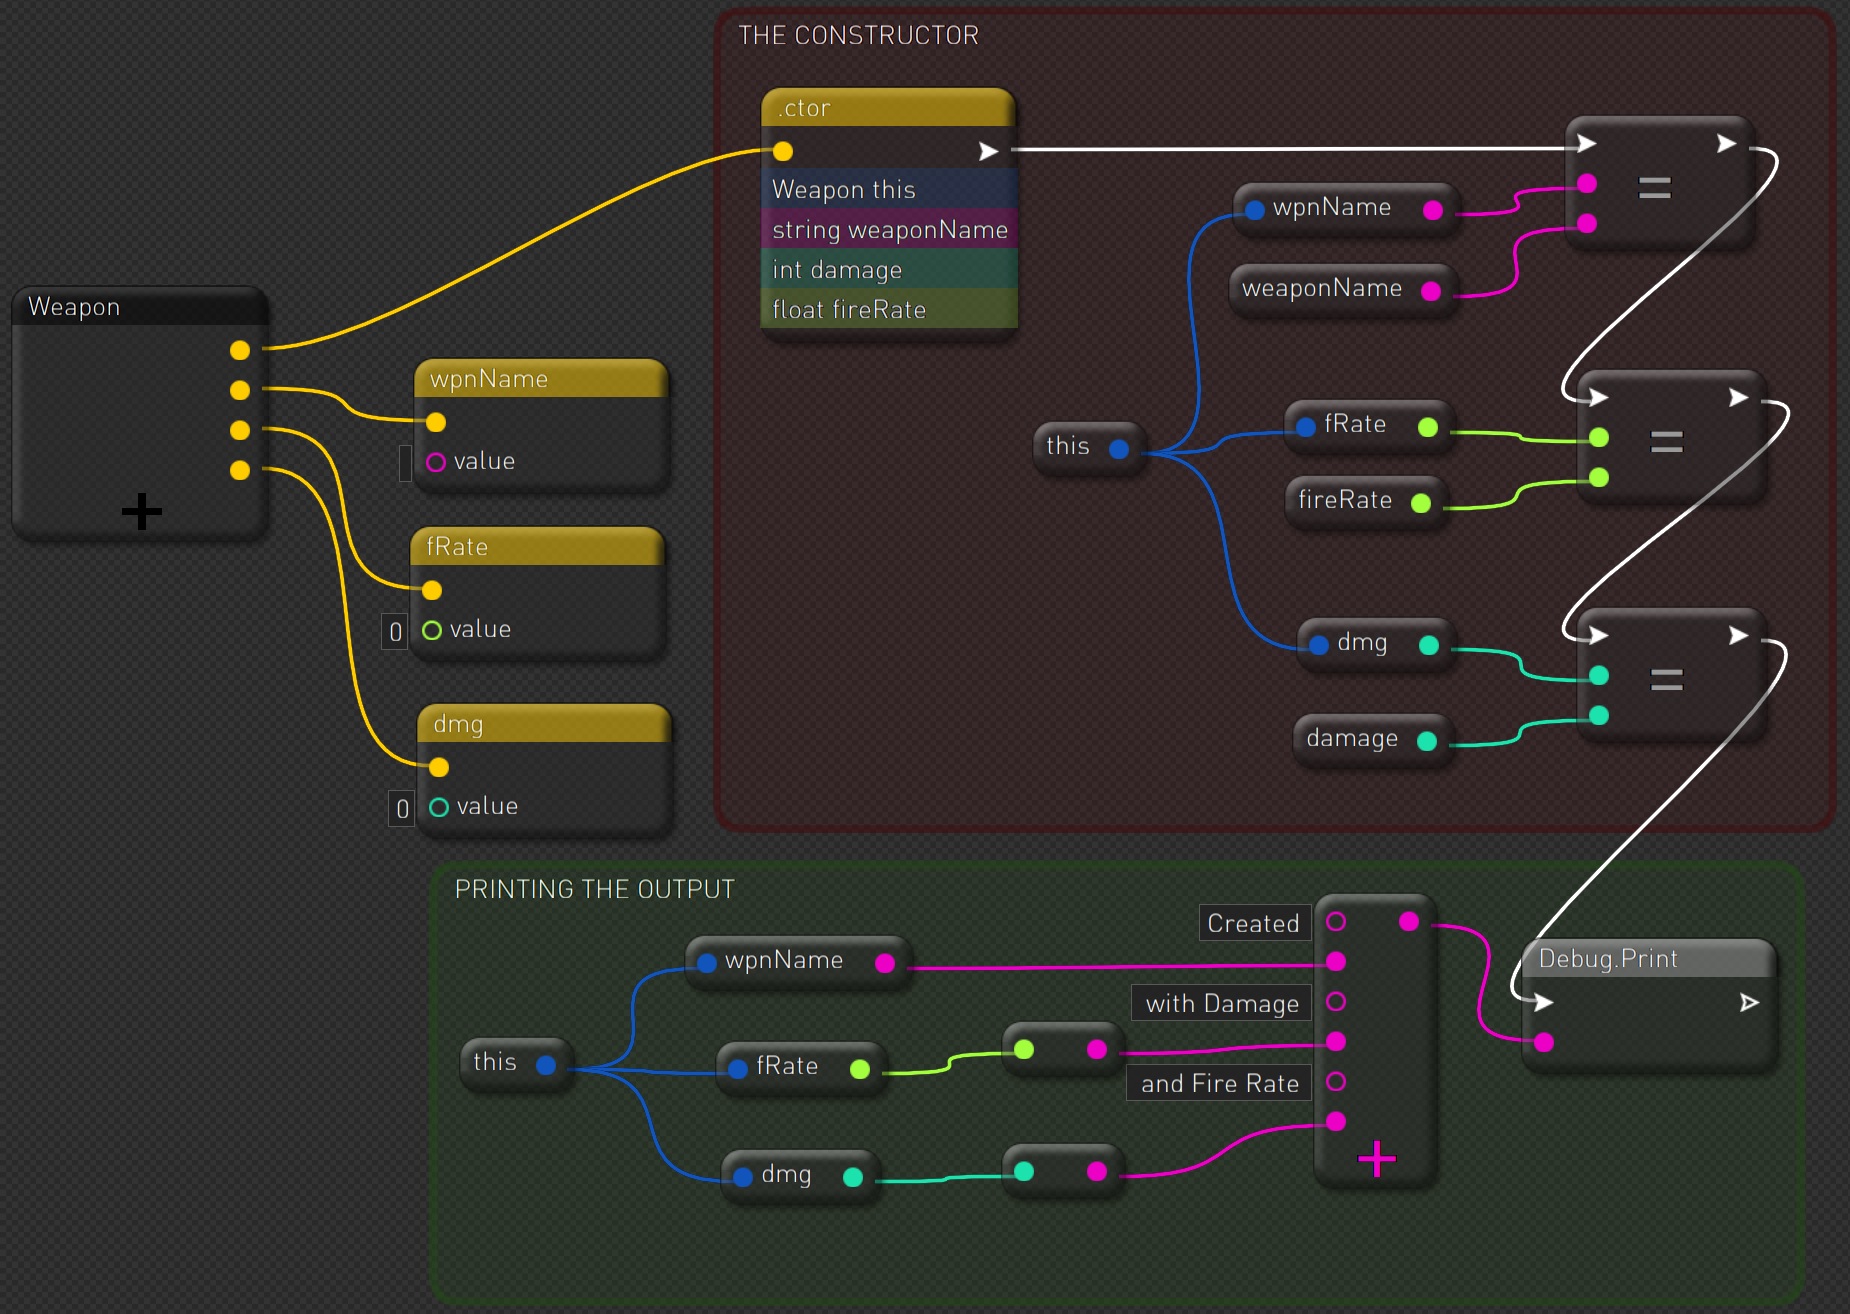
(Click image to enlarge)
To create the constructor in the block editor, just create a normal function block, but instead select ‘Constructor’:
Using the Constructor (Code and Visual Scripting)
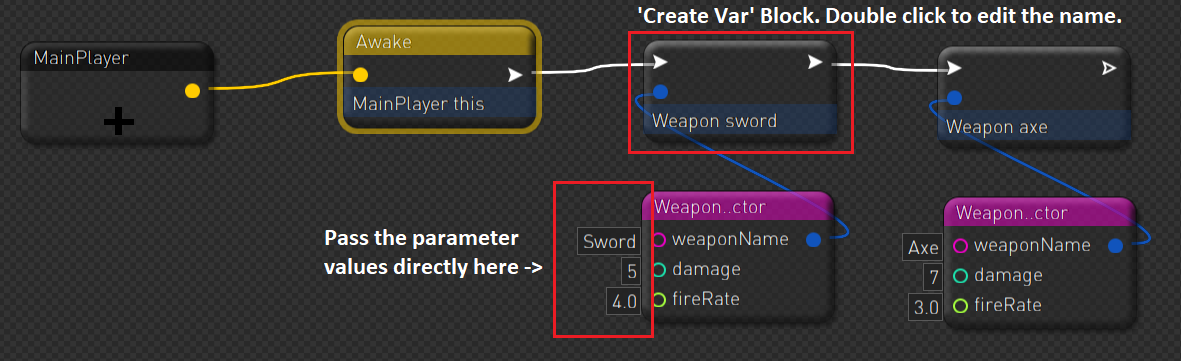
For this example we want the objects to be created 1 time upon script loading, so we place their creation inside the Awake(). We will also attach the script on our main player, so our Superclass here will be ObjectBehaviour.
class MainPlayer : ObjectBehaviour

{

  override void Awake()

  {

  Weapon axe = new Weapon("Axe", 7, 3);
  Weapon sword = new Weapon("Sword", 5, 4);

  }

}
Visual Scripting version:
Now if you run the project and check the console, you will see the two objects (sword and axe) being created:

Constructor Overloading
You can also create multiple constructors for the same object but with different signatures. Signature is the part of the constructor declaration which holds the arguments, ie the part inside the parentheses:
Weapon(string weaponName, int damage, float fireRate)
So you can have in addition, a constructor with no parameters Weapon() and one with only a string for the weapon name Weapon(string weaponName). This gives you the flexibility to instantiate weapon object with various ways, e.g. Weapon(spear) or just Weapon()
Project Files
| constructors.veb | Visual scripting version for the above example. |
| constructors-code.veb | Code version for the above example. |
1 of 1 users found this section helpful