

MAKE YOUR OWN ADVENTURE GAME
Visionaire Studio is everything you need from a modern game engine. It’s among the best options and one of the most powerful engines to start building up your own adventure game. While it is exclusively an ‘Adventure Game’ engine, there are still many different ways to set up mechanics and experiment.
Have fun and be creative!

Introduction
Visionaire is a powerful engine designed originally for 2D/2.5D point ‘n click adventure games and it’s among the best options if you plan to make such a game. It has been used in many successful commercial games, most notably by Daedalic Entertainment. You can see a comprehensive list of games made with this engine here.
This guide will help newcomers to easily setup and build their first game, but is also a handy ref for experienced developers during the production of our game. Apart from our own studio’s experience with working with the engine, this guide practically contains consolidated and structured information and examples available in the following links:
https://wiki.visionaire-tracker.net (Wiki)
http://www.visionaire-studio.com/luadocs (API Reference)
https://www.visionaire-studio.net/forum (Forum)
https://discord.com/invite/g5zFejW (Discord)
What about other game genres?
Visionaire improves its capabilities with every update. Overall, the following game types are currently possible to be made:
- 2D/2.5D third person point & click adventure games.
- First person myst-like adventure games.
- Interactive visual novels.
- FMV point & click adventure games.
- Games with Strategy / Simulation/ RPG mechanics/elements.
- Platformer games (using Box2D and Ilios)
- Isometric style games.
Main Features / Highlights
- Very lightweight (size only abt 100MB), optimized for low resource usage.
- Easy export to Win, Mac, Linux, HTML5, iOS, Android, Nintendo Switch, Xbox, Playstation
- Support for both pixel art as well as high resolution games (up to 4K).
- Built in functionality for easy point and click games creation.
- Spine / Dragonbones 2D Skeletal Animation Import.
- Characters 3D Model Import (Blender etc).
- Rhubarb Lipsync support.
- Advanced Audio System for Dynamic and Adaptive Sounds/Music (similar to iMuse).
- FMOD Adaptive Audio Plugin.
- Easy game creation for beginners without scripting.
- Lua Scripting for more advanced customizations.
- C# Like Support (Ilios language) for Component Based programming with Box2D physics engine.
18 of 18 users found this section helpful
Quickstart
Installation
You have two options to download the engine and start playing around:
Test Version
You can download it from here. Its purpose is to test if the software fulfils your needs before buying a license. It is fully featured with the following limitations:
- Max 10 scenes.
- You cannot create builds.
Full Version
You can buy a license that suits your needs and download the latest version from here. You will then receive the registration details by email and you can activate your full version under Extras -> Register Editor.

Note: if for any reason the ‘Register editor’ is not showing, edit the Viseditor.ini and delete the line showing RegisteredVersion. You can go directly to the proper folder from here:

5 of 5 users found this section helpful
Project Files
.ved – The project file that holds all the data structure of your project in an XML format. You can also open and edit it with any text editor (only if you know what you are doing!).
.veb – A compressed version of the .ved file. It holds the exact same data but it has much less size. It is not viewable or editable.
You can choose which of the above formats your project file will be in at any time when saving:

.vis – The main output file of your compiled game. It holds all your game’s assets (graphics, sounds etc.)
11 of 11 users found this section helpful
Initial Game Setup
Below you can see the minumum required steps to have a game up and running from a blank project, considering a 3rd person game. For more details in each step you can refer to the relevant section of this guide.
- Add a Scene. The scene needs to have a background image and a way system.
- Add Scene Objects for the character to interact with. Define their interaction polygons, give them a name and set the position for the character to walk to when interacting with them.
- Add a Font for the text to be displayed in game.
- Add the Playable Character and the relevant images. Set his starting position and the font to appear when he talks.
- Add your Cursors and their active/inactive images. You can have the main game cursor, cursor for you actions (Look, Use etc). Set the animation center for each one.
- Setup the Interface of the game. This includes all commands which represent specific actions and use the cursors we have defined above. Don’t forget to assign the interface to the playable character.
- Setup game’s Properties. Set your game’s resolution, the first scene, the playable character.
- Create Actions when interacting with Scene Objects.
- Save and run your game (CTRL+F9).
See below also some more details on how to get everything up and running.
Resources
| Name | Description | Author |
| Creating a Scene from Scratch PDF | Tutorial on the setup of Inventory, check also the Youtube Video | W. Kruger |
| Creating a Scene from Scratch Project Files | Visionaire Files for the tutorial | W. Kruger |
9 of 9 users found this section helpful
config.ini
Visionaire uses a config.ini file to predefine the settings of the started game. The config.ini is created automatically when you build your game and is placed in the same directory as the player. The default config.ini looks like this:
FILE = data.vis
#
# FULLSCREEN = {yes|no}
# yes - starts the game in fullscreen
# no - starts the game in a window
FULLSCREEN = yes
#
# RESOLUTION = {Auto|Desktop|Game}
# Auto - wide-screen support is activated if a wide-screen display is detected
# Desktop - current desktop resolution is used when game is started in full screen mode
# Game - game is initialized with the resolution specified in the game
RESOLUTION = desktop
#
# INTRO = {yes|no}
# yes - Show the intro movie on start-up
# no - Don't show the intro movie
#
# LANGUAGE = {German|English|...}
#
# LOGLEVEL = {Info|Warning|Error}
LOGLEVEL = info
Visionaire checks the config.ini when it runs the game and adjusts the settings accordingly; if you want to change any settings edit config.ini manually before starting the game.
Dynamic Configuration
For a released game with a proper settings screen, you need to write and read from the config.ini dynamically from within the game. The example script below will allow you to do that in a new config.ini file which will be located in the localAppDir of the user. You may adjust as required to suit your game needs. For this particular one you need to create the following conditions/values on a scene:
-
- Conditions cfg_fullscreen, cfg_subs, cfg_speech_timeout
- String values cfg_res, cfg_language
- Integer values cfg_res_x int, cfg_res_y int
-- * local variables * --
local fn = "config.ini" -- store filename
-- * --
-- * fallback * --
local lglvl = "Error" -- default value for log level
local df = "woc.vis" -- filename, should reflect exported .vis file
game.SpeechLanguage = game.StandardLanguage -- default speech language to standard language
-- * tables * --
local t_res = {"Auto","1280x720","1600x900","1920x1080","Desktop"} -- add available resolutions here
local t_lang = game:getLinks(VGameLanguages) -- store all available languages into a table
-- * function used to read data from the config.ini file * --
function read_ini()
local fr = io.open(localAppDir .. fn, "r") -- read from config.ini
-- * --
if fr then -- if file exists then...
lines = fr:read() -- read currently selected line
print("-- * --")
print(fn .. " exists")
print("retrieving settings from " .. fn)
for lines in io.lines(localAppDir .. fn) do
line = string.lower(lines) -- convert all line content to lowercase
line = string.gsub(line, '\r', '') -- 5/12/2020 -> Fix for Mac / Linux. config.ini is printed with "\n" at the end of the lines, so that everything's in its own line. Windows ignores the "\n" part but mac/linux read it as "\r". So when you do if line == whatever in Windows it's if "line" == "line" for the line you're searching (Correct!) while as in mac or linux it does if "line\r" == "line" and thus fails.
if not line:find("#") then -- skip all lines containing "#"
if line:find("file =") then df = string.sub(lines, 8); print("file is currently linked to " .. df) end
-- * window mode * --
if line == "fullscreen = no" then Conditions["cfg_fullscreen"].Value = false; print("window mode is currently set to Windowed") end
if line == "fullscreen = yes" then Conditions["cfg_fullscreen"].Value = true; print("window mode is currently set to Fullscreen") end
-- * resolution * --
for i = 1, #t_res do if line == ("resolution = " .. string.lower( t_res[i] )) then Values["cfg_res"].String = t_res[i]; Values["cfg_res"].Int = i; print("resolution is currently set to " .. Values["cfg_res"].String) end end
-- * subtitles * --
if line == "subtitles = no" then Conditions["cfg_subs"].Value = false; print("subtitles are currently set to Off") end
if line == "subtitles = yes" then Conditions["cfg_subs"].Value = true; print("subtitles are currently set to On") end
-- * text speed * --
if line:find("textspeed =") then print("text speed = " .. game.TextSpeed) end
-- * text language * --
for i = 1, #t_lang do if line == ("textlanguage = " .. string.lower(t_lang[i]:getName() )) then game.StandardLanguage = t_lang[i]; print("text language is currently set to " .. game.StandardLanguage:getName()); Values["cfg_language"].String = t_lang[i]:getName() end end
-- * speech language * --
for i = 1, #t_lang do if line == ("speechlanguage = " .. string.lower( t_lang[i]:getName() )) then game.SpeechLanguage = t_lang[i]; print("spoken language is currently set to " .. game.SpeechLanguage:getName()) end end
-- * speech timeout * --
if line == "speechtimeout = no" then Conditions["cfg_speech_timeout"].Value = false; print("speech timeout is currently set to Off") end
if line == "speechtimeout = yes" then Conditions["cfg_speech_timeout"].Value = true; print("speech timeout is currently set to On") end
-- * log level * --
if line == "loglevel = error" then lglvl = "Error"; print("log level is currently set to Error") end
if line == "loglevel = warning" then lglvl = "Warning"; print("log level is currently set to Warning") end
if line == "loglevel = info" then lglvl = "Info"; print("log level is currently set to Info") end
-- * sound levels * --
if line:find("musicvolume =") then print("music volume = " .. getVolume(eMusicVolume)) end
if line:find("soundvolume =") then print("sound volume = " .. getVolume(eSoundVolume)) end
if line:find("speechvolume =") then print("speech volume = " .. getVolume(eSpeechVolume)) end
if line:find("movievolume =") then print("movie volume = " .. getVolume(eMovieVolume)) end
if line:find("globalvolume =") then print("global volume = " .. getVolume(eGlobalVolume)) end
end
end
fr:close()
print("successfully retrieved settings from " .. fn)
else
print(fn .. " does not exist. Setting defaults")
setVolume(eMusicVolume, 70)
setVolume(eSoundVolume, 75)
setVolume(eSpeechVolume, 75)
Values["cfg_res"].String = "Desktop"
Values["cfg_res_x"].Int = 1920
Values["cfg_res_y"].Int = 1080
Conditions["cfg_subs"].Value = true
Conditions["cfg_speech_timeout"].Value = true
write_ini() -- creating new config.ini
end
end
-- * function used to write data to the config.ini file * --
function write_ini()
local fw = io.open(localAppDir .. fn, "w") -- write to config.ini
print("-- * --")
print("writing new settings to " .. fn)
-- * data file * --
fw:write("File = " .. df .. "\n")
-- * window mode * --
fw:write("#\n")
fw:write("# Fullscreen = {Yes|No}\n")
fw:write("# Yes: starts the game in fullscreen\n")
fw:write("# No: starts the game in a window\n")
fw:write("Fullscreen = ")
if Conditions["cfg_fullscreen"].Value then fw:write("Yes\n") else fw:write("No\n") end
-- * resolution * --
fw:write("#\n")
fw:write("# Resolution = {Auto|Desktop|Custom}\n")
fw:write("# Auto: wide-screen support is activated if a wide-screen display is detected\n")
fw:write("# Desktop: current desktop resolution is used when game is started in full screen mode\n")
fw:write("# Custom: enter a custom value eg: Resolution = 1920x1080\n")
if Conditions["cfg_fullscreen"].Value then fw:write("Resolution = Desktop\n") else fw:write("Resolution = " .. Values["cfg_res"].String .. "\n") end
-- * subtitles * --
fw:write("#\n")
fw:write("# Subtitles = {Yes|No}\n")
fw:write("# Yes: show subtitles during the game, cut scenes & videos\n")
fw:write("# No: do not show subtitles during the game, cutscenes or videos\n")
fw:write("Subtitles = ")
if Conditions["cfg_subs"].Value then fw:write("Yes\n") else fw:write("No\n") end
-- * text speed * --
fw:write("#\n")
fw:write("# TextSpeed = the speed of the displayed text {0-100} \n")
fw:write("TextSpeed = " .. game.TextSpeed .. "\n")
-- * text language * --
fw:write("#\n")
fw:write("# TextLanguage = {English|French|German|Spanish}\n")
fw:write("# this will display subtitles in the specified language\n")
fw:write("TextLanguage = " .. game.StandardLanguage:getName() .. "\n")
-- * speech language * --
fw:write("#\n")
fw:write("# SpeechLanguage = {English|French|German|Spanish}\n")
fw:write("# this will play speech files linked to the specified language\n")
fw:write("# if no speech language is provided then the speech language will default to the standard language\n")
fw:write("SpeechLanguage = " .. game.SpeechLanguage:getName() .. "\n")
-- * speech timeout * --
fw:write("#\n")
fw:write("# SpeechTimeout = {Yes|No}\n")
fw:write("# Yes: always wait for mouse click to continue the dialogue\n")
fw:write("# No: do not wait for mouse click to continue the dialogue\n")
fw:write("SpeechTimeout = ")
if Conditions["cfg_speech_timeout"].Value then fw:write("Yes\n") else fw:write("No\n") end
-- * log level * --
fw:write("#\n")
fw:write("# LogLevel = {Info|Warning|Error}\n")
fw:write("LogLevel = " .. lglvl .. "\n")
-- * volume settings * --
fw:write("#\n")
fw:write("# MusicVolume|SoundVolume|SpeechVolume|MovieVolume|GlobalVolume = int value {0-100}\n")
fw:write("MusicVolume = " .. getVolume(eMusicVolume) .. "\n")
fw:write("SoundVolume = " .. getVolume(eSoundVolume) .. "\n")
fw:write("SpeechVolume = " .. getVolume(eSpeechVolume) .. "\n")
fw:write("MovieVolume = " .. getVolume(eMovieVolume) .. "\n")
fw:write("GlobalVolume = " .. getVolume(eGlobalVolume) .. "\n")
print("new settings successfully written to " .. fn)
fw:close()
end
The main two functions of the above script are:
-
- read_ini() – used to read data from the config.ini and update your game’s relevant settings at startup. Call it inside an execute script action in your game’s Start Action.
- write_ini() – used to write data to the config.ini. To use this just create a condition cfg_update (default false) and set it to true any time the player adjusts a setting. Now in your settings screen, create an ‘At end of scene’ action with the following Execute Script action:
if Conditions["cfg_update"].Value then Conditions["cfg_update"].Value = false write_ini() end
If for any reason you need to delete the config.ini file at some point you can do so with:
os.remove(localAppDir .. "/config.ini")
4 of 4 users found this section helpful
Resolution Handling
Setting the game’s resolution
One of the first (and most important!) things you need to do is to set the resolution of your game through the game properties:

This will be the default resolution of your game, and normally it should match your graphics resolution.
You can get the current resolution using getProperty(“display_resolution”) which returns the rectangle that is drawn in (excluding any black borders):
local resx = getProperty("display_resolution").width
local resy = getProperty("display_resolution").height
Adjusting the window size
For window modes, you may adjust the screen size on the fly with Lua:
local ScreenMultiplicator = 6; // let's say we want to make the window 6 times bigger
setWindowSize({x = 320 * ScreenMultiplicator, y = 200 * ScreenMultiplicator})
Pixel Art Games
By default, Visionaire uses Linear interpolation for the graphics output which is more suitable for higher resolution games. If you are using pixel art though and want to keep the crispiness, you need to change to Nearest Neighbor interpolation by activating the pixel effect in game properties:

7 of 7 users found this section helpful
Text Handling
Using Values and Strings in Display Texts
- Integer values: <vi=valuename>
- String values: <vs=valuename>
Text Pauses
You can control how long a text will be displayed for by using <p> tags after the text as follows:
Wait until left mouse button is clicked to continue <p> Continue after 2500 milliseconds (ms) <p2500ms> Continue after 2.5 seconds (s) <p2.5s> or <p2.5> Wait until linked speech file has finished playing <pa> Wait until linked speech file has finished playing (with fallback time (in ms) if media file is missing or corrupted <pa2500ms> Automatic pause <pt> (character count * 130ms * VGameTextSpeed%)
Adjusting Text Speed
By default the display time of a text depends on the number of characters. Internally Visionaire waits for 130ms per char. So if the current text has 30 chars (including blanks, etc) it will display for 30 x 130 = 3900 ms. You can adjust this time as follows:
game.TextSpeed = 100 -- default value (in %), lowering it will slow text down.
Wait for Click to Skip Text
By implementing the textStarted event handler you have a faster way to make all your game’s text skippable only with a click and not depending on any display time:
function sText(text)
if Conditions["manual_skip_text"].Value then -- create the 'manual_skip_text' condition somewhere in your game.
text.TimeToWait = -1 -- this adjusts the total time (in msec) for showing current text. Setting this to -1 waits indefinitely for a click.
text.WaitForAudio = false -- it ignored any linked audio file
end
end
registerEventHandler("textStarted", "sText") -- event handler for begin text
Intercepting and Changing Text on the Fly
We can use a hook function to listen for texts at runtime and replacing them (by returning a different text):
function textFunc(obj)
if obj.CurrentText == "abc" then
return "def"
end
return obj.CurrentText
end
registerHookFunction("textText", "textFunc")
5 of 5 users found this section helpful
Scenes
Query name of scene
Wrap in If lua action part:
return game.CurrentScene == Scenes["101_river"]
Check if the name of the scene contains specific string
Good for filtering scenes!
if string.match(game.CurrentScene:getName(), "minigame") then ... end
Check if a scene is a Menu
game.CurrentScene.SceneIsMenu
1 of 1 users found this section helpful
Adding a Scene
To add a new scene, from the top toolbar:

Choose ‘Scene’ and enter a name.
Add a background by accessing scene’s properties:

5 of 5 users found this section helpful
Scene Transitions
There are a couple of ways to change a scene, and they are quite straightforward using action parts.
1. Change to a new scene, relocate the character
Use the ‘Change scene’ action part. This will position the character to a specific object of another scene, align him as we need and change to this scene:

2. Change to a new scene of a specific character
We can change to a scene of any character we want using the ‘Change to scene of a character’ action part. Changing to current character can be useful also when returning to the game from a menu scene for example.

3. Show a scene or menu, without any character relocation
If we don’t need or want the character to be relocated at the time of scene change, we can just show a scene with the ‘Show scene/menu’ action part. We can relocate him manually later if we need. This action part can also show menus.

In all above action parts, you can define how the transition will be made:
-
- Immediately show scene/menu. This will change to the scene/menu without any transition effect.
- Fade to scene/menu. This will use a transition effect during the change.
Change the transition effect
For transition effects, the ‘Fade out and fade in’ effect is used by default. If we want a different effect, we can choose one using the ‘Set fade effect to new scene’ action part. We can also define the duration of the effect:

or with Lua:
game.FadeEffect = eShiftUp
There is a variety of fade effects to choose from:
-
- Fade in
- Fade out
- Fade out and fade in
- Fade to new scene
- Shift left
- Shift right
- Shift up
- Shift down
- Tunnel effect
- Fade with shader
Especially for the tunnel effect, you can adjust how it looks with lua:
game.FadeCenter = {x=300,y=200} -- The position of the center of the circle when you fade out the scene
game.FadeInCenter = {x=600,y=700} -- The position of the center of the circle when you fade in the scene
game.FadeRadius = 200 -- You can have a nice blur effect around the circle center, define the radius here
Note: the change in the fade effect will remain until you change it again.
You may also check the below tutorial for more info.
Resources
| Name | Description | Author |
| Scene Transitions PDF | Tutorial on the Scene Transitions, check also the Youtube Video Part | W. Kruger |
| Scene Transitions Project Files | Visionaire Files for the tutorial | W. Kruger |
2 of 2 users found this section helpful
Way Systems
Way Systems tell the engine where the character is allowed to walk in the scene and how the scaling works as he moves around. To create a new way system for a scene:

You can assign a default way system to a scene through its properties.
Multiple Way Systems
You can use multiple way systems in a scene. This can useful in cases when you the way system of a system is modified, very common for example when doors open to reveal new areas. You can change the currently used way system with the relevant action part:

Each way system consists of way borders and way points, so let’s define them also.
Way borders
Way borders define the walkable area in the scene; any character cannot walk outside this area.
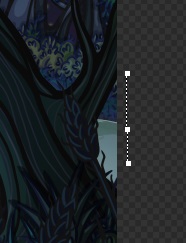
You define a way border by creating points; you’ll notice that your cursor will change to ![]() when you hover over the scene. Make sure you close the way border by moving the cursor over the first way point. Cursor will change to
when you hover over the scene. Make sure you close the way border by moving the cursor over the first way point. Cursor will change to  , click and you have your way border. Alternatively, you can close a way border by right clicking while you drag a way border point.

Things to note:
-
- To delete a way border point, select it and press Delete key.
- To deselect a way border point, Right click outside it.
- To move a way border point, select it and drag it with the mouse.
- To move a whole way border, hover the mouse over it, hold CTRL key, click the Left mouse button and drag it.
- You can make straight way border lines, by holding SHIFT key when positioning your point.
You can also combine all overlapping areas of the current way system by using the relevant button in the scene toolbar:
There are times when you need to create non-walkable areas inside your way border, generally due to an obstacle, so that the character will walk around it and not through it. In such cases, you need to make another way border inside the original one. Just hover the mouse over the original way border and press ALT key; this will allow you to start a new way border inside the original one:
Way points
Way points serve as pathfinding when our character moves. They must be inside the way border and connected with each other.

Things to note:
-
- To delete a way point, select it and press Delete key.
- To deselect a way point, Right click outside it.
- To connect or disconnect 2 way points, Left click on the 1st way point and then Right click on the 2nd point. This will draw a line between these two points or delete it if already exists.
- To move a waypoint, select it and drag it with the mouse.
- You can also select and move multiple way points at the same time by holding the left mouse button to create a red rectangle over the way points you want.
Generally, a spider web type approach is recommended when creating way paths; try to keep the way paths as simple as possible as the engine will most of the time determine its own path.
Character scaling
Apart from the pathfinding, way points are needed to define the character scale as he walks around the scene. You can actually define the % of the character size in any way point you select (100% = the default size, -1 = do not scale). You may also select a character to preview his actual size in the scene.
Most of the times, scaling only on the y-axis is needed. In this case, it’s a good practice, instead of setting the character scale in various way points in the scene, to keep all the way points scale to -1 and to make a separate vertical waypoint system outside of the way border to keep it cleaner and easier to maintain:
Tip: Hold down the middle mouse button while over the scene preview to drag around and reposition the scene and add waypoints (or way borders) outside its boundaries.
Store / Restore Destinations
There might be times when you need to store the character destination, do something and then restore it; you can do the following use the ‘Execute a Script’ action part:
Store the destination in a table:
t_dest =
{
dest = game.CurrentCharacter.Destination, -- Destination where the character is currently walking to.
obj = game.CurrentCharacter.DestinationObject, -- Scene object the character is currently walking to. The character will be aligned to the scene object when it is reached.
cmd = game.DestinationCommand, -- This command will be executed when the object is reached
evt = game.DestinationEvent, -- This event will be executed when the object is reached (0 = no event, 1 = left mousebutton click, 2 = right mousebutton click, 3 = left mousebutton double click, 4 = left mousebutton hold, 5 = mouse enters area, 6 = mouse leaves area)
itm = game.DestinationItem, -- This item will be used (dropped) on the object when it is reached
itm_picked = game.DestinationItemPicked -- This will be set to true in case an item was picked up (dragged) and game.DestinationItem will be executed
}
Restore the destination:
game.CurrentCharacter.Destination = t_dest["dest"] game.CurrentCharacter.DestinationObject = t_dest["obj"] game.DestinationCommand = t_dest["cmd"] game.DestinationEvent = t_dest["evt"] game.DestinationItem = t_dest["itm"] game.DestinationItemPicked = t_dest["itm_picked"]
5 of 5 users found this section helpful
Action Areas
Action areas are sections you can draw in and can be used to determine if the engine should perform some actions when the specified – or any – character walks into or out of the action area. You can consider them as triggers. A few example uses:
- Changing footstep walking sound type
- Triggering specific events
- Changing between way systems if you needed to split the scene up into multiple way systems for some reason.
You can create one or more action areas in a scene similarly to Way Borders:
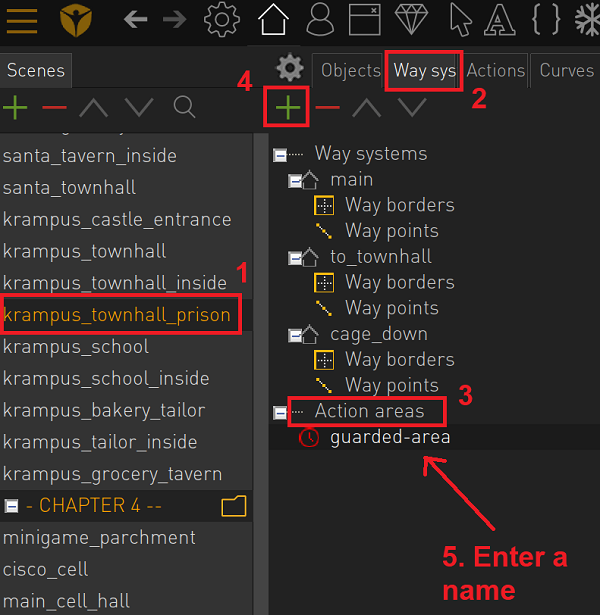
Next step is to draw the action areas. We have to create closed polygons, within which our actions will be triggered (or not)
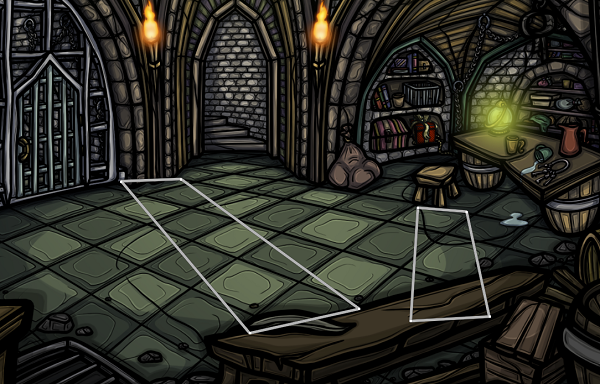
Final step is to define the relevant actions to be triggered:
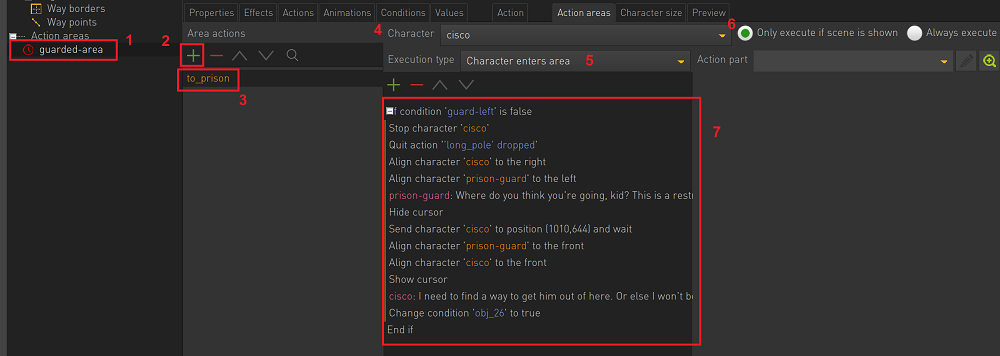
- Click on the action area you want to edit
- Add a new set of actions for this area.
- Enter a name for this set of actions.
- Set which character triggers the action area. You can also choose ‘any’ character.
- Set whether the action area will be triggered upon entering or exiting.
- Set whether this action area will be triggered only when the scene is shown or always.
- Add your action parts as always!
Action Area Event Handler
You may also register an event handler to listen out for any triggers:
function onActionArea(movement, actionArea, character)
if movement == "ENTER" then
-- do something
elseif movement == "LEAVE" then
-- do something else
end
end
registerEventHandler("actionArea", "onActionArea")
Tip: actionArea == ActionAreas[“example”] (ActionAreas is a table)
2 of 2 users found this section helpful
Meanwhile Cutscenes
There are a few possible ways to display a ‘Meanwhile’ message as per Lucasarts style. The easiest one:
-
- Make a new scene with a black (or any other color you like) background.
- When needed, use ‘Show scene/menu’ action part to show the black scene.
- Use ‘Display narration text’ with your meanwhile message.
Another option would be to fade the scene brightness instead of using a black background, using the to() tweening function:
game.CurrentScene:to(500, {SceneBrightness = 0}, easeQuintOut) -- easing is optional
2 of 2 users found this section helpful
Scrolling
Visionaire offers scrolling effects for your scenes that are larger than the viewable area along with the possibility to adjust various settings.
Adjust the scroll speed
The basic setting for the scroll speed of your scenes (in pixels / sec) is done through Game Properties:

For a more dynamic adjustment, e.g. if you need to adjust this setting during gameplay, you can use lua as follows:
game.ScrollSpeed = 300 -- scroll by 300 pixels a second
Snap the scroll position of a scene
You can move the camera at any point (this will be top left corner of the camera view) of your current scene using the relevant action part:

or with Lua:
game.ScrollPosition = {x = 300, y = 200} -- important note: x, y is the top left corner of the scroll position!
You can also snap the camera position to a specific object with the relevant action part:

Wait until scrolling finishes
Sometimes you need to wait for scrolling to finish before letting some actions continue. You can achieve this by detecting if the position of game.ScrollPosition changed over the last frame in a main loop: (set as definition script)
local lastScrollPosX = 0
function scrolling()
if lastScrollPosX ~= game.ScrollPosition.x then
Conditions["scrolling"].Value = true -- create a condition 'scrolling' somewhere
lastScrollPosX = game.ScrollPosition.x
else
Conditions["scrolling"].Value = false
end
end
registerEventHandler("mainLoop","scrolling")
You can now use the action part ‘Wait until ‘scrolling’ is false to control your actions flow.
Smooth Scrolling
To start the scrolling smoother (i.e. in the beginning and end of the scrolling), from the Game Properties:

Adjust scrolling triggering by the character
Visionaire uses bounding boxes at the scene edges to monitor when the character goes over them so that the scrolling can be started. These bounding boxes can be adjusted for both the horizontal and vertical axis using the relevant action parts:


Alternatively, with Lua:
game.HorizontalScrollDistance = 300 -- scroll on X axis when character is 300 pixels or less from scene edge (left or right) game.VerticalScrollDistance = 150 -- scroll on Y axis when character is 150 pixels or less from scene edge (up or down)
For example, to keep the character always at the center of the screen when scrolling horizontally, you can use:
game.HorizontalScrollDistance = game.WindowResolution.x / 2 -- always using 50% of the current window width size
Scroll Scene with the Mouse
By default, you cannot make a scene scroll by hovering the mouse over its edges, but you can enable this in the scene’s properties:

Alternatively, with Lua:
game.CurrentScene.ScrollOnEdges = true
Using Lua, you can also adjust the bounding box size which will trigger the scroll when you hover the mouse over it:
game.CursorHorizontalScrollDistance = 50 -- scroll on X axis when cursor is 50 pixels or less from scene edge (left or right) game.CursorVerticalScrollDistance = 200 -- scroll on Y axis when cursor is 200 pixels or less from scene edge (up or down)
Limit Scrollable Area
By default, a scene can be scrolled from edge to edge. You can limit this by defining a specific rectangle for the scrollable area:
game.CurrentScene.ScrollableArea = {0, 0, 1920, 1080} -- {x, y, width, height}
Parallax Scrolling
Apart from the scene’s background which always scrolls in the defined scrolling speed, you can set independent scrolling speed for objects to give a nice parallax scrolling effect. This can be applied to any scene object via its effects tab for both axis x and y:

100% will use the defined scene scroll speed while any value <100% will make it slower and 0% will stop it. You can also use Lua to adjust these:
Objects["table"].ScrollFactorX = 50 Objects["table"].ScrollFactorY = 100
2 of 2 users found this section helpful
Curves
There are 3 types of curves:
-
- Curve
- Continuous Curve
- Curve via control points
Note: the first point of the curve is the starting point (also for the continuous curve)
With Tween Curves you can move a particle system (through an object) on a curve and rotate, or make non-linear animations like flying/swooping bird or wave motion etc.
Step 1 – Create a Curve in a specific scene. Each curve has an index: 1,2,3…
Example 1 – Move a Particle System (through an object)
Step 2.1 – Create a scene object & call it e.g. “moving”
Step 3.1 – Create a particle & link it to the scene object.
Now let’s write a tween loop to make it move around the curve we have created:
startCallBackTween(duration, function(position) --code-- end, easing, loop, pendulum)
duration: the time needed to complete 1 loop
loop: true = infinite loops, false = 1 loop only
pendulum: if loop = true, it will reverse direction each next loop
startCallbackTween(30000, function(x) -- starts loop function that lasts for x time
local pos = game.CurrentScene.Curves[3]:curveAt(x) -- gets current position of linked curve
local direction = game.CurrentScene.Curves[3]:curveDirection(x) - 1.57 -- gets the current direction based on position of curve in the curve
local p = graphics.getParticles(game.CurrentScene.Objects.moving) -- gets the particle belonging to the scene object ["moving"]
p.emissionDirection = {0.0, direction, 0.0, direction} -- updates the angle of the particle
p.center = {pos.x,pos.y} -- updates the position of the particle
end, easeLinearIn, true, false)
Example 2 (Move Animation)
startCallbackTween(30000, function(x)
local pos = game.CurrentScene.Curves[3]:curveAt(x)
local direction = game.CurrentScene.Curves[3]:curveDirection(x) - 1.57
ActiveAnimations["animation_name"].AnimationCurrentPosition = {x = pos.x, y = pos.y}
end, easeLinearIn, true, false)
You can create curves in each scene. ‘Curves’ is a linklist; you can access a specific curve in the list using the index, in the above example 3.
The curve object has 3 functions:
curveAt(x) -> position
curveDirection(x) -> degree (rad direction)
curveDerivative(x) -> vector pointing in the direction (tangent)
How to stop curve
If the function(x) returns false, then the startCallbackTween() will stop. Taking into consideration that if you exit a scene that has curves used for animation you will get an error as it will not be able to find the curve or the active animations anymore, use the following format:
startCallbackTween(duration, function(x) if game.CurrentScene == Scenes["Scene that the curves/anims live"] then -- do your stuff else return false end -- it will kill the loop in any other scene (returns false) end, easeLinearIn, true, false)
3 of 3 users found this section helpful
Lightmaps
Lightmaps allow characters and objects to change brightness or tinting depending on where they are located in the scene so that they follow the light sources in the scene.
Lightmaps maps work based on character / object positions in the scene. Basically the engine:
-
- Checks if a lightmap is assigned to the scene.
- Checks the position of the character or object against the lightmap.
- Tints the character or object based on the color found at the pixel coordinates of where the character or object is.
Notes:
-
- The entire character or object is tinted.
- Lightmaps only affect the tint of the characters or objects. If you want one to affect the entire scene you could add them as images inside of scene objects.
- It’s advisable to add feathering as it allows the character or the object tint to smoothly change from one tint to another.
Especially for objects, you can control which objects will be affected by the lightmap and which not:
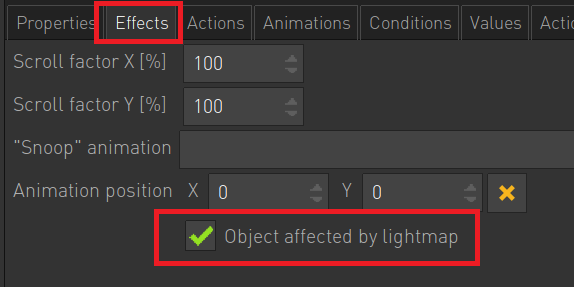
or with Lua:
Objects["apple"].LightmapAffected = true
Lightmaps are the easiest way to apply tinting, nevertheless you can also use Lua:
Characters["Dragon"].Tint = 0xFF0000 -- format used by Visionaire is 0xBGR (BBGGRR) so this will tint the character blue
Alternatively you could use shaders to directly apply lighting to your scenes which would affect things in a more dynamic way.
You may check the tutorial below for more info.
Resources
| Name | Description | Ver. | Author |
| Lightmap Tutorial PDF | Tutorial on the use of lightmaps, check also the Youtube Video | 1.0 | W. Kruger |
| Lightmap Tutorial Project Files | Visionaire Files for the tutorial | 1.0 | W. Kruger |
2 of 2 users found this section helpful
Earthquake Effect
A nice built in effect to use in your game is the earthquake effect, to simulate such events in your game. You may do so with the ‘Start/Stop earthquake’ action part:

You can control how intense and fast the motion will be. Alternatively, you can use Lua to have even more control, as you have the option to define different forces at x,y axes respectively:
game.Quake = true -- true to start the earthquake, false to stop it game.QuakeForceX = 0 -- force at x axis game.QuakeForceY = 5 -- force at y axis game.QuakeSpeed = 5 -- speed
1 of 1 users found this section helpful
1st Person Perspective
Creating 1st person, myst-like and puzzle games in Visionaire is easy and can be done in a couple of ways, feel free to check below examples for more information.
Resources
| Name | Description | Ver. | Author |
| Zepellin 1st person Template | 1st person template. (Youtube Tutorial) | 1.1 | nigec |
| Handyman 1st person Template | Another 1st person template featuring turning animations/videos. | 1.0 | nigec |
| Sceneception | Grid based scenes technique for 1st person view. (Tutorial) | 1.0 | AFRLme |
1 of 1 users found this section helpful
Objects
Object Graphics and Display Order
Scene objects (only applies to regular scenes) need to be sorted based on their object center value (z-index) otherwise random bugs can occur. In most cases most of the time scene objects’ object center should be set as -1 to always be drawn below characters or should be set to whatever the height of the scene is to always be drawn in front of the character. The only time you should need to use a unique value is for when characters should be allowed to drawn in front & behind of a scene object based on where the character is currently positioned in the scene.
quick tip #1: on the toolbar above the scene object list is a button with 2 green arrows that face up & down. Click on this to auto sort the scene object list based on the current object center value of each scene object. All scene objects that contain the same value will be grouped together but retain their order in the list.
quick tip #2: open up the visionaire studio editor options, navigate to settings & untick set object center automatically to prevent the editor from automatically changing the object center of a scene object whenever you drag around the image/animation belonging to the object.
See below some more info the subject.
Resources
| Name | Description | Author |
| Object Graphics and Layering PDF | Tutorial on the setup of Objects’ Graphics, check also the Youtube Video Part 1 , Youtube Video Part 2 | W. Kruger |
| Object Graphics and Layering Project Files | Visionaire Files for the tutorial | W. Kruger |
Get the VS object name (left column of objects in scene)
game.CurrentObject:getName() -- For object under cursor game.SavedObject:getName() -- For saved object game.UsedItem:getName() -- For the item at hand
Get the object name as it appears in game
game.CurrentObject:getTextStr(VObjectName)) game.SavedObject:getTextStr(VObjectName))
Change the name of the object as it appears in game
game.CurrentScene.Objects["obj"]:setTextStr(VObjectName, "string")
Note: if you want to change it in all languages you need to do a for loop through all languages.
Check if a string value is not empty (zero length)
string.len(game.CurrentObject:getTextStr(VObjectName)) ~= 0
How to clear/unlink an object value?
Using the ‘emptyObject’, e.g.:
Characters["Tom"].FollowCharacter = emptyObject
Item at hand
The currently used item, either with the ‘Set item’ action part or dragged item:
game.UsedItem
Hide an Object
Objects["bottle"].Visibility = 0
Note: it hides only the image, not the interaction polygon.
Get the Sprite position of an object
Objects["name"].Sprite.Sprite -- holds a table with information about the sprite path, position , etc
Get the position of the sprite
Objects["name"].Sprite.Sprite:getPosition().y -- for the y-axis position
Move or Check if an object has moved to another position (x,y)
game.CurrentScene.Objects[“key”].ObjectOffset
1 of 1 users found this section helpful
Object Areas
All the object areas are made of polygons which are defined by points. Practically polygons are a collection of points which are joined together. An object can have multiple polygons.
You can also access the points of an object’s polygon with Lua:
for i = 1, #Objects["big-door"].Polygon do print(i,Objects["big-door"].Polygon[i].x,Objects["big-door"].Polygon[i].y) end
1 of 1 users found this section helpful
Object Animations
Animations can be attached to objects and this can make your scenes look so much livelier. Check the tutorial below so see how to achieve this efficiently.
Resources
| Name | Description | Author |
| Object Animations PDF | Tutorial on the Object Animations, check also the Youtube Video Part | W. Kruger |
| Object Animations Project Files | Visionaire Files for the tutorial | W. Kruger |
1 of 1 users found this section helpful
Duplicate Objects
You can create a new object from an existing one:
local obj = game.CurrentScene.Objects.["table"]:duplicate("duplTable") -- duplicate object is created and then stored into a variable
You can delete this new object with:
obj:remove()
1 of 1 users found this section helpful
Setting up a Menu
Visionaire offers two kinds of building elements for your Scenes:
- ‘Scenes’ which are practically used for your gameplay areas and in which the characters ‘live’, and
- ‘Menus’ which are used to build Main, Save/Load, Options Menus etc, as well as other in game scenes where the characters do not exist. (e.g. you could make for example a Map Scene as a Menu)
To make a Main Menu in Visionaire is not hard, but menus are most of the time a tedious process with all the buttons and such. You may download a template below for a Main Menu to get you started and inspired.
Resources
| Name | Description | Ver. | Author |
| Main Menu Template | A fully functional Main Menu template for Visionaire 5+. | 1.1 | Esmeralda |
Checking if a scene is a menu
game.CurrentScene.IsMenu
2 of 2 users found this section helpful
New Game Button
The best way for having a new game functionality is to create an autosave the first time you launch a new game (e.g. just before your intro starts). Then every time you click the ‘New Button’ you can query if the autosave exists, if it does then load that; if it doesn’t then create it. Note: You have to be on a regular scene not a menu scene type for autosave to work. As a good practice, use autosave #1 only for your new game functionality.
So for example in your New Game button add the following actions:
If autosave #1 exists Load autosave #1 Else Show scene 'Intro' Εnd if
Now when your intro starts, at the beginning of scene just include at the very top:
If condition '1st-play' is true Change condition '1st-play' to false Pause for 1 second Execute autosave End if
Above we have created the ‘1st-play’ condition which is true by default because we want to create the autosave at the very first play. Note also that we added 1 second pause before executing the autosave to allow the scene to fully load first.
You could also try using the Lua replaceGame() function when you click on the ‘New Button’ but it restarts the game from the very beginning like you have just launched it.
replaceGame("data.vis")
Replace “data” with whatever you called the vis file when you export/compile the game. For testing via Visionaire Studio editor just enter your project’s ved or veb file instead.
Also note that old save files cause conflict issues when you have added new content/data to your game since it was created. While you are working on your game it is a good practice to check if an autosave exists and delete it. This will generate a fresh autosave each time you launch the game.
If autosave #1 exists Delete autosave #1 End if
3 of 3 users found this section helpful
Save / Load Menu
Creating an effective Save/Load menu is essential for any game; the process in Visionaire is quite straightforward, downlad below the necessary information to get you started.
Resources
| Name | Description | Ver. | Author |
| Save/Load Menu Template | A fully functional Save / Load Menu template for Visionaire 5+. | 1.1 | Esmeralda |
| Save/Load Menu Template Tutorial | PDF Tutorial to create a fully functional Save / Load Menu for your game. | 1.1 | Esmeralda, Einzelkämpfer |
1 of 1 users found this section helpful
Characters
Positioning of a character in a scene
To position the character above an object in a scene, you must set a YChar in the scene as follows:
YChar > YObjCenter [r], where YChar = YChar Actual + YAnim Center
So you basically need to set the YAnimCenter = YChar – YCharActual
Example: I want to place a character with YActual = 344 above an object with YAnim Center = 650, therefore I set YChar = 651, which means than i have to change YAnimCenter = 651 – 344 = 307
To be able to work with characters, the first thing to do is to retrieve their object and store it in a variable.
Get current character object
local cisco = game:getLink(VGameCurrentCharacter)
Get any character object
local kosmos = getObject("Characters[kosmos]")
Now, you can do anything with your character.
Get the position (x,y) of a character
local pos = cisco:getPoint(VCharacterPosition)
Set the position (x,y) of a character
kosmos:setValue(VCharacterPosition, {x = pos.x, y = pos.y})
Get the Direction of a character
local direction = cisco:getInt(VCharacterDirection)
Set the Direction of a character
cisco:setValue(VCharacterDirection, 0) Characters["Cisco"].Direction = 0 --shorthand game.CurrentCharacter.Direction = 0 -- for current character
Note: 0 = right, 90 = top, 180 = left, 270 = bottom
Hide/Show a character
Characters["cisco"].CharacterActive = false / true
Set the size of a character
Characters["unicorn"].Size = 50 -- in %
Disable character scaling
Characters["franco"].Size = 100 -- First set him to 100% Characters["franco"].CharacterScale = false
Disable Interaction during animation state of the current Character
You can do this from the game properties but it is possible with lua also
game.DisableInteractionDuringAnim = eDisableInteractionAlways
Possible options:
-
- eDisableInteractionAlways 2
- eDisableInteractionCharacterAnim 1
- eDisableInteractionNever 0
Get the animation state of a Char
You can actually listen to the animation state of a char by using the following
game.CurrentCharacter.AnimState
Where AnimState can be:
eCharacterAnim 4
eStandingAnim 3
eTalkAnim 2
eWalkAnim 1
eNoAnim 0
eRandomAnim 5
Example
if Characters["grocery-elf"].AnimState == 2 -- (or == eTalkAnim) then -- do something end
So for example, you want to check when a character is talking, possible options:
-
- Use a mainLoop to listen out for animation state change.
- textStarted & texts linked to characters
- Insert a play animation action part into the first frame of each of your talk animations. There is also a ‘Wait until a character stops speaking’ action part.
- Use the action part hook:
local SHOW_TEXT = 23
system.registerActionPartHook(SHOW_TEXT, "charTalk")
function charTalk(actionPart)
if actionPart.Link:getName() == "Tom" then
-- do something
end
end
Prevent Character from Moving
game.LeftClickBehaviour = eMouseActionBehaviourDoNotSendCharacter -- Disable left click from updating/setting destination game.LeftClickBehaviour = eMouseActionBehaviourSendCharacterToCursor -- Enable left click update/set destination
Character talking and walking
Switch to an outfit where the character’s face/mouth isn’t drawn on. Create a secondary character that has the same canvas height & character center position as the actual character but only contains the face/mouth. Use a script to make sure that the position & alignment of the actual and the secondary characters match. Secondary character to do the talking.
Alternative Option (no lip sync is possible in this case though)
Switch to an outfit where the character also includes a talk animation with the walk animations. Set the spoken text as background (text can move with moving char)
Access current character animation
graphics.getCurrentAnimation(char)
Empty the inventory of a character
1 of 1 users found this section helpful
Character Texts
You can control what happens when a character text starts or stops by registering textStarted / textStopped event handlers:
function txtStart(text) -- this function handles actions when the char text starts
local owner = text:getLink(VTextOwner)
if owner:getId().tableId == eCharacters and owner:getName() == 'cisco' then
-- start any actions here
end
end
function txtEnd(text) -- this function handles actions when the char text finishes
local owner = text:getLink(VTextOwner)
if owner:getId().tableId == eCharacters and owner:getName() == 'cisco' then
-- start any actions here
end
end
-- * initialize text event handlers * --
registerEventHandler("textStarted", "txtStart")
registerEventHandler("textStopped", "txtEnd")
Getting the text position of the character talking:
graphics.getCharacterTextPosition(Characters["dad"])
0 of 0 users found this section helpful
Speech Bubbles
By default, Visionaire shows the spoken text of the characters in a plain fashion, just the text. It’s possible though to create a speech bubble effect, where the spoken text is enclosed in bubble which adjusts its size automatically depending on the text length.

A nice tutorial and demo to assist you in creating your speech bubbles can be downloaded below, instructions are included.
Resources
| Name | Description | Ver. | Author |
| Speech Bubbles Demo | A demo implementation of Speech Bubbles for Visionaire 5+ | 2.1.4.1 | The Argonauts |
| Speech Bubbles Tutorial | PDF Tutorial for the speech bubbles demo. | – | Einzelkämpfer |
2 of 2 users found this section helpful
Dialogs
What an adventure game would be without dialogs? Visionaire provides a system for interacting with NPCs and create dialogs for them, as well as for the playable character. See below some useful tutorials with more info.
Resources
| Name | Description | Author |
| Dialogs Basic PDF | Tutorial on the use of the Dialog System, check also the Youtube Video | W. Kruger |
| Dialogs Basic Project Files | Visionaire Files for the tutorial | W. Kruger |
There are always some more tricks we can use as well as the possibility to manipulate the dialog system from our scripts with Lua:
Start a dialog or a dialog layer
Use the relevant ‘Start dialog/dialog-layer’ action part.

To start a dialog from the beginning (i.e. 1st layer or super layer), choose one under ‘Characters’

You can also start a specific dialog layer/part (these are the ones that have children dialogue options) by choosing ‘Dialog Parts’.

Use a Dialog Part only once
You can have a dialog part to be selected only one time and then to be removed:

The limitation to the above is that you can only delete the dialog part being selected at a time. If you want to delete a dialog part from any other place, you need to do it with LUA, e.g.:
Characters["townhall-elf-right"].Dialogs.townhall.DialogParts[4].DialogPartAvailable = false -- this will remove the dialog part with ID 4
Access Dialog Parts
You can loop through the dialog if you want; you can access them by directly by name:
Characters.Daniel.Dialogs.feueralarm.DialogParts["1.Test"]
Generally, if you have unique texts/naming you can search them directly:
DialogParts["1.Test"]
or via table/Array number:
Characters[1].Dialogs[1].DialogParts[1]
Checking for availability:
Characters[1].Dialogs[1].DialogParts[1].Available == true
Disable a dialog option
Sometimes you want to disable a dialog option and not delete it, e.g. for testing. Just set False to an empty condition:

Switch to 1st dialog level
The dialog options allow you to switch to the previous dialog level but not the first one. To achieve this, just use the execute action and restart the dialog by adding a Start Dialog action part.
Greyed-out Dialog Options
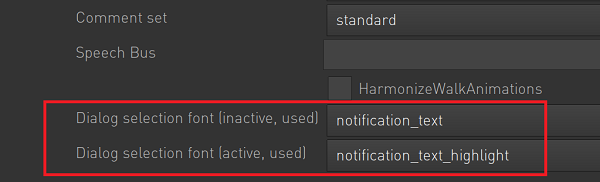
It is possible to make dialog options that have already been chosen/used by the player to stand out, e.g. greyed-out etc. You can have different active/inactive fonts for these but adjusting the relevant option under Character’s Properties Tab:
You can also change the status of a dialog option to used or not with Lua (useful when you want to have full control over this, e.g. in nested or quit dialog options):
DialogParts["10. I'm going back to bed now."].Used = false // it will reset this back to non-used option
More Control over the Selection of Dialog Parts
With Lua you have some more control over which dialog parts can be selected which might be useful for example when you want to control this with keyboard or gamepad:
system.dialogScrollPosition = 0 -- it detects/sets the scroll position of the dialog system.dialogActiveOption = 0 -- it detects/sets the currently hovered dialog option system.dialogSelect() -- it selects the current dialogActiveOption (so make sure you set system.dialogActiveOption first)
1 of 1 users found this section helpful
Outfits
Your character can take on different appearances throughout the game and each of these different appearances we call an ‘Outfit’. So outfits are different appearances that your character will be represented as. As a practical example, imagine a puzzle where you need to wear a disguise or wear a different set of clothes. These will be additional outfits that your character will wear.
See below some useful tutorials with more info.
Resources
| Name | Description | Author |
| Character Outfits PDF | Tutorial on the use of Character Outfits, check also the Youtube Video | W. Kruger |
| Character Outfits Project Files | Visionaire Files for the tutorial | W. Kruger |
For more advanced manipulation of outfits, you can use Lua as always:
Query the Outfit of a Character
if game.CurrentCharacter.CurrentOutfit == Outfits["sad"] then ... end if Characters["potion-man"].CurrentOutfit == Outfits["tied"] then ... end
Play a Character Animation
startAnimation(game.CurrentCharacter.CurrentOutfit.OutfitCharacterAnimations["cisco_kosmos_appear_right"]) startAnimation(Characters["cisco"].Outfits["normal"].OutfitCharacterAnimations["cisco_kosmos_appear_right"])
Set Character Speed
game.CurrentCharacter.CurrentOutfit.OutfitCharacterSpeed = 400
Random Animations
Played whenever a character is idle (i.e. doesn’t move and no animation is played) for a certain period (between 10 and 30 seconds). The animation, which is going to be played, is chosen by chance. Note: Random animations do not play also when there is text displayed on screen and a dialog is active.
You can change above times with Lua:
Characters["cisco"].CurrentOutfit.RandomMinTime = 1500 Characters["cisco"].Outfits["Surprised"].RandomMinTime = 1500 -- choose a specific outfit -- Changing the random times for all character's outfits for i = 1, #Characters["cisco"].Outfits do Characters["cisco"].Outfits[i].RandomMinTime = 1500 Characters["cisco"].Outfits[i].RandomMaxTime = 5000 end
1 of 1 users found this section helpful
NPCs
NPC (Non-playable Character) setup and placement in the Scene is a straightforward process. See below some useful tutorials with more info.
Resources
| Name | Description | Author |
| NPCs PDF | Tutorial on the setup of NPCs, check also the Youtube Video | W. Kruger |
| NPCs Project Files | Visionaire Files for the tutorial | W. Kruger |
1 of 1 users found this section helpful
Frame Animations
When we talk about character animation, we simply mean animations that play when the character walks, talks or interacts with objects in the game world. Visionaire handles animations basically as frame animations, i.e. animations that consist of a sequence of images. See below tutorial for more info on the topic:
Resources
| Name | Description | Author |
| Character Animations PDF | Tutorial on the Character Animations, check also the Youtube Video Part | W. Kruger |
| Character Animations Project Files | Visionaire Files for the tutorial | W. Kruger |
1 of 1 users found this section helpful
Spine Animations
Spine is a great tool to create 2D Skeletal animations. You can actually import your Spine animations into Visionaire and use them in your game.
You can try importing Spine’s standard example, called ‘spineboy’ into Visionaire to play around:
-
- Download the spineboy zip from here.
- Open it in spine, go to export and extract the spineboy.atlas, spineboy.png and spineboy-ess.json to a subdirectory of your project.
- Rename the spineboy-ess.json to spineboy.json, the names need to match.
- Add the spineboy.json to the Spine files of an outfit.
- Click on one animation and on the cog wheel select an animation on the right (if the right one seems selected you need to reselect it). It should now be shown in the preview.
Some recommended settings can be seen below:

1 of 1 users found this section helpful
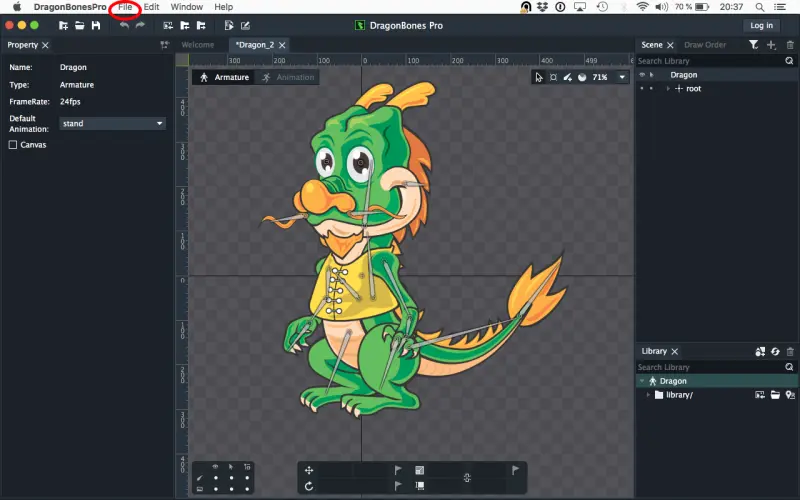
Dragonbones Animations
Dragonbones is an open source and free skeletal animation solution, alternative to Spine. You can import your animation into Visionaire fairly easy:
- Download and install the software (Win + Mac Os) from https://docs.egret.com/dragonbones/en
- Open the software and load the Dragon example
- Select File/Export…
- Select the following settings:
– Data Config: Type: Spine
– Data Config: Data Version: 3.3
– Texture Config: Image Type: Texture Atlas
– Texture Config: BG Color: Transparent
– Generated Files: * Data * Texture
– Choose output path and file name
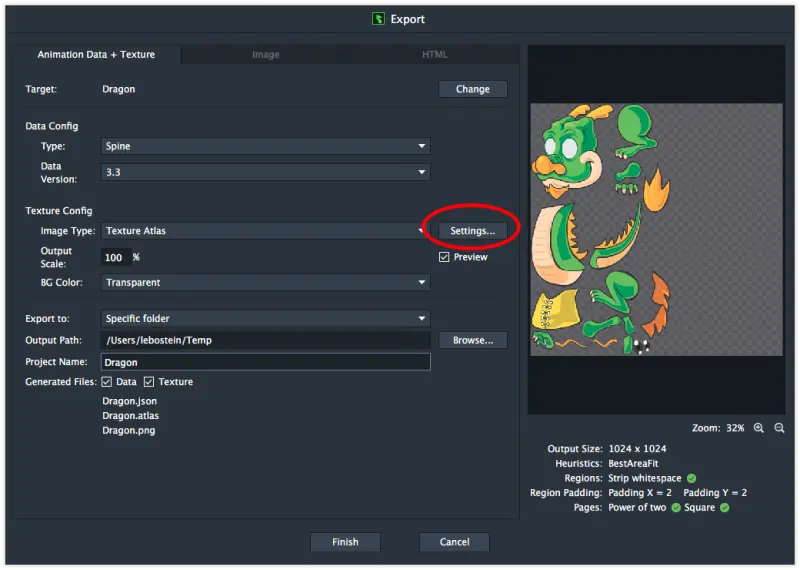
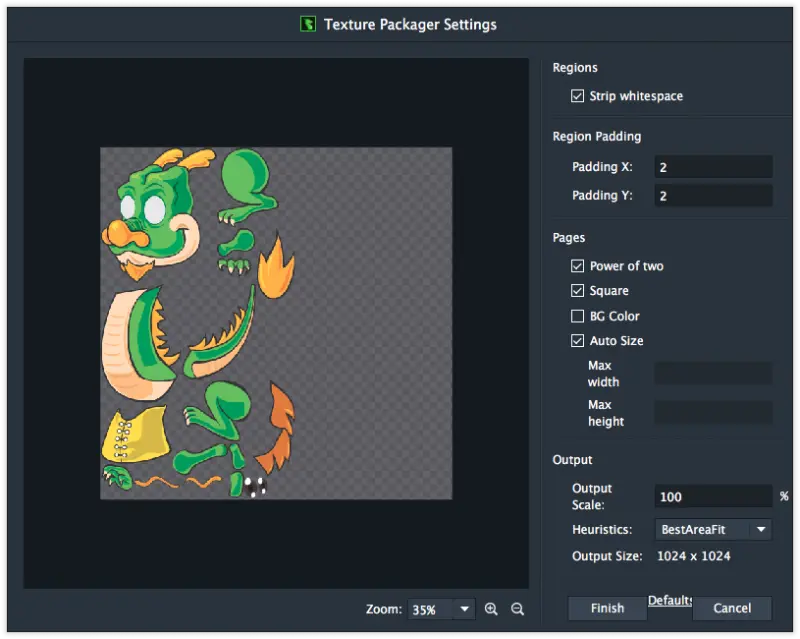
- Click on “Settings…” to the right of “Image Type” and set the settings as shown on the screenshot below.
- Click on “Finish” to close the settings and on “Finish” to export the data
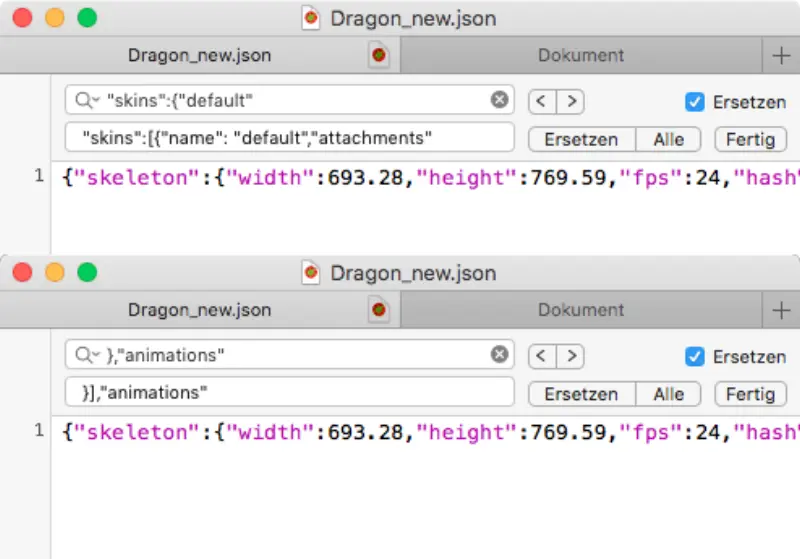
- In current Spine exports (> 3.3) the skin section is a list now instead a dictionary. Use the python script below or open the generated JSON-file with a text editor end replace 1 with 2:
"skins":{"default":
"skins":[{"name":"default","attachments":
and
},"animations":
}],"animations":
Copy the 3 files into your Visionaire-Project:
- Dragon.atlas
- Dragon.json
- Dragon.png
9. Create a new character in your project and load the JSON.
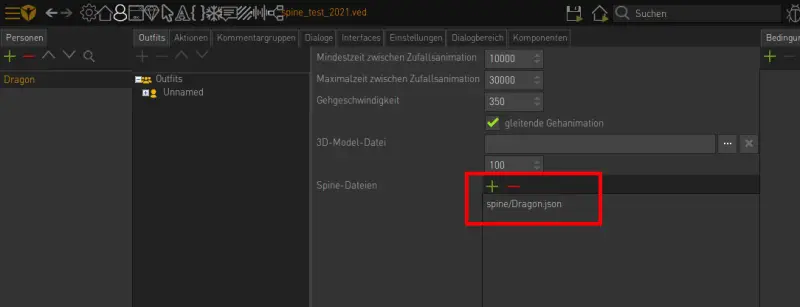
10. Select an outfit slot and select an animation of the loaded Spine file
0 of 0 users found this section helpful
3D Character Models
Using 3D character models is beneficial in many cases as it could save time from designing all character’s animation frames. Visionaire will use the 3D model to display the character in the proper angle automatically.
Note: This guide was made using Blender 2.91.0. You can also download a ready .blend model for testing from here (check video description).
Exporting from Blender
Before you export your character model, it’s suggested to rename your animations in Blender’s Outliner panel to help you assign them to the character after importing to Visionaire:

Under File -> Export -> Collada (Default) (.dae)
From the settings, you only need to adjust the axis orientation to match Visionaire orientation system, as follows:

Finally click EXPORT COLLADA button. This will create your .dae model file. If your model uses textures, the separate file for the texture will also be exported.
Importing to Visionaire
Under your character’s outfit, load the file and adjust any other settings as you wish:

Then, create a new animation under each section (walk /standing / talk etc) – you don’t have to create one for each direction, that’s the good thing with 3d models! – and then select the animation to be played (the name we set in Blender before) and adjust the speed (1 = the normal anim speed)

Now you can assign your character in the scene as you would do normally.
4 of 4 users found this section helpful
Lip Sync
Rhubarb is a Lip Sync software that is supported by Visionaire. Download it from here. It generates single files from a .wav file in “tsv” format. Basically text files with start time -> phoneme.

The first six mouth shapes (Ⓐ-Ⓕ) are the basic mouth shapes and the absolute minimum you have to draw for your character. In addition to the six basic mouth shapes, there are three extended mouth shapes: Ⓖ, Ⓗ, and Ⓧ. These are optional. You may choose to draw all three of them, pick just one or two, or leave them out entirely.
Example .tsv file:
0.00 X
0.04 F
0.46 X
1.24 B
1.44 F
1.58 B
1.79 A
1.87 B
2.04 X
2.18 X
A = 1, B = 2, C = 3, D = 4, E = 5, F = 6, G = 7, X = 8
You may also replace ABCAX etc with frame numbers instead if you don’t want to have them in the same order in VS. Ideally, in order not to edit the Rhubarb file, then just check out the corresponding mouth shapes and use that to select and order 8 frames so that they match the images. The 8th frame should be your character with their mouth closed/resting position – same as your idle character animation.
You can use ogg or whatever you want in the editor. The tsv file just has to include the same filename, format name & .tsv, e.g. filename.ogg.tsv.
Using Rhubarb you create the tsv file using a wav version of your speech file. Import the tsv file into the same folder as the ogg speech file & rename it so it’s exactly the same name & format as your speech file, but with .tsv on the end.
Quick tip: when you create the tsv file with Rhubarb you should consider linking in a txt file that contains the dialog being spoken in the wav file. Apparently it helps Rhubarb analyze & generate more accurate lip sync than letting it try generate them from the wav file only.
rhubarb -o filename.format.tsv -d dialog.txt –extendedShapes GX speech.wav
By default Rhubarb is using all of the extended shapes. H is not desired as Visionaire will only show A-G + X, so you need to declare that it only uses GX extended shapes.
2 of 2 users found this section helpful
Interfaces
Each character has a default interface.
Check current scroll position of inventory panel
Interfaces["cisco_scumm"].ItemsScrollPosition -- returns the position of the first visible inv item - 1
Therefore, ItemsScrollPosition = 0 implies the initial scrolling position. If your visible inventory slots are 8 and you are on 2nd screen, i.e. the first visible item is the 9th one, then ItemsScrollPosition = 8
Check if an interface is hidden
Interfaces["menu_name"].Visible = true
Add a new Interface Class
Creating a new Interface Class is also possible:
- Open up the explorer tool (ctrl/cmd + e) and scroll down to eInterfaceClasses.
- Right click on it and Create a new interface class.
- Click on the new one it creates and rename it to whatever you want to call it.
- Expand it and rename the InterfaceClassName inside it with the exact same name you just gave the new interface class.
You can now assign that interface class via the editor to any of your interfaces
Action Text
game.DrawActionText = 0 -> do not draw action text. game.DrawActionText = 1 -> draw action text at current cursor position game.DrawActionText = 2 -> draw action text centered in the rectangle defined by GameActionTextRect.
1 of 1 users found this section helpful
Inventory
Having an inventory is essential for your game to be able to manage the picked objects (called “Items”). Inventories can be created within Interfaces, while the items through the Items screen.
See below some useful tutorials with more info.
Resources
| Name | Description | Author |
| Inventory PDF | Tutorial on the setup of Inventory, check also the Youtube Video | W. Kruger |
| Inventory Project Files | Visionaire Files for the tutorial | W. Kruger |
1 of 1 users found this section helpful
Dragged Items
What is a Picked/Holding Item?
game.UsedItem returns the currently picked up item. A picked up item is either dragged (shown instead of cursor) or displayed in the action text, i.e. set by the ‘Set Item’ action part.
Setup dragged item functionality
-
- Set ‘Items can be dragged with this command’ in the command you want (e.g. walk or push)
- Set ‘Allow dragging of items from inventory’ in the game properties
- Execution type should be ‘Item dropped’
Notes:
-
- It will reset to standard command with right click no matter where the cursor is over at.
- After a failed execution the command / item will remain active.
See below some useful tutorials with more info.
Resources
| Name | Description | Author |
| Dragged Items PDF | Tutorial on the setup of Dragged Items, check also the Youtube Video | W. Kruger |
| Dragged Items Project Files | Visionaire Files for the tutorial | W. Kruger |
Check whether character holds an item
return game.UsedItem:isEmpty() -- true means that the character is not holding an item.
Get the name of the holding item
game.UsedItem:getName()
Adding / Removing an item to/from inventory
Ilios
game.CurrentCharacter.Items.Add(game.Items[0]);
2 of 2 users found this section helpful
Combined Commands
Combined commands are the typical ‘Use Key with Door’ or ‘Give Crystal to Dwarf’ style of commands that we encounter in adventure games (and not only). We can easily achieve such kind of commands with Visionaire.
You may also check the below tutorial for more info.
Resources
| Name | Description | Author |
| Combined Commands PDF | Tutorial on the Combined Commands, check also the Youtube Video Part | W. Kruger |
| Combined Commands Project Files | Visionaire Files for the tutorial | W. Kruger |
1 of 1 users found this section helpful
Tasks/Objectives List
--[[
usage: (via execute a script)
add_task("pick up paycheck")
remove_task("pick up paycheck")
]]--
task_list = {} -- create an empty table for storing tasks into
tl_txt = {} -- create an empty variable for storing the task list texts
function draw()
if #task_list > 0 then -- check task_list table contains entries
graphics.font = Fonts["example"] -- specify which font we want to use (this uses all parent properties of linked font; size, color, border, shadow, etc)
tl_txt = ""
-- + --
for i = 1, #task_list do -- iterate through task_list entries
tl_txt = tl_txt .. task_list[i] .. "\n" -- generate text to display
graphics.drawFont(tl_txt, 100, 100, 1) -- text to display, x position, y position, opacity
end
end
end
graphics.addDrawFunc("draw()", 1) -- -1 = below scene, 0 = above scene, 1 = above interface
function add_task(str) -- note that str is case sensitive
if #task_list > 0 then
for i = 1, #task_list do
if task_list[i] == str then break end
if i == #task_list and task_list[i] ~= str then
table.insert(task_list, str)
end
end
else
table.insert(task_list, str)
end
end
function remove_task(str) -- note that str is case sensitive
for i = 1, #task_list do
if task_list[i] == str then
table.remove(task_list, i)
end
end
end
1 of 1 users found this section helpful
Cursors
Show/Hide Cursor
game.HideCursor -- True = Cursor is Hidden, False = Cursor is visible
Get Cursor Position (x,y)
local curPos = getCursorPos()
Set Cursor Position (x,y)
setCursorPos({x=40,y=20})
Change Cursor
system.cursor = Cursors["example"]
2 of 2 users found this section helpful
Fonts
Font setup in Visionaire is pretty straightforward. See below some useful tutorials with more info.
Resources
| Name | Description | Author |
| Fonts PDF | Tutorial on the setup of Fonts, check also the Youtube Video | W. Kruger |
| Fonts Project Files | Visionaire Files for the tutorial | W. Kruger |
Font Scripting
The latest list of exposed variables can be found here:
Modify the size of a font:
Fonts["narration_text"].Size = 50
Modify the line break size of a font (Line break or FontAutoLineBreak must be true):
Fonts["char_speech"].LineWidth = 1000
Adjust the line spacing:
Fonts["my_font"].VerticalLetterSpacing = -3
1 of 1 users found this section helpful
Particles
You have two settings to control the amount of particles: with the Maximum (particle count) and the Emission Count.
Emission tab: you can adjust various settings over the time of the emitter (Emitter Duration).
Emitter Duration [ms]: this is the duration for which the emitter will produce particles. The emitter will go through all the curves below it during this duration in a single loop.
Emitter Loops: you can set the emitter to only do these curves n times. 0 = infinite repetitions. Important note! Setting the loops to a low number doesn’t necessarily stop the emitter; if you want it not to emit set emission count to 0. (generally, every change resets the emitter, also it will stay at the value at the end of the curve).
Direction to rotation: if ticked, all particles rotate in their direction, that can also have an offset in degree.
Particle tab: you can adjust various settings over the life of one particle.
Assign Particles
To make a particle system available to a scene, you need to assign it to a scene object using the Components Tab.
Show/Hide Particles
The particle systems share the shown status of the object they are assigned to. So if you want to hide/show a particle, just hide/show the relevant scene object.
Z-Index / Layering of Particles
Same as above , the particle systems share the same z-index of the object they are assigned to. So if you want to show a particle system in front or behind an object or char, just adjust the laying of the object it’s assigned to.
Moving Particles
The position of a particle system on a scene can be changed by adding a Transform Component. This way you can show the same particle system at different positions in the same scene.
You can also move a particle system by moving its centre position (x,y)
Additionally you can even move a particle system along a curve.
Dynamic Adjustment of Particles
You can change most of the settings of a particle emitter with lua.
Example: Prevent new particles to be created.
graphics.getParticles(game.CurrentScene.Objects["Object1"]).numberOfEmitted = {0.0,0.0} -- {x,y,x1,y2....} points on a curve!
Examples Download
| dust-particles.zip | Dust Example |
| teleportation.zip | Teleportation Effect |
| footsteps.zip | Footsteps Effect |
| fountain.zip | Fountain Effect |
| particles_examples.zip | Various Particles (dust, fog, rain, insects, snow, leaves) – Credits: Simona |
1 of 1 users found this section helpful
Conditions and Values
What are Conditions?
Conditions can be seen as a sort of switch that we use in the game world to signify a state or a condition. For example, we have a key in our scene that our player needs to pickup and add to our inventory. Visionaire needs to have a way to know whether the key has been picked up or not picked up. We can keep track of this via what we call a condition. Conditions are best used when the state we try to simulate can either a true or false value, i.e. when we only need to have 2 different states like for example: door opened/closed, key picked/not picked etc. If we have more than 3 states, we can use Values (check the relevant section)
See below some useful tutorials with more info on Conditions and some Lua tips for more powerful usage.
Resources
| Name | Description | Author |
| Conditions Part 1 PDF | Part 1 Tutorial on the use of conditions, check also the Youtube Video | W. Kruger |
| Conditions Part 1 Project Files | Visionaire Files for the tutorial | W. Kruger |
| Conditions Part 2 PDF | Part 2 Tutorial on the use of conditions, check also the Youtube Video | W. Kruger |
| Conditions Part 2 Project Files | Visionaire Files for the tutorial | W. Kruger |
What are Values?
For more complex checks where a binary state (either true or false) is not suitable we can use Values. Values though can address such cases; imagine having your character to reply something random among 4-5 possible replies when he looks at an object or having 3 states on a door (open, close and locked, close and unlocked). Value achieve that by assigning number to them; each number represents state, so we can practically have infinite states. Values also can store strings instead of numbers so the possibilities are indeed endless.
See below some useful tutorials with more info on Conditions and some Lua tips for more powerful usage.
Resources
| Name | Description | Author |
| Values PDF | Tutorial on the use of values, check also the Youtube Video | W. Kruger |
| Values Project Files | Visionaire Files for the tutorial | W. Kruger |
Conditions and Values can be created in the following areas:
-
- Scene Objects
- Scenes
- Characters
- Items
- Interfaces
You can create them anywhere though, it’s a matter of taste and organization actually. This is because conditions are global, i.e. they can be accessed from anywhere.
Store value into a Condition
Conditions["condition_name"].Value = true
Note: you cannot store a value in a combined condition, as this is calculated from its linked conditions.
Store value into a Variable
Variables can hold either an integer value…
Values["value_name"].Int = 10
…or a string value
Values["player_name"].String = "Chris"
Checking against Conditions & Values
The simplest way of checking against a Condition or Value is with the relevant IF action parts, but it also possible with Lua:
return Conditions["example"].Value and Values["example"].Int >= 10
Important note: combined conditions need to be fetched differently as they are being calculated on the fly:
if system.getCondition(Conditions["combined_condition_name"]) then -- do something end
Display a value
You can practically display a value anywhere inside a Display Text (or Narration / Object Text).
For integer values:
<v=integer_value_name>
For string values:
<vs=string_value_name>
Toggling a condition
condition == not condition
0 of 0 users found this section helpful
IF Statements
What are IF Statements?
IF statements are a very powerful way to control the game logic by creating branching actions within your game. At it’s core it’s a statement that has a different end result depending on the condition we use. Visionaire has built-in a number of IF Statements Action Parts to help you make a number of checks basis your needs:
See below some useful tutorials with more info.
Resources
| Name | Description | Author |
| IF Statements PDF | Tutorial on the use of IF Statements, check also the Youtube Video | W. Kruger |
| IF Statements Project Files | Visionaire Files for the tutorial | W. Kruger |
1 of 1 users found this section helpful
Actions
Action Types
At beginning of scene: Note that this action will also run during the loading of a savegame, so make sure that you keep the action parts included to a minimum.
Called by other action:
Start an Action
Editor: Call/Quit Action
startAction(Actions["action_name"]) -- Global call from the Actions table
startAction("Scenes[Save_Menu].Objects[Back_Button].Actions[Left click]") -- Direct call
Stop an Action
Editor: Call/Quit Action
stopAction(Actions["action_name"])
Action Part Hooks
You can create event hooks for every action part using the registerActionPartHook(actionPartCommand, hook) system method where actionPartCommand is the id of the action part and hook the function we want to execute. A full list of available action parts can be found here.
Example:
local ADD_REMOVE_ITEM = 150
system.registerActionPartHook(ADD_REMOVE_ITEM, "addRemoveItem")
function addRemoveItem(actionPart)
if actionPart.Int == 0 then
-- added
elseif actionPart.Int == 1 then
-- removed
end
local evt = {}
evt.item = actionPart.Link
evt.character = actionPart.AltLink
-- now do something
return true -- don't execute
--return false // still execute
End
1 of 1 users found this section helpful
Disable Player Interaction
To prevent the player from being able to interact with the game you can wrap the action blocks with cutscene wrappers. There are 2 different types of cutscene wrappers:
-
-
- Begin/End Cutscene Action Parts
- Hide/Show Cursor Action Parts
-
See below a comparison between the two so that you may select the best option in each case:
| Waiting Cursor? | Skippable? | Active Text can be skipped? | Interface Hidden? | End? | |
| Begin/End of Cutscene Action Part | Yes | With ESC key. | No, unless ‘Always allow active text to be skipped’ is enabled. | Yes, unless ‘Show interface permanently’ is selected for the particular interface | Automatically closes when you change scene |
| Hide/Show Cursor | Yes | No. All key/mouse input is disabled. | No, unless ‘Always allow active text to be skipped’ is enabled. | No | Automatically closes when you change scene |
1 of 1 users found this section helpful
Animations
Active Animations Table includes:
- All cursor animations (regardless of their status, i.e. currently playing or not).
- All animations that have started.
- Animations for the inventory items currently visible in the inventory panel.
You can check whether an animation is playing with:
ActiveAnimations["example"].Active
Note: you can’t access active animations by id, you must iterate over them. Example for checking if a specific animation is currently playing:
function animPlaying(anim)
for i = 1, #ActiveAnimations do
if ActiveAnimations[i]:getName() == anim then
return true -- anim already playing
end
end
startAnimation(Animations[anim]) -- anim not playing, start it
end
Random Loop Pauses
For animations that play in random intervals and they are hidden when not playing you can use Random Loop Pauses. Such animations could be for example cars or birds going from one screen edge to the other. By enabling the relevant option in animation’s properties, a Random Loop Pause between 5 and 20 seconds will be added between each animation play; during this pause the animation won’t be shown.
You can control the maximum possible Random Loop Pause with Lua:
ActiveAnimations["car"].WaitingTime = 30
Many times we need to have animations that play at random intervals but they have to be visible on screen at all times. E.g. a bird that is standing on a branch and flaps its wings at random intervals. For this we just need to add some code in the first two frames of the animation by adding the relevant ‘Execute Script’ action part.
First frame:
Animations["bird_flap"].Pause = math.random(3000,6000) -- The bird will be shown idle for this random amount of time
Second frame:
Animations["bird_flap"].Pause = 100 -- the animation speed resumes back to the default value and the animation plays
Tip: to make things 100% random every time a game is started, it is advisable to run this code at every game start action:
math.randomseed( os.time() )
Pendulum Animation
Sometimes we need to have an animation play forward and then backwards (or the opposite). You just need to set the first and last frame of the animation as follows:
First frame:
ActiveAnimations[“labefana_hand”].PlayOppositeDirection = false
Last frame:
ActiveAnimations[“labefana_hand”].PlayOppositeDirection = true
Mirror / Flip Object Images and Animations
obj.ObjectScale = -1 -- (along both X and Y axis) obj.ObjectScaleX = -1 -- (along X axis) obj.ObjectScaleY = -1 -- (along Y axis)
Get the index of the currently active frame
ActiveAnimations["example"].CurrentSpriteIndex
Get the amount of frames of an animation
#activeanimation.SavedObject.Sprites -- # returns the length of the table
Cursor Animations
For cursor animations you need to define if you need the active or inactive cursor as follows:
ActiveAnimations[“cursor_look (inactive)”].LastFrame = 2 -- adjusting the inactive cursor ActiveAnimations[“cursor_look (active)”].FirstFrame = 1 -- adjusting the active cursor
2 of 2 users found this section helpful
Tweening
Visionaire offers a very handy function for tweening objects and fields:
obj:to(delay, {action1, action2, action3, ...}, easing, [loop, reverse])
obj: this is a reference to an object, you can assign a short notation variable to make it easier to call functions on this object, e.g:
local obj = game.CurrentScene.SceneObjects["some_object_name"]
time: the amount of time it takes to perform the transition in ms (1000 ms = 1 second).
{action1, action2, action3…}: A comma-separated list of actions to perform during this transition period, could include for example Visibility, Rotation, AnimationSize, AnimationCurrentPosition etc…
easing: specify the type of curve used for the transition. This allows the start or end of the transition to be slower or faster, to bounce or overshoot slightly, etc. Refer to the next section for details!
loop: once the transition is finished, does it immediately repeat again from the start? True/False. It’s optional, default: False
reverse: once the transition is finished, does it then go backwards until it gets back to the start? (pendulum loop). True/False. It’s optional, default: False
Examples
game:to(3000, { ScrollPosition = {x = 100, y = 0} }, easeBackInOut) -- move the scroll position
game.CurrentScene:to(1000, {SceneMusicVolume = 0}) -- fade background music volume of current scene to 0%
game.CurrentScene:to(1000, {SceneBrightness = 0}) -- fades the scene to black
Interfaces["inventory"]:to(500, { InterfaceOffset = {x=0, y = Interfaces["inventory"].InterfaceOffset.y} }, easeBounceOut) -- slide in/out an interface with a bounceout easing
game.CurrentScene.SceneObjects["example"]:to(10000, {ObjectScale = 1.3}, easeLinearInOut, true, true) -- Scale object up and down in a loop
ActiveAnimations["animation_name"]:to(10000, {AnimationSize = 130}, easeLinearInOut, true, true) -- scaling an animation
object:to(750, {Visibility = 0}, easeExpoIn, true, true) -- spend 3/4 seconds fading the object to hidden, then 3/4 seconds fading back to visible, then keep repeating itself
Notes:
-
- Tweens are overwritten if they are set again.
- Be sure to stop your repeating tweens if you change the scene, or they will start eating up your performance.
0 of 0 users found this section helpful
Easings
Easings can make your animations look more natural by specifying the type of motion used for the transition. They specify the rate of change of a parameter over time. This allows the start or end of the transition to be slower or faster, to bounce or overshoot slightly, etc.
The following easing types are available:
Linear / Sine / Quad /Cubic / Quart / Quint / Expo / Circ / Back / Elastic / Bounce
Animated examples of easings can be viewed at http://easings.net/
Note: Linear is not listed on that web site, but refers to an even transition speed, no slowing down or speeding up.
Easings may appear at the start of the transformation “In”, at the end of the transition “Out”, or at both the start and end “InOut”.
Full list of easings (Note: In Visionaire the titles are reversed, so easeInSine would be easeSineIn and so on)
| easeLinearIn | easeLinearOut | easeLinearInOut |
| easeSineIn | easeSineOut | easeSineInOut |
| easeQuadIn | easeQuadOut | easeQuadInOut |
| easeCubicIn | easeCubicOut | easeCubicInOut |
| easeQuartIn | easeQuartOut | easeQuartInOut |
| easeQuintIn | easeQuintOut | easeQuintInOut |
| easeExpoIn | easeExpoOut | easeExpoInOut |
| easeCircIn | easeCircOut | easeCircInOut |
| easeBackIn | easeBackOut | easeBackInOut |
| easeElasticIn | easeElasticOut | easeElasticInOut |
| easeBounceIn | easeBounceOut | easeBounceInOut |
Default: easeLinearInOut
0 of 0 users found this section helpful
Start/Stop an Animation
Use the ‘Play/Hide animation’ action part:

‘Play’ will start the animation while ‘Hide’ will stop it.
‘Play in reverse order’ will start playing the animation from the last frame towards the first frame.
‘Wait until animation is finished’ will stop the action parts queue execution until the animation finishes.
Lua
startAnimation(Animations["example"]) startAnimation(Scenes["a"].SceneObjects["b"].ObjectAnimations["example"]) -- get a specific object animation stopAnimation(Animations["example"]) stopAnimation(Scenes["a"].SceneObjects["b"].ObjectAnimations["example"]) -- get a specific object animation
0 of 0 users found this section helpful
Pausing Animations
Set the Global Pause of an animation
Animations["cisco_still_right"].Pause = math.random(1000,3000)
Pause an Animation Frame with Lua:
local activeAnimation = getObject("ActiveAnimations["..animationName.."]")
activeAnimation.FirstFrame = 1
activeAnimation.LastFrame = 1
activeAnimation.Loops = 0
Where FirstFrame and LastFrame is the frame you want to pause on. You could also use the following script:
function setAnimFrames(ani, n1, n2) n2 = n2 or n1 -- fall-back in case n2 = nil (will use same value as n1) ActiveAnimations[ani].AnimationFirstFrame = n1 ActiveAnimations[ani].AnimationLastFrame = n2 end
And then just use:
setAnimFrames("animation_name", 1, 1)
0 of 0 users found this section helpful
Moving Objects
‘Move object’ / ‘Move object to’ action parts
They work based on an offset value from the current position of the object.
function moveObj(obj, x, y, delay, easing)
obj = getObject("Game.GameCurrentScene.SceneObjects[" .. obj .. "]")
startObjectTween(obj, VObjectOffset, obj:getPoint(VObjectOffset), {x = x, y = y}, delay, easing)
end
To summarize the script :
– pause 1 ms
– execute script moveObj(“Obj_Credits”, 0, 0, 0, easeQuintOut)
– move object Obj_Credits in 15000 ms
0 of 0 users found this section helpful
Moving Animations
Sometimes it’s more convenient to move animations instead of objects. This is because moving animations:
-
- Works with absolute coordinates
- Is suitable when you don’t need the object polygon to move also
How?
- Add the animation to a scene object.
- In the animation properties tab set ‘Loops’ as Infinite (0).
- Set the animation as the ‘Default animation’ in the object’s Properties tab.
- Create an ‘Execute script’ action part containing:
ActiveAnimations["animation_name"]:to(time, { AnimationCurrentPosition = {x = 0, y = - 3240}}, easing)
To get the current position of an active animation:
ActiveAnimations["animation_name"].CurrentPosition.x or for example: ActiveAnimations[game.CurrentScene.Objects[i].Animations[1]:getName()].CurrentPosition.y
0 of 0 users found this section helpful
Scaling Objects / Animations
Notes:
ObjectScale should also work for animation because the scaling applies to the object image and all object animations.
ObjectScale uses decimals while AnimationSize uses percentage.
0 of 0 users found this section helpful
Rotate Object
To get the current rotated angle of an object (in radians):
object.Rotation
To rotate an object, first we need to set the centre point of rotation, e.g.
object.RotationCenter = {x = 100, y = 150} -- Note: Using -1, -1 for the coordinates will use the centre of the image.
Next we perform the rotation transformation:
object:to(5000, {Rotation = math.rad(360)}, easeLinearInOut, false, false) -- This will spend 5 seconds rotating the object 360 degrees, using a constant / linear speed, then will stop.
-
- Rotation degrees are specified in radians, use the math.rad() function to convert degrees to radians.
- You can specify large amounts of rotation, such as 720 degrees, to rotate multiple times.
- If you specify negative degrees, the object will rotate counter-clockwise.
- The object image as well as all object animations will be rotated.
An example of a function which will rotate an object clockwise, useful e.g. for dials, knobs etc:
function rotateObj(obj, delay, deg)
local obj = Objects[obj]
local delay = delay -- the amount of time in ms for the turn
local deg = deg -- the amount of degrees we want the object to turn
local currentDeg = math.floor(math.deg(obj.Rotation) + 0.5) -- The current degrees the object is turned at. Note: Lua doesn't have a native round function so we use a trick with + 0.5 to achieve this.
obj.RotationCenter = {x = -1, y = -1} -- the center of the object's image
obj:to(delay, {Rotation = math.rad(currentDeg + deg)}, easeLinearOut) -- we turn the object
if currentDeg + deg == 360 then -- optional: when we reach a full circle we reset the object back at 0 to restart and keep it clean (otherwise it will keep adding degrees forever)
setDelay(delay, function() obj:to(0, {Rotation = math.rad(0)}, easeLinearOut) end) -- we wait to complete the final turn to 360 before we immediately reset to 0
end
end
Use the above as definition script, and when needed (e.g. clicking on the dial) just use the following inside an execute script action:
rotateObj("temp_dial", 150, 45) -- this will turn the dial clockwise 45 degrees within 150 ms
2 of 2 users found this section helpful
Minigames
Minigames are generally 1st person view puzzles that can include among others: sliding puzzles, ring puzzles, hidden objects, reassembling something broken, lock combination, text input password. They are possible to be made with Visionaire, although some scripting might be needed if you want to build something complex. Feel free to check the examples below and experiment!
Resources
| Name | Description | Ver. | Author |
| Jigsaw-Rotate-Slide | Example of 3 puzzles: Jigsaw / Rotate Tile / Slide Tile | 1.0 | Tudor / AFRLme |
| Rotate-Swap | Example of 2 puzzles: Rotate Tile / Swap Tile | 1.0 | Esmeralda |
| Combination lock (sequential) | A simple combination lock with sequential type keypad, this would be used as a keypad for an alarm system or telephone. Only using action parts. The right code is 4321. | 2.0 | nigec |
| Combination lock (non-sequential) | A non-sequential combination lock, suitable for multiple choice inputs. Using Lua script controlled animations. | 1.0 | nigec |
| Combination lock (inventory-based) | An inventory based combination lock. Using mainly action parts. | 1.0 | nigec |
2 of 2 users found this section helpful
Audio System
Incorporating sound into your game using Visionaire’s basic audio system is straightforward.
You may also check the below tutorial for more info.
Resources
| Name | Description | Author |
| Audio System PDF | Tutorial on the Audio System, check also the Youtube Video Part | W. Kruger |
| Audio System Project Files | Visionaire Files for the tutorial | W. Kruger |
1 of 1 users found this section helpful
Advanced Audio System
Visionaire offers an advanced audio system which you can use to :
-
- Αssign sounds to specific audio channels
- Αpply effects such as reverb, distortion, delay, echo etc. directly in the editor
- Directly apply high & low pass filters which will allow you to create effects such as sounds sounding like they are coming from another room.
- Build music tracks from different instruments with the sync container as long they are prerecorded.
You can access the audio system with the Audio tab.
The system consists of two parts, a container list and a mixer hierarchy.
-
- Containers play and manipulate sounds contained in them. A container can contain multiple sounds.
- Mixers control effects like reverb and volume. A mixer can contain multiple sub mixers.

Low-pass filter (LPF)
A filter that passes signals with a frequency lower than a selected cutoff frequency and attenuates signals with frequencies higher than the cutoff frequency.
High-pass filter (HPF)
Does the opposite than LPF
Container List (Audio containers)
Allows to play sounds in different ways. Containers can be started in 2 ways:
-
- With the fade action part
- By assigning them to scenes.
Sound: The actual sound you want to play/modify
Mix Container: The container plays all subcontainers and their properties can be modified via blendtracks and automations.
Random Container: Plays sounds under this container randomly or in sequence.
Sync Container: Allows to set a timeline when sounds are played.
Switch Container: Allows to switch between sounds with fades or synced by using a sync container.
Mixer hierarchy (Mixers)
Allows you to modify sound properties and add effects. Sounds and speech can be assigned to a bus via the 4 standard busses or on a per character basis.
“New Automation”
“New Send” button -> Add the effect module block to the mix container. You should also consider renaming the effects you have created.
Bus or buss: A conduit to move a group (or a single sound) from one place to another. It is mainly used to create groups, sub-groups and duplicates of a channeled sound.
Mixer: Takes various audio sources through its multiple input channels, adjusts levels and other attributes of the sound, then usually combine them to a lesser number of outputs.
By default the following mixers are available:
eMusicVolume
eSoundVolume
eSpeechVolume
1 of 1 users found this section helpful
Containers
Sound Container

The sound container essentially contains one sound (you may also drag n drop the file directly).
Pitch
Pitch is changed by sample rate conversion (resampling). Slowing down lowers the pitch, speeding up raises the pitch.
Pitch is entered in cents:
-
- 100 is equal to one semitone
- 1200 is equal to an octave.
The range is limited to 2 octaves up and down.
HPF (High Pass Filter)
It removes lower frequencies; the range of the value reaches from 0 to 100.
LPF (Low Pass Filter)
It removes higher frequencies and makes the sound more muffled.
Looping
If looping is not checked the sound will play once and then stop. If looping is checked and the loops are set to 0, the sound loops indefinitely, else the sounds is looped exactly as set in the value.
Output Bus
The output bus sets the mixer that this sound will be channeled through, when it’s played independently. The sound receives the HPF, LPF, pitch and volume settings as well as the effects.
Testing
The sound can be played by clicking the waveform at any point or with the play button.
1 of 1 users found this section helpful
Mix Containers
A mix container mixes all the sounds it holds; the sounds can be modified using blendtracks and automations. Note that a mix container loops forever and does not stop by itself, however this does not affect the sounds it contains (if these should loop you must set this independently).
Blendtracks
Blendtracks map a value to different sounds. For example you might have a value “rain strength” and three different sounds “light rain”, “medium rain”, “heavy rain”. When “rain strength” is set to 100 “heavy rain” should play and at 20 “light rain”. The blendtrack will handle this.
-
- Create a mix bus and add the three sounds under it and set all of them to loop.
- Create a value on the right and set minimum to the starting value and maximum to the end value, here 0 and 100.

-
- Create a blendtrack on the top right.
- Select the value on the right.
- You can now add sounds by right clicking, add all three sounds. If they overlap the gui indicates that they will automatically blended in the crossing section. You can also blend them manually by right clicking on the right most / left most bound of the object and selecting manual, which shows a movable point. This also needed on the leftmost object as it can’t overlap but should still be faded in.

-
- On pressing play on the upper right, the value will be shown under it and the gui also shows an indicator in the blendtrack.
Automations
Automations map values to different sound properties. For example as you enter a room the music that plays outside get muffled (higher LPF).

To create an automation, you need to select:
-
-
-
- The source (which is the value you have created, let’s call it ‘muffle-level’) and
- The target, which can be the mixer itself or another container inside the mixer (in our example it’s a sound container).
- The field to be mapped to the value; this can be the volume, pitch, LPF, HPF, and also trigger rate and delay on a random container. In our example we chose the LPF.
- The mapping type: 1:1 / 1:1 Power ( takes the square root of the value) / dB (calculates a factor from dB, so 0dB is 1.0, -6dB is 0.5, -12dB is 0.25) / 100:1 / 1:100 / Curve
-
-
You can now assign the mixer in both scenes (outside / inside the room) and set or tween the ‘muffler-level’ value as required when you enter or exit the room.

0 of 0 users found this section helpful
FMOD
Visionaire offers a native plugin for the support of the popular FMOD software which is used to implement adaptive audio in your game. To install the plugin go to Plugins -> Install FMOD; this will add the necessary action parts.
0 of 0 users found this section helpful
Game Controls
Mouse Setup
You can define the mouse actions through Game Properties -> Mouse Properties:

By clicking on the lighting button you can define action parts to be carried out when various mouse events take place, like Left/Right/Double Clicks, Mouse Wheel Up/Down etc.
You can also define the behaviour of the controllable character when you click somewhere on the scree, i.e. if the characters goes to cursor position or not, or only moves when you click on an on an object.
This is also possible with Lua:
game.LeftClickBehaviour = eMouseActionBehaviourDoNotSendCharacter -- when you Left Click, character will not move to cursor position
For the other mouse behaviours use game.RightClickBehaviour / game.MiddleClickBehaviour / game.LeftHoldBehaviour
Note that instead of the full name, you can use numbers (they are enums / enumerators):
0 = eMouseActionBehaviourDoNotSendCharacter: The character will not be send to the current position. 1 = eMouseActionBehaviourSendCharacterToCursor: Character will be send to current position. 2 = eMouseActionBehaviourSendCharacterToObjects: Character will be send to current position if it is a scene object.
0 of 0 users found this section helpful
Advanced Mouse Event Handing
You can have total control over mouse events by creating Main Loops.
function onMouseEvent(eventType, mousePosition)
if eventType == eEvtMouseWheelUp or eventType == eEvtMouseWheelDown then
-- mouse wheel was activated, do something
end
end
registerEventHandler("mouseEvent", "onMouseEvent", {eEvtMouseWheelUp, eEvtMouseWheelDown})
On the example above, we register a ‘mouseEvent’ main loop. This loop listens out for the eEvtMouseWheelUp and eEvtMouseWheelDown events and when any of these occur, it runs our onMouseEvent function.
Not that any function for a ‘mouseEvent’ main loop needs to have two (2) arguments: eventType and mousePosition.
eventType = the mouse event from the list {} passed in eventFlags. In our example will be either eEvtMouseWheelUp or eEvtMouseWheelDown
mousePosition = the current mouse position (x,y)
Currently the following mouse events are supported:
– eEvtMouseMove
– eEvtMouseLeftButtonDoubleClick
– eEvtMouseLeftButtonDown
– eEvtMouseLeftButtonUp
– eEvtMouseLeftButtonHold
– eEvtMouseLeftButtonHolding
– eEvtMouseRightButtonDoubleClick
– eEvtMouseRightButtonDown
– eEvtMouseRightButtonUp,
– eEvtMouseMiddleButtonDown
– eEvtMouseMiddleButtonUp
– eEvtMouseWheelUp
– eEvtMouseWheelDown.
Note: If no mouse event is specified then the event handler is registered for all mouse events.
Tip! If we want to loop a function on button hold, then we need to use “mouseEvent” in conjunction with “mainLoop”:
local buttonPressed = false
function OnMainLoop()
if buttonPressed == true then
-- do some action
else
-- do some other action
end
end
function OnLeftButtonDown()
buttonPressed = true
end
function OnLeftButtonReleased()
buttonPressed = false
end
registerEventHandler('mouseEvent', 'OnLeftButtonDown', {eEvtMouseLeftButtonDown})
registerEventHandler('mouseEvent', 'OnLeftButtonReleased', {eEvtMouseLeftButtonUp})
registerEventHandler('mainLoop', 'OnMainLoop')
0 of 0 users found this section helpful
Gamepad Integration
Visionaire uses the SDL (Simple DirectMedia Layer) library, so any SDL capable controller will work.
Download gamecontrollerdb.txt file from here and place it in your game directory. This file contains almost all available SDL controllers definitions; you may even add your own if not there by creating mappings (there are special tools for this).
Shoulder Trigger Buttons
...
if string.match(character, 'TRIGGERLEFT') then
if keycode >; 1 then print("left trigger pressed") else print("left trigger released") end
elseif string.match(character, 'TRIGGERRIGHT') then
if keycode >; 1 then print("left trigger pressed") else print("left trigger released") end
end
…
Generally there are 2 control options possible:
-
- Control the character directly with the gamepad. Use action areas and/or lua to determine if the char is next to an interactable object. When pressing a gamepad key for an action, just check if the char entered the region or is in a specific radius (lua).
- Control the cursor like a mouse.
1 of 1 users found this section helpful
Box2D
Visionaire supports Box2D, a 2D physics engine for games development by Erin Catto. For the complete in-depth documentation of Box2D, you may check the official website here.
Through Components Tab, you can give some properties to your object:
A static body does not react to any force, impulse, or collision and does not move. A static body can only be moved manually by the user. A static body also does not collide with other static or kinematic bodies.
A dynamic body reacts to forces, impulses, collisions, and any other world event. Dynamic bodies can also be moved manually, although I’d suggest to let them be moved by world forces, and collide with all body types.
Fixed Rotation: Prevents body from rotating (e.g when colliding)
Linear Damping: Used to reduce the linear velocity
Angular Damping: Used to reduce the angular velocity
Gravity Scale: Used to weaken or strengthen the effect of world’s gravity. E.g. 1 = normal gravity, -1 = reverse gravity, 0 = zero gravity etc.
0 of 0 users found this section helpful
Plugins
Install Plugins
Plugins extend the functionality of Visionaire, e.g. by adding new action parts.
- Download the plugin zip file.
- In your project root folder (where the .ved/veb is) add a folder called “plugins”, if there isn’t already one.
- Unzip the downloaded plugin file and copy its folder into the “plugins” folder.
- Open your project in Visionaire and click the jigsaw icon in the upper right.
- The list of available plugins opens up. Click “Install” next to the newly added entry.
- Save your project.
Now you’re ready to use the new action part(s). You find all custom action parts at the bottom of the action part list, but not in the action part selection dialog.
Note: Plugins are installed per project, i.e. for any new project you have to reinstall the ones you want.
Available Plugins
| Name | Description | Ver. | Author |
| Change Mousebutton Behaviour | Adds an action part to change the behaviour of left and right mousebutton (send character to…) | 1.0 | Esmeralda |
| Change object / item / character name | Adds action parts to change the name of a scene object, inventory item or character during the game | 1.3 | Einzelkämpfer |
| Fullscreen message | Adds action part for fullscreen, faded in and out messages, either with a colour or a background image | 1.0 | J. Cadenas |
| Move animation to | Adds an action part to move an animation to a given position over a given time + easing | 1.0 | Esmeralda |
| Roll out dialog | Adds action part for rolling out dialog window | 1.0 | J. Cadenas |
| Scale or rotate object | Adds action parts to scale and rotate objects with easing | 1.1 | Esmeralda |
| Set animation frames | Adds action part to set animation frames to first and last given frames | 1.0 | J. Cadenas |
| Set interaction position character | Adds an action part to set the character postion for executing an action on a character | 1.0 | Esmeralda |
| Set scene volume | Adds action part for changing scene volume | 1.0 | J. Cadenas |
| Set value string | Adds action part for setting and clearing value strings | 1.0 | J. Cadenas |
| Show/Hide Single Interface | Adds an actionpart to show/hide an individual interface (not an interface class) | 1.2 | Esmeralda |
| Slide Interface left/right | Adds an action part that slides an interface to a given position on the x-axis | 1.0 | Esmeralda |
| Slide Interface up/down | Adds an action part that slides an interface to a given position on the y-axis | 1.1 | Esmeralda |
Create your own Plugin (Credits to lehman)
The plugin system consists mainly of three files: player.lua, editor.lua and config.ini.
- player.lua is the code the game executes when playing the action part
- editor.lua is used to define the action part controls inside Visionaire editor
player.lua has two basic parts: the function to register the action part in the engine and the function you write to make the action part work. the first one is something like this:
registerActionPart('SET_SCENE_VOLUME', function(activeAction, actionPart)
addSetSceneVolume(actionPart.Link, actionPart.Int)
return false -- end of action
end)
The registerActionPart function takes 2 parameters:
- The code name of the action part you’re adding (which we’ll be using both in the editor.lua file and the config.ini)
- The callback function which lets you add the code. This function accepts two parameters:
- ‘activeAction’ which is the action that the action part belongs to in Visionaire editor
- ‘actionPart’ which is the actionPart itself. The full list of action parts can be found here.
Note that you can add all the code for your new action part directly inside the callback function but using a function is recommended as it’s cleaner.
Example of editor.lua
registerActionPart('SET_SCENE_VOLUME',{
isif=true,
link1={text='Scene',use=true,control=1},
link2={text='',use=false,control=0},
integers={use=2,useint3=false,pointlabel='',pointdialog=0},
integer1={text='Volume',control=6,min=-100,max=0,val=0,options={}},
integer2={text='',control=0,min=0,max=0,val=0,options={}},
integer3={text='',control=0,min=0,max=0,val=0,options={}},
path={text='',use=false,filter=0},
string={text='',use=0},
link1filter={'\\eScenes'},
link2filter={},
stringfilter={},
})
translation(2, 'SET_SCENE_VOLUME', 'Set scene volume')
translation(2, 'SET_SCENE_VOLUME_Name', "Set scene volume of '%link1' to '%int1'")
translation(1, 'SET_SCENE_VOLUME', 'Set scene volume')
translation(1, 'SET_SCENE_VOLUME_Name', "Set scene volume of '%link1' to '%int1'")
To understand each field:
--[[ link1 control link2 control 0 link field 1 link combobox 2 text integers text integers use 0 nothing 1 point dialog 2 use int 1 3 use both ints integer1 control 0 spinner 1 slider = spinner 2 bool 3 radio buttons 4 combobox 5 direction 6 color picker int(3) db (int1) path filter 0 image 1 sound 2 video string use 0 none 1 text 2 multiline 3 script 4 link 5 link field ]]
- isif
- link1 and link2 correspond to actionPart.Link and actionPart.AltLink (in case you need links to two different tables). We can use these to link to any of the Visionaire tables, see complete list here. For example, when you use the value picker in the set value action part of the engine, that’s a link. In the example above where you set the Scene Volume, link1 is the Scene picker.
- text is the name you want to show in the editor
- use (bool) is to let the editor know you’re using that field. If it’s true it enables the field in the editor, if it’s false it disables it.
- control is the type of picker you want to use. That’s an int, explained in the comment block.
- integers is the field that allows you to choose how many int fields you want in the editor part, which can be up to three, but it depends on what you want to do, because the setup of this is restricted to use cases
- use, which is documented in the comment block, setups how many of the int fields you’re using. 0 is none, 1 is using the coordinates picker, 2 is using one int, 3 is using both Int and AltInt.AltInt2 is controlled by the useint3 parameter of integers
- pointlabel is the text you want the editor to show with your coordinate picker
- pointdialog
Integer Example
integer1={text='Volume',control=6,min=-100,max=0,val=0,options={}}
- Text is the label you want in the editor for the int field
- Control is an int explained in the comment block:
0 and 1 is for the field to show the arrows for int+1 int-1
2 is bool, 3 is radio button and so one
5 is the direction compass for animation directions
and 6 depends on the integer field
it can be color picker if you’re using integer3 or a db control if you’re using integer1, not really sure what it is with integer2 - min, max are the min and max values (I want my volume to go from 0 to 100? then min = 0, max = 100, and you can’t surpass those limits in the int picker)
- val is the initial value for the field
- options is just what you use to convert the integer field in a combobox or a radio button. you set them with ‘option1’, ‘option2’, which is the name of each of the entries in the combobox or each of the radio buttons they’re codified 1,2,3,4,5 etc, in the order you set them
- path is a link to an image, sound or video file. Corresponds to actionPart.Path.
- text is the label
- use is to show it or not
- filter is the kind of asset
- strings is just a text field, which can be: text, multiline, or script. But given the number of fields is restricted, you can convert the string field to a link or a link field if needed, but that means you need to convert the value in player.lua later. Corresponds to actionPart.String.
- link1filter, link2filter and stringfilter are used to let Visionaire editor know what do you want it to show in the popup window for link selection. You need to escape each value with \ and it’s basically a way to access the tables and their different fields. Some examples to show scenes, char anims and char values respectively:
link1filter={'\\eScenes'}
link1filter={'\\eCharacters\\VCharacterOutfits\\eOutfits\\VOutfitTalkAnimations\\eAnimations'},
link2filter={'\\eCharacters\\VCharacterValues\\eValues'}
For the translations note that there there’re two lines per language. First one is the text you want to show as actionPart name in the actionPart selector (third parameter). The second parameter is again the actionpart name of your choosing. The second line is for the text that you can see in the action. Note that you can use parameters here to adjust the actual text to be shown for the action part.
editor.lua is now completed along with the basic setup. Back to player.lua. Our function that will actually include the plugin’s logic is:
function addSetSceneVolume(scene, volume)
if scene.empty then
game.CurrentScene.MusicVolume = volume
else
Scenes[scene:getName()].MusicVolume = volume
end
end
Note that here scene = actionPart.Link, volume = actionPart.Int as per the function call addSetSceneVolume(actionPart.Link, actionPart.Int).
The last part is config.ini, which is just linking everything together and letting the engine know what’s your plugin. For example:
Name=Set scene volume Author= Date= Version=1.0 PluginVersion=1 Link= ActionParts=SET_SCENE_VOLUME Description=Adds action part for changing scene volume.
Imporant thing to note is that ActionParts=SET_SCENE_VOLUME is a list of the actions parts you’re adding with the plugin, you can register several at once. The name should be the same one you’re using both in player.lua and editor.lua and you set them apart with a comma: ActionParts=SET_SCENE_VOLUME, ANOTHER_ONE. The rest is the info visionaire editor shows in the plugins section and then, the final touch, is that you can add image.png (with that name), a 128×128 image for the Visionaire editor to show in the plugins section/
0 of 0 users found this section helpful
Platform Export
Visionaire supports multiple platforms for exporting. You can build your game by going to Tools -> Build Game or pressing CTRL+B.

Every time you try to build your game for a specific platform, Visionaire will automatically download the latest build files for this platform in C:\Users\your_username\AppData\Local\Visionaire Editor\platform (Windows).
Convert WebP / Change Resolution: You can adjust these settings to lower the size of your assets. Important though: make sure you delete the folder /tmp located in the project folder before building the game because it’s used for caching the assets.
2 of 2 users found this section helpful
Android
Since August 2021, the requirements for uploading a new app to Google Play are:
-
- Android App Bundle (AAB) format instead of APK.
- Target API level set to 30+ (VS added support in 5.1.4.1)
- Usage of ‘Play Asset Delivery’ or ‘Play Feature Delivery’ instead of .obb expansion files to deliver assets or features that exceed download size of 150MB.
Codec Support
The codec support on Android is smaller than other platforms, recommendation is h.264 and ogg.
0 of 0 users found this section helpful
iOS
Requirements for Iphones / Ipads
iOS: 10+
64-bit architecture chip
Building your game with Visionaire
Visionaire exports a zipped XCode project.
Import the project into XCode.
Ensure that you have the latest version of XCode (Check App Store -> Updates). Unzip the project and open it in XCode (the file with the extension .xcodeproj)
Setup Xcode
Build Settings -> Set Product Bundle Identifier (e.g. com.dionous.watchoverchristmas)
Build Settings -> Set Product Name (e.g. Watch Over Christmas)
Build and Run Project
Add the necessary icon files and update the launch screen (if you want to). You can edit the icon for the app under Appicons – you should save the icon in several square resolutions for different devices and usages (iPad, iPhone, thumbnail)
Some Terms
Bundle ID is a unique identifier for Apple to distinguish between different apps. Apple recommends it to be a reverse-domain name style string (i.e. com.domainname.appname).
Capabilities are the features of the app, e.g. Push Notifications, In-App Purchase and NFC Tag Reading, etc.
Testing your game
For testing yourself you only need a free Apple account. With VS export you cannot test on a simulator, only an actual device.
For beta testing of your apps with TestFlight (through App Store Connect) you need to enroll in Apple’s Developer Program.
Developer Testing
Connect your device (IPhone / Ipad) to your Mac. Note: when running the 1st time, you need to update the setting for the non-appstore app General-> Device Management -> Trust
Publishing your game
For publishing to App Store you need to enroll in Apple’s Developer Program.
Managing your Apps through App Store Connect
Use App Store Connect to submit and manage apps, invite users to test with TestFlight, add tax and banking information, access sales reports etc.
Initially, only the Account Holder (the person who joins the Apple Developer Program) has access to App Store Connect and is assigned the Legal role. Later, the Account Holder can create additional users in App Store Connect and assign specific roles to users.
1 of 1 users found this section helpful
Steam
Check if steam_api is loaded and client connected
local steamLoaded = getProperty("steam_initialized")
-- set a condition value based on the result
if steamLoaded then
Conditions["steamLoaded").Value = true
else
Conditions["steamLoaded").Value = false
end
Executables
The executables that need to be set under Installation -> General Installation -> Launch Options are:
- Windows: The game’s .exe file, e.g. ‘data.exe’
- Mac: The .app package bundle, e.g. ‘myGame.app’
- Linux: ‘start’
Stats and Achievements
- Define the stats or achievements in Steamworks. For more info, check Steam’s instructions here. For example:

- Add the stats or achievements in your game (see below).
- Copy the necessary files from your relevant Steamworks SDK folder (\redistributable_bin) into the exported game’s folder.
– Windows: Copy steam_api64.lib and steam_api64.dll (for versions < 5.1.5 rename to steam_api.lib / steam_api.dll first!
– Mac: Copy libsteam_api.dylib into \Contents\Frameworks and \Contents\Resources folders
– Linux: Copy libsteam_api.so from the \linux64 folder to the root of your project as well into \libs64 folder - Apply Steam’s Wrapper to your executable. Note: if Standard mode fails, use Compatibility mode. For more info, check Steam’s instructions here.
- Upload your build to Steam. For more info, check Steam’s instructions here.
- Run your game through Steam and test. If the steam API is initialized properly, getProperty(“steam_initialized”) will return True and you will see the following pop up on the bottom right when starting the game:

Add an Achievement or Stat
Just use the following inside an execute a script action part
setGameClientAchievement("ach_cisco_janitor") -- the name used must match the one set in Steamworks
setGameClientStat("stat_progress",50) -- to be used for stats if you use them. The name used must match the one set in Steamworks
Clear an Achievement
setGameClientAchievement("ach_cisco_janitor",{flags=1, clear=true})
Reset all Stats and Achievements
resetGameClientStats() -- will reset all stats resetGameClientStats(true) -- will reset all stats and clear all achievements also!
Cloud Saves
Setting up Steam’s Cloud Achievements is pretty forward if you know the correct paths. You can see more info on how to setup Steam Cloud here.
For Visionaire games, you need to the setup Steam’s Auto-Cloud Configuration which is adequate for basic functionality.
At first make sure to specify the basic two Steam cloud settings:

Above values are an example, but it should be ok for most Visionaire games. Note that Visionaire savegames are relatively small in size (<100kb).
Now you can setup the Root Path (usually for Windows) and then Root Overrides (for Mac and Linux) as below. Values below are for one of our games but you get the point! Make sure these match your actual Savegames folder path.

Now your savegames (all .dat files) will be synchronized between your game installations, regardless of OS!
6 of 6 users found this section helpful
GOG
Copy the library files
Inside the /Libraries folder of the latest Galaxy SDK which you download from the GOG Galaxy dev portal you will find the necessary library folders for the integration to work properly:
- Win: Copy Galaxy64.dll inside the game’s root folder
- Mac: Rename libGalaxy64.dylib to libGalaxy.dylib and place inside /Contents/Frameworks
- Linux: Copy libGalaxy64.so inside the game’s folder
Note: for Linux, the Galaxy Client not yet available, so you cannot get notifications for achievements etc..
Initialize the Galaxy Client
In order to use the Galaxy SDK and subsequently its features (Achievements etc) you need to initialize the Galaxy Client. Create a definition script as follows:
initGameClient("clientID", "clientSecret")
The clientID and clientSecret can be found in the SDK credentials section of your GOG developer account, so for example:
initGameClient("50225266424144145", "45955f1104f99b625a5733fa1848479b43d63bdb98f0929e37c9affaf900e99f")
Check if galaxy_api is loaded and client connected
local galaxyLoaded = getProperty("galaxy_initialized") -- true/false depending if the galaxy_api was loaded and client is connected, false if the operation failed
-- set a condition value based on the result
if galaxyLoaded then
Conditions["gogLoaded"].Value = true
else
Conditions["gogLoaded"].Value = false
End
Check if galaxy_api has finished initialization and is ready
local galaxyReady = getProperty("galaxy_ready") -- true if the galaxy_api is ready
Add an Achievement or Stat
Just use the following inside an execute a script action part
setGameClientAchievement("ach_cisco_janitor") -- the name used must match the one set in GOG dev portal
Clear an Achievement
setGameClientAchievement("ach_cisco_janitor",{flags=1, clear=true})
Reset all Stats and Achievements
resetGameClientStats() -- will reset all stats resetGameClientStats(true) -- will reset all stats and clear all achievements also!
1 of 1 users found this section helpful
Epic Games Store
Copy the library files
Inside the /SDK/Bin folder of the latest EOS SDK which you download from the Epic dev portal you will find the necessary library folders for the integration to work properly:
- Win: Copy EOSSDK-Win64-Shipping.dll inside the game’s root folder
Mac: Copy libEOSSDK-Mac-Shipping.dylib inside \Contents\Frameworks
Optional Win: include also an .ico file for the desktop icon. It must have the same name as the executable, e.g. woc.ico for woc.exe
Optional Mac: replace the .icns file with the one for your game
Note: Social Overlay doesn’t work on Mac and Linux. Also, linux builds are not supported.
Initialize the EOS Client
In order to use the EOS SDK and subsequently its features (Achievements etc) you need to initialize the EOS Client. Create a definition script which you MUST name it “EOS” as follows:
initGameClient("clientID", "clientSecret", "productId", "sandboxId", "deploymentId")
All the above parameters can be found in your EOS dev portal, at the end it should look like this (don’t forget to name the script EOS!)

Add an Achievement
Just use the following inside an execute a script action part
setGameClientAchievement("ach_cisco_janitor") -- the name used must match the one set in Epic dev portal
2 of 2 users found this section helpful
Nintendo Switch
To download the necessary material from Nintendo, you must be a registered Nintendo Developer. Contact also the Visionaire team to provide you with the required Visionaire Nintendo Switch Platform Export files. Finally, it’s highly recommended to purchase a Nintendo Switch devkit for your tests!
0 of 0 users found this section helpful
Xbox One / Series X|S
Visionaire creates Xbox One builds using XDK (Xbox Development Kit). In 2022, Microsoft dropped XDK in favor of GDK (Game Development Kit) which unifies Xbox / PC development, therefore builds using GDK will also be possible with Visionaire. Your game will also be available to newest Xbox Series X|S as this is backwards compatible with the Xbox One titles.
To download the necessary material from Microsoft, you must have enrolled to ID@Xbox program. Contact also the Visionaire team to provide you with the required Visionaire Xbox Platform Export files.
0 of 0 users found this section helpful
Playstation 4 / 5
Visionaire can create Playstation 4 builds. Your game can also be available to Playstation 5 as this is backwards compatible with the Playstation 4 titles.
To download the necessary material from Sony, you must be a Playstation Partner. Contact also the Visionaire team to provide you with the required Visionaire Playstation Platform Export files.
0 of 0 users found this section helpful
Draw Functions
local sprite = graphics.loadFromFile("vispath:somepath/file.png")
graphics.drawSprite(sprite , 1.0 , 0xffffff)
It adds an image sprite on the scene, no object, no rectangle. You can also manipulate this image sprite using the following fields:
.position point
.rotation float
.scale float
.scaleX float
.scaleY float
.shaderSet int
.rotationCenter point
.matrixId int
.size readonly int
.width readonly int
.height readonly int
So for example, to set the position (always before drawing) use
sprite.position = {x=230, y=50}
Lua Draw Functions
graphics.addDrawFunc("draw()", 0)
function draw()
graphics.Font = Fonts["default_font"]
graphics.drawFont("hello world", 100, 100)
end
We’ve added a draw function (called draw) to a table that listens out for draw functions, you only need to add the draw function once. After that you can just keep overwriting the function. You can remove the draw function with
removeDrawFunc(name)
Draw a Line
graphics.addDrawFunc("draw()", 0)
function draw()
drawLine(100, 300, getCursorPos().x, getCursorPos().y, 0xffffff, 1.0)
end
0 of 0 users found this section helpful
Languages
Adding a new Language
You can add a new language through the Game info tab under Game Properties:

Now you will be able to add strings for these languages in various places in the editor, e.g. object names, display texts etc. by selecting the relevant flag icon:

Get System Language
local lang = getProperty("system_language") -- returns the english name of system language or "unknown" if language could not be retrieved.
Change Language
game.StandardLanguage = Languages["english"] -- Changes the displayed text language game.SpeechLanguage = Languages["german"] -- Changes the spoken text language
0 of 0 users found this section helpful
Translations
For translating or correcting your text you can export in .csv or .po format.
.CSV Format (for use with and Excel Sheet or Google Sheets)
-
-
- Under Extras, Export Texts -> Export into CSV
- In Googlesheets: File -> Import, Separator Type: Custom, Do not convert text to numbers and dates
- Modify as required.
- Select all (CTRL+A), Copy (CTRL+C)
- Open Notepad, Paste (CTRL+V), select a tab character and copy, replace (CTRL+H) all tabs with semicolons.
- Save as .CSV file.
- In VS, under Extras, Import Texts
-
.PO Format (for use with .po editors)
-
-
- Under Extras, Export Texts -> Export into .po format
- Open in any .po editor (e.g. Poedit) and modify as required
-
1 of 1 users found this section helpful
Savegames
A few tips for Visionaire’s Save Game System
1. never use the save game system while you are actively working on the development of your game. It’s ok to use it for the current playthrough but it’s not ok to use it once you edit, remove, add changes to the ved/veb file, because the data in the save game file will have incorrect or missing data from it, which could lead to random bugs that wouldn’t occur in a fresh playthrough of the game.
quick tip: to reduce the risk of your save game files not being valid after updating your game, create excess conditions & values for later use. Also don’t forget to add actions parts for setting the lightmap & background music inside of an at begin of scene action (per scene).
2. save game files always get saved into the first available empty save slot – regardless of which save slot you have selected – unless a save game already exists in the selected save slot, which in that case it will overwrite the save game file in the selected save slot.
Visionaire offers two types of savegames:
Autosaves: bookmark00.dat, bookmark01.dat, etc…
Normal saves: savegame00.dat, savegame01.dat, etc…
These are saved in the following locations depending on the OS:
Windows: /Users/username/AppData/Local/Company Name/Game Name/Savegames
Mac: /Macintosh HD/Users/yourusername/Library/Application Support/Company Name/Game Name/Savegames
Linux: /home/.local/Share/Company Name/Game Name/Savegames
You define the Company Name and the Game Name in the Game Properties tab. (Tip: if you decide to add in a game or company name via the main settings area of the vs editor, try to avoid including special characters (ideally use english only) & make sure that you don’t accidentally include any white space at the beginning/end of the name(s) as both of these can break the pathing amd prevent the engine from being able to access/generate/overwrite the save game files, log file, & the config.ini file)
You can also define specific things to be done just after a savegame loads successfuly using the relevant event handler as a definition script:
function onEngineEvent(event, path)
if event == "LoadingSavegameSuccess" then
-- do something
end
end
registerEventHandler("engineEvent", "onEngineEvent")
0 of 0 users found this section helpful
Shaders
Shaders are a powerful way to add special effects in your game but can be quite intimidating for beginners. One of the best introductory sources for anyone interested in learning shaders is ‘The Book of Shaders’ which can be found here: https://thebookofshaders.com/ . Its examples are using GLSL (a special OpenGL Shading Language with syntax similar to C) and are practically directly usable in Visionaire with some slight adjustments so it’s a good start for learning the basics of shaders. At the end of this section you can download most of the examples from The Book of Shaders to check them directly in Visionaire.
Visionaire Studio offers a simple shader cross compiler that works with OpenGL ES 2.0 syntax. These shaders are compiled to GLSL (Win and Mac) and HLSL (Win only: DX9/DX11).
Shaders can be used in conjunction with Visionaire’s shadertoolkit (Latest version can be found here)or on its own and applied on to objects, characters or buttons. It’s also possible to assign the same shader to multiple objects.
You can create the following types of shaders:
-
- Vertex Shaders: They manipulate the vertices and send the output to the fragment shader for rendering.
- Fragment (or Pixel) Shaders: They calculate effects on a per-pixel basis (lighting, colouring, shading etc.)
You can create your shaders in the relevant Shaders menu:

Notes: gl_FragCoord is not supported, you need to replace that with a varying.
Apply Shader to an Object
You can apply a shader on an object as follows:
class ApplyShader
{
static
{
int shader = Shaders["fractal"].Compile();
Graphics.ShaderUniform(shader, "resolution", 1024.0,768.0, 0.0,0.0);
Objects["Rock"].ShaderSet = shader;
}
}
Examples Download
| flashlight-beam.zip | Flashlight Beam Effect |
| flashlight-round.zip | Flashlight Effect Round – Follow Cursor |
| fisheye.zip | Fisheye Effect |
| shader-toolkit.zip | Demonstration of Shader Toolkit script’s various effects |
| normal-mapping.zip | Normal Mapping (surface affected lighting effect) |
| heatwave.zip | Heatwave Effect |
| reflection-vertical.zip | Reflection Effect (Vertical) |
| book_of_shaders.zip | Book of Shaders Examples |
2 of 2 users found this section helpful
Scripting
Script Types
-
- definition script – executes on game launch (useful for scripts containing functions & global variables/tables that you might need to access at any point)
- execution script – used for large blocks of code that are too large for execute a script action blocks that you want to trigger manually.
- execute a script – inline code used for calling functions, toggling loops, updating variables, small scripts.
- event handlers / hook functions – these can be added in any of the above 3 methods & once added they will run in the background & listen out & respond to certain events.
Everything is Case Sensitive
1. please take into consideration when you name things that everything you access via scripting is case sensitive. for example, let’s say that you want to access a character called Tom. print(Characters["Tom"]:getTextStr(VCharacterName)will work, whereas print(Characters[tom"]:getTextStr(VCharacterName)will not work.
Global Access vs Direct Access
Always try to use unique names for everything you create inside of Visionaire. Why? Let’s say that you want to globally access a value you called “health” and let’s say that you created this value with the same name for every single character in the game. return Values["health"].Int will not work because the engine will not know which value you are actually trying to access, which means that you would actually need to use direct access like so return Characters["Tom"].Values["health"].Int to access the needed value. It’s possible and totally valid, however it’s recommended to use unique names as it saves a lot of time later on if you want to access/edit something via scripting.
0 of 0 users found this section helpful
Visual Scripting
Behaviour Modification
With Ilios you can create new classes that can affect the game or object behaviour. You can do this either using visual scripting (Blocks tab) or code (Code Tab)
Game Behaviour
To change the game behaviour, first we create a new class which inherits from the GameBehaviour. In the example below we override the default behaviour of the MouseEvent and we type a msg in the debug when we click the mouse:
class HelloWorldClick : GameBehaviour
{
override void MouseEvent(MouseEvent evt)
{
switch(evt.Type)
{
case EventType.MouseDown:
Debug.Print("Hello World Clicked!");
break;
}
}
}
Now to add the above behaviour, we add the newly created class under the global ‘Components’ tab of our project:

Object Behaviour
To change objects’ behaviour we need to create a new class which inherits from ObjectBehaviour:
class ObjectTestBehaviour : ObjectBehaviour
{
override void Awake()
{
Debug.Print("Object Loaded!");
}
}
Now select the new class under the Components tab of the object that you want to assign the new behaviour to, in the Behaviours section:

When the object’s scene is run and the object is loaded, you will see the msg in the debug area.
0 of 0 users found this section helpful
Videos
Visionaire supports videos in game and also for splash screens. The recommended video format is .webm which is practically a Matroska (.mkv) format with VP8/VP9 video and Ogg Vorbis/Opus audio codecs; it produces high quality / performance videos and it’s open source as well as royalty free.
Splash Video
There are 2 ways to create a splash video for your game (i.e. the first thing that appears when loading your game, e.g. your logo.)
Video Subtitles
To use subtitles in your videos first you need to set them in a 3rd party software (e.g. MKVToolMix). It is important to set a language for them!
Now you have some flexibility with scripting:
game.VideoSubtitleLanguage = "French" -- set the text language
game.VideoAudioLanguage = "Spanish" -- set the audio language
game.VideoSubtitleFont = Fonts["example_font"] -- set the font for the subtitles
game.VideoSubtitlePosition = {800,900} -- set the x,y position on the screen
Ingame Videos
There are 2 ways to add ingame videos:
- ‘Play video’ action part
- Video components
The ‘Play video’ action part is used when you want a fullscreen video to play (e.g. a cutscene or credits video):
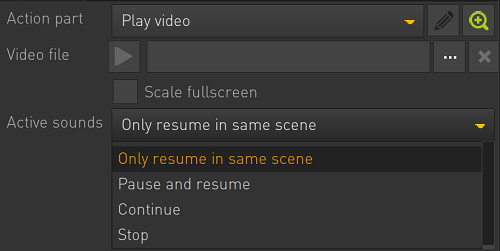
The Video component on the other hand is used when you want to use the video as an object layer within the scene, i.e. the object layering hierarchy is to be kept. Useful for example in case you want to show the character over a (fullscreen or not) video. This is the reason you need to attach the video component on a specific object on the scene:
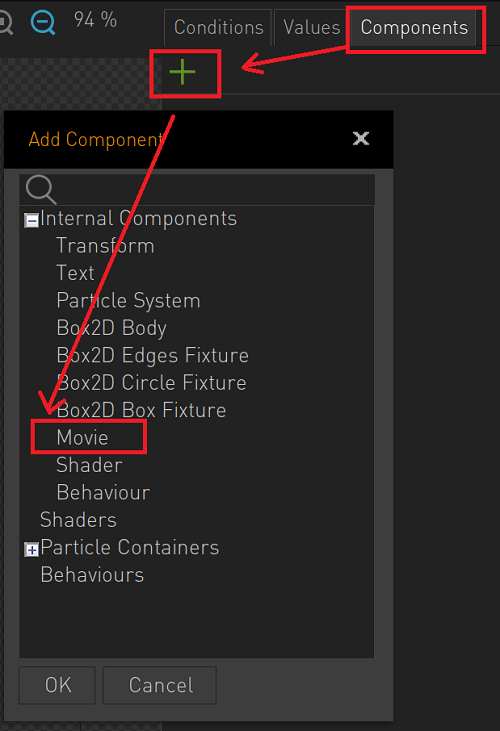
You can now attach your video and adjust the relevant settings:
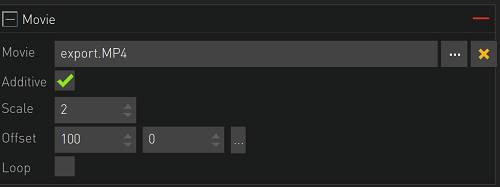
The video is now attached to the object and is played only when this object is active; therefore, use conditions/values to start/stop it.
Video Pause Screen
It is possible to add a screen to be shown when a playing video is paused through game’s properties:

1 of 1 users found this section helpful
Optimizations
Resources
| Name | Description | Ver. | Author |
| JPG/PNG 2 WEBP (Win) | Batch file for converting your project’s jpg/png art to webp (loseless). cwebp.exe is required. It also edits your .ved file. | 1.1 | Dionous |
| MP3/WAV 2 OGG (Win) | Batch file for converting your project’s wav/mp3 audio to ogg. ffmpeg is required. It also edits your .ved file. | 1.1 | Dionous |
Optimizing the resources usage of your game (RAM / VRAM) and the loading times can be quite beneficial especially if you target various different platforms, incl. mobiles.
Image / Animations
By default Visionaire loads an animation frame by frame. The loaded frames are retained in memory until the cache you set in the game properties gets filled up (by default this is set to 40MB).
![]()
Maximum size for the sprite cache is 500MB. But note that the higher you set it, the more VRAM is reserved for this purpose.
Some good practices:
- Use webp format for all your images and animations as their size for the same quality is less than png. This will reduce your final build’s size as well as the loading times per frame / animation.
- Do not use duplicate frames in your animations to create pauses between frames; instead use the set pause for individual frames option.
- Minimize canvas size if not required. E.g. for a foreground image don’t create it with the same canvas size as the scene resolution.
- For pendulum animations, i.e. animations that play forward and then backwards, use PlayOppositeDirection to control the animation direction and avoid any frames duplication.
- Use the built-in tweening function for moving an object from one point to another, instead of animating frame by frame.
- For environment animations & animations that don’t need to be super sharp, consider creating them at a smaller size and using Lua script to scale them up to actual size.
Preloading Animations
Although it is really recommended not to manually preload anything as the engine’s management system is intelligent enough, you might need to (e.g. if you have some animations with large file / canvas sizes, lots of frames). Visionaire offers a way to manually preload animations / characters through relevant action parts; this will load the complete animation into memory instead of frame by frame. If this is the case:
-
- Take care to unload everything you have preloaded, it is important that you don’t you miss something. Preloaded animations stay in the cache until you manually unload them and can take up unnecessary memory.
Monitoring Resources Usage
By pressing the ‘Home’ button when testing your game through the editor you can take a decent look of its resources requirements.

1 of 1 users found this section helpful